NOTE: I live in the US and this guide is US-centric. Anyone in another country can do this mod, but I listed sources for my materials that are in the US and may not be in other countries. Also, my pattern is in inches.
This weekend I completed my rear seat delete. Essentially all I did was remove the rear seat and put a black carpet mat over the bare area where the seat was.
Materials needed:
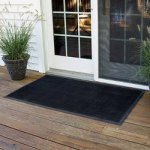
Blue Hawk 4 ft x 6 ft Clean Loop Door Mat from Lowe's for $40. It's basically an indoor-outdoor rubber mat with carpet loops on the top.
Mountain Mist Quality Quilt Batting for 45" x 60" from my wife's craft cabinet, but you can get it at Sears for about $5. You can probably get it at any fabric or craft store and maybe Wal-Mart.

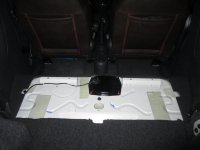
Step 1: Remove the seats. I started from the bracket in the middle that anchors the seat backs, removed the seat backs, then the brackets on the walls. Then I removed the two bolts from the front of the seat bottom and removed that. I removed the entire bracket in the middle including the seatbelt latches, but I left the actual seatbelts in place (they don't bother me).
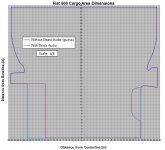
Step 2: Trim the mat. I developed a pattern; you can download an Excel version of it here. The pattern itself is 1/8 scale, but the X-Y points are included. If you just want to draw a 1-inch grid on paper and make a pattern and eyeball it or whatever, that's up to you. I used normal scissors to cut the mat.
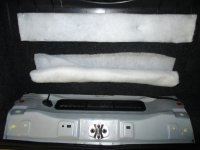
Step 3: Soundproof the vent. Others have commented, and I noticed, that the road noise increases when you remove the rear seat. Someone remarked that most of the noise comes "through the hatch" and I looked around and found that just below the hatch there's a panel, and behind that panel there's a vent. I think this is where a good portion of the noise gets in. So I rolled up some quilt batting and put it between the vent and the trim piece. It won't prevent air pressure from blowing out when you slam the doors (which is why the vent is there), but it does stop some of the noise from getting in. To remove the trim piece, remove the screws on the bottom corners of the piece, then lift up. There are four push-fasteners holding it in place, but just go ahead and pull. I found that when putting it back together, I lined up the guide pin on the trim piece, pushed it mostly into place, but then slid it under the hatch seal and making sure the fasteners all lined up before pushing against the piece to install it.
Here you can see the trim piece at the top (with a little bit of batting attached to the back of it, the roll of extra batting I added, and the vent.
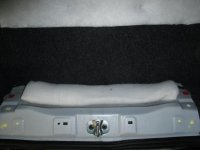
And here is the batting in place before putting the trim piece back on.
Step 4: Sound deadening where the seat was. I put the rest of the batting where the seat was.
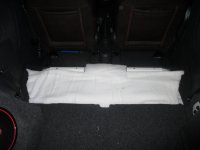
And then I put a piece of the mat that was left over when I trimmed it.
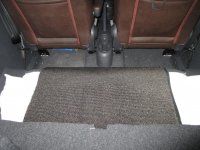
Step 5: Put the cut mat in place.
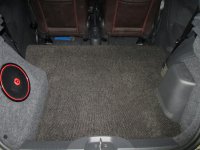
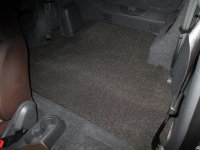
Note that the little pieces that stick out on the sides cover up (somewhat) the spots where the seats attached on the side.
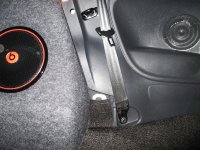
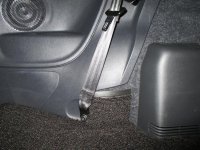
The mat can be removed in seconds. I can lay it on the ground and use a vacuum cleaner on it to quickly clean it. It goes back in just as easily. Once in, it doesn't really move around.
I also saved a piece of the matt to use over the threshold. The reason I removed the seat was to make more room for my dogs and I don't want their claws to mess up my bumper cover, so I use this piece to cover it when they're getting in and out.

So there you go: a decent looking seat delete do-it-yourself kit for less than $50.
This weekend I completed my rear seat delete. Essentially all I did was remove the rear seat and put a black carpet mat over the bare area where the seat was.
Materials needed:
Blue Hawk 4 ft x 6 ft Clean Loop Door Mat from Lowe's for $40. It's basically an indoor-outdoor rubber mat with carpet loops on the top.

Mountain Mist Quality Quilt Batting for 45" x 60" from my wife's craft cabinet, but you can get it at Sears for about $5. You can probably get it at any fabric or craft store and maybe Wal-Mart.

Step 1: Remove the seats. I started from the bracket in the middle that anchors the seat backs, removed the seat backs, then the brackets on the walls. Then I removed the two bolts from the front of the seat bottom and removed that. I removed the entire bracket in the middle including the seatbelt latches, but I left the actual seatbelts in place (they don't bother me).

Step 2: Trim the mat. I developed a pattern; you can download an Excel version of it here. The pattern itself is 1/8 scale, but the X-Y points are included. If you just want to draw a 1-inch grid on paper and make a pattern and eyeball it or whatever, that's up to you. I used normal scissors to cut the mat.

Step 3: Soundproof the vent. Others have commented, and I noticed, that the road noise increases when you remove the rear seat. Someone remarked that most of the noise comes "through the hatch" and I looked around and found that just below the hatch there's a panel, and behind that panel there's a vent. I think this is where a good portion of the noise gets in. So I rolled up some quilt batting and put it between the vent and the trim piece. It won't prevent air pressure from blowing out when you slam the doors (which is why the vent is there), but it does stop some of the noise from getting in. To remove the trim piece, remove the screws on the bottom corners of the piece, then lift up. There are four push-fasteners holding it in place, but just go ahead and pull. I found that when putting it back together, I lined up the guide pin on the trim piece, pushed it mostly into place, but then slid it under the hatch seal and making sure the fasteners all lined up before pushing against the piece to install it.
Here you can see the trim piece at the top (with a little bit of batting attached to the back of it, the roll of extra batting I added, and the vent.

And here is the batting in place before putting the trim piece back on.

Step 4: Sound deadening where the seat was. I put the rest of the batting where the seat was.

And then I put a piece of the mat that was left over when I trimmed it.

Step 5: Put the cut mat in place.


Note that the little pieces that stick out on the sides cover up (somewhat) the spots where the seats attached on the side.


The mat can be removed in seconds. I can lay it on the ground and use a vacuum cleaner on it to quickly clean it. It goes back in just as easily. Once in, it doesn't really move around.
I also saved a piece of the matt to use over the threshold. The reason I removed the seat was to make more room for my dogs and I don't want their claws to mess up my bumper cover, so I use this piece to cover it when they're getting in and out.

So there you go: a decent looking seat delete do-it-yourself kit for less than $50.

