Jacks and axle stands - supporting your vehicle.

Currently reading:
Jacks and axle stands - supporting your vehicle.

Joined
Oct 1, 2017
Messages
7,355
Points
2,308
Location
Edinburgh Scotland
With MOTs due on four of the "family fleet" by the end of March and Mrs J now returned to me from her unexpected stay in hospital - she's taking things very quietly for a while - I've been working my way through our Panda and Ibiza to leave time for the boys to leave their cars when convenient to them.

The Ibiza, being so new (coming up on 4 years and 18,000 miles) is, as you would expect, needing little more than a good service and a bit of "fettling". She's already giving up a few "intimate" secrets though, like the air filter having two "pop" on/off rubber grommets underneath where you can't see them! The effect is that they make it feel as if, despite having removed all the fixings, it - the filter casing - still doesn't want to come off. You have to be brave and give it an almighty tug! Now much easier after a light application of silicon grease!

My preferred local factor (SRS) is now supplying Mahle filtration products as well as the Comline they've been doing for some time. I'm very pleased about this and will be using the Mahle filters from now on.

Yesterday I started on Becky (our Panda). The service went well and I was pleased to see that the "dampness" under the rear wheel cylinder dust rubbers has not got any worse. I've already bought new cylinders but as I'm going to have to do pipes as well I'm just hoping it'll all last until the better weather comes. Then, service complete, I went looking for the "clunk" her front suspension has been making for the last couple of weeks. I was suspecting it to be due to an anti roll bar drop link ball joint and she didn't disappoint me. The diagnostic give away was that it clonked most loudly when either front wheel went over a bump, pot hole, etc on it's own but not so much when both wheels went over a bump together (like a "sleeping policeman" for instance). So, right enough, Front end up in the air, - you need to get both front wheel up in the air otherwise, if you just jack up one wheel, the anti roll bar will exert force on the drop links and you won't be able to feel any play in the joints - and there it was O/S/F drop link bottom joint with play in it when you give it a wiggle.

As I was lying on my back thinking "the thread on the bottom bolt looks mighty rusty, might have to take the angle grinder to it" It flashed through mind that, from time to time, people have posted asking how best to support their car whilst working on it. So I thought You might like to see how I support Becky?

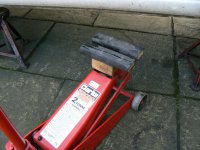
I'm fortunate in that I have a nice big trolley jack and I've made up a couple of jacking pads which allow the load to be spread on the sill panels. Still always listen carefully for "crackling" noises and sill deformation during jacking though.
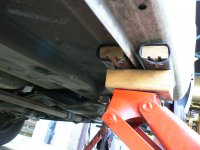
P1090051.JPG

P1090052.JPG

Of course you can equally well just use the car's jack but do be careful as they are well known for being somewhat unstable. Please never get any part of you under a car supported only on a jack!

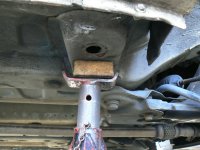
Having got the car up in the air where do you put the axle stands? The panda has some box sections under the floor which work well. At the rear there is this very handy spot about a foot or so in front of the rear wheel:
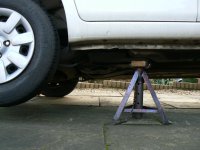
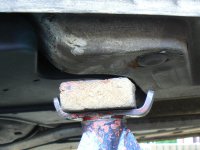
P1090049.JPG

P1090050.JPG

At the front there is a similar point just behind the front wheel arch:
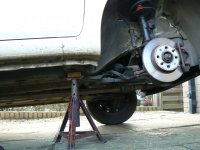
P1090047.JPG

P1090048.JPG

But you might also choose to locate on the front subframe. If using the subframe on any car think carefully about what you are doing or you may bend it. If you look at where I've positioned the stand it's right below where the subframe bolts to the body structure so it's unlikely to bend here.
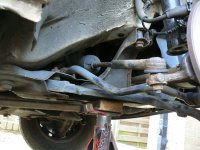
P1090045.JPG

You'll notice I also put little blocks of wood on the axle stand contact pads? that will stop the stands slipping and also reduce damage to paint and antirust treatments.

NEVER EVER try to support the vehicle on a flat floor panel - footwell etc - it'll definitely bend and might cost "mega bucks" to repair. Also, although tempting as you can get both wheels off the ground in one go, I would never jack up in the middle of a rear axle. Even a slight bend will really mess up the rear geometry.

Hope some of that is helpful?
regards
Jock

PS if your vehicle is getting on a bit in years always remember that rust is like icebergs - at least 90% hidden from view - so what looks to be sound and strong may very well not be! Just take it very slowly and listen for the "rice crispy" noises as the load goes on.
 
Last edited:
Nice post, covers most of what I do.

A neat additional bit of advice/equipment is:

THE ICE HOCKEY PUCK

Instead of wood I generally use Ice Hockey Pucks as lift isolation blocks. The are hard compacted rubber structures and FAR FAR cheaper than rubber lift blocks from garage equipment suppliers.

https://puckstop.com/product/ice-hockey-puck-black-6oz

Other purchase sources available.

Other features:

o They stack well

o They fit most trolley jack lift plates

o They store neatly in the boot of the car so when a roadside visit from the AA/RAC/other is ever required an they are about to just metal to metal jack you can step in.

o Same goes for tyre shops etc.

One of the best ever purchases I've made.
 
o They fit most trolley jack lift plates

o They store neatly in the boot of the car so when a roadside visit from the AA/RAC/other is ever required an they are about to just metal to metal jack you can step in.

o Same goes for tyre shops etc.

One of the best ever purchases I've made.

Thanks for that. I've read about Ice hockey pucks and how you can cut a groove across the middle so it can be used on sills like my adapter block. I never thought about the roadside breakdown aspect!

I also never thought to deeply about tyre shops because I take wheels off, put them in my other car and take them to the tyre supplier loose. Done it for years as it avoids loads of problems and sometimes speeds things up if a workshop is clogged with vehicles. However it occurs to me that I might need to visit a tyre shop when away from home and something like this would be invaluable in that circumstance.

So thanks very much, think I'll invest in a couple at least.
 
I have a 500X and I dread any tyre shop visit.

A lot of shops have the drive over low lift platforms and then use flexible rubber block on the sills. The work similarly to your two rubber lined wood blocks (I also use a 3x3 fence post with a routed channel for the sill drop flange).

On the 500X the metal sills live around one inch ABOVE the lower sill trim. Also the sill flange is not a folded "L" shape but just a simple not structural vertical seam. So when the car is lifted on the platform/block system almost all of the vehicle weight is applied to the plastic sill trim trim and not any structure of substance.

I hate to think about how many damaged 500Xs there are out there due to incorrect lifting. Most owners will ever know and if/when a trim falls off they will be none the wiser as to how and when the problem was created.

My '08 Bravo is the same as it's fitted with the Sport Pack option. The owner's manual says the car is only to be lifted using the 4 pressed metal blocks fitted fore and aft inboard of the sills, also says not to attempt to jack under the rear axle beam (as Jock has already stated) or under any suspension arms.

Fortunately I consulted the Main Dealer before bringing my car for it's 1st State inspection (@4 years old). The dealer told me to remove the plastic sill skirts/covers. The test centre just placed large rubber blocks on top of timber blocks :eek: under the sill pinch welds and sent it into the air. The hoists used have built-in 'shake plates' to test for suspension wear and boy, do they give the car a good workout - including the lifting points utilised. Was I glad I took the precaution of removing the sill trims. While there, I saw several other cars with plastic sill covers being lifted the same way.

There's a big sign on the wall in reception (iirc also on the booking letter sent out) that says 'Cars are tested at owner's risk, it is the owner's responsibility to ensure the car is in a fit state to be tested incl. replacement of the engine timing belt if required, plus adequate oil, coolant etc.'

Like Jock, I always bring loose wheels for tyre changes, (my wheels have never been over-tightened!), never drive the car in - have seen too many tyre centres in this part of the world (southern Ireland) just roll a trolley/floor jack out and proceed to jack up the car often without even looking to see where the jack is located. If you say anything, they just scowl and say they know what they're doing. If fact, for the last few tyre changes, I've gone to a local (Peugeot) Main Dealer. The tyres+fitting+new valves+ balancing+ environmental disposal fee cost the same, but the service is better, carried out by trained Mechanics who seem to me to care. Additionally, batteries I've bought there are good quality and come with a test certificate, battery is tested while you're there.

Al.
 
Jock has it covered pretty well. (y)

All I can add is :-

If you have an owner's handbook or workshop manual for you car, read the section on jacking up and supporting the vehicle. Sometimes there are dimples/notches on the vehicle sills/pinch welds to show where the standard issue car jack should be used, (sometimes there's a sticker/decal on the jack showing pictorially, the correct positioning of the jack) these can often also be used to position axle stands as often these points are reinforced, may even be double thickness. e.g. just inboard of the pinch weld.
Will also point out suitable places to position axle stands and the places to avoid that might look ok to use.

Be wary of what is below your jacking surface... I've heard of cases where an old concrete driveway, with concrete of possibly variable thickness, collapsed under the load of an axle stand because there was a void under the concrete.
I've had it happen with a tarmac drive. Driveways using paving slabs could suddenly give way if the slab splits.

Never use bricks or blocks instead of proper axle stands - they can split/crumble without warning - neither like to be point loaded e.g. by having a bolt or stud under a car pressing on them. If you have no axle stands, use large blocks of timber and place 1 or 2 car wheels under the car.

After jacking up the car and placing on axle stands, and especially if the car is quite old and therefore potentially rusty in important areas, give the car a good shake side-to-side before going underneath. If the car shifts on the stands or something gives way, better to have it happen now, not when you're underneath, heaving on some tight fasteners.

I prefer to jack up the front or rear or both front and rear of a vehicle rather that jack up only one side - I always feel that jacking up and supporting just one side potentially puts a side load onto the axle stands. It also means that box/castle/channel section are not meeting the saddle on the axle stand squarely.

Re:- being unable to jack up under a rear axle beam or the absence of a front crossmember - some tool/equipment suppliers (iirc e.g Draper), can supply an adjustable (in width) jacking beam that fits in place of the saddle on their floor/trolley jacks, so can lift both sides (front or rear) at the same time. This avoids the problem that very often the recommended jacking points near the sills are the same points where axle stands need to positioned, so having jacked up the car, you can't fit the axle stands.

Anyone with basic fabrication skills and access to welding equipment could make their own jacking beam, assuming there's room to use it - many modern cars are too close to the ground.

I used to make my own axle stands and usually made the top saddle deeper than normal to allow a wood block or a section of tyre thread to be bonded in place to protect paint/underseal., while still having some metal either side of a box/channel section to prevent slipping. I used to test my 'homemade' axle stands in a hydraulic press before use. (tip:- wrap a chain around the axle stand before testing to max load/destruction - if/when if fails it can fly :eek: ).

If I think of anything else to worry you guys, I'll be sure to post :D

Al.
 
Last edited:
Nice post, covers most of what I do.

A neat additional bit of advice/equipment is:

THE ICE HOCKEY PUCK

Instead of wood I generally use Ice Hockey Pucks as lift isolation blocks. The are hard compacted rubber structures and FAR FAR cheaper than rubber lift blocks from garage equipment suppliers.

https://puckstop.com/product/ice-hockey-puck-black-6oz

Other purchase sources available.

Other features:

o They stack well

o They fit most trolley jack lift plates

o They store neatly in the boot of the car so when a roadside visit from the AA/RAC/other is ever required an they are about to just metal to metal jack you can step in.

o Same goes for tyre shops etc.

One of the best ever purchases I've made.

Now this is a great idea and low cost :)

For years, I used the rubber cushion blocks from sprung HGV cabs mountings. These were like jumbo versions (c. 3" diameter by 3/4" thick) of the rubber cushion rings used on rear telescopic shocks. The ice hockey pucks are a much better idea. (y)

Al.
 
Be wary of what is below your jacking surface... I've heard of cases where an old concrete driveway, with concrete of possibly variable thickness, collapsed under the load of an axle stand because there was a void under the concrete.
I've had it happen with a tarmac drive. Driveways using paving slabs could suddenly give way if the slab splits.

Never use bricks or blocks instead of proper axle stands - they can split/crumble without warning - neither like to be point loaded e.g. by having a bolt or stud under a car pressing on them. If you have no axle stands, use large blocks of timber and place 1 or 2 car wheels under the car.

After jacking up the car and placing on axle stands, and especially if the car is quite old and therefore potentially rusty in important areas, give the car a good shake side-to-side before going underneath. If the car shifts on the stands or something gives way, better to have it happen now, not when you're underneath, heaving on some tight fasteners.

I prefer to jack up the front or rear or both front and rear of a vehicle rather that jack up only one side - I always feel that jacking up and supporting just one side potentially puts a side load onto the axle stands. It also means that box/castle/channel section are not meeting the saddle on the axle stand squarely.

Re:- being unable to jack up under a rear axle beam or the absence of a front crossmember - some tool/equipment suppliers (iirc e.g Draper), can supply an adjustable (in width) jacking beam that fits in place of the saddle on their floor/trolley jacks, so can lift both sides (front or rear) at the same time. This avoids the problem that very often the recommended jacking points near the sills are the same points where axle stands need to positioned, so having jacked up the car, you can't fit the axle stands.

Anyone with basic fabrication skills and access to welding equipment could make their own jacking beam, assuming there's room to use it - many modern cars are too close to the ground.
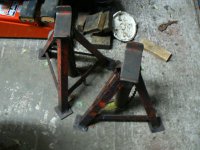
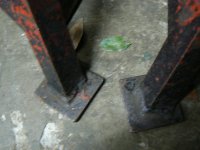
Securely supporting the vehicle is sometimes about the last thing on your mind when tackling a problem with your vehicle - especially if you are young, inexperienced and eager to just get on with the job. Working on a firm solid surface is essential but how you can tell there is a void under that bit of concrete or tarmac I don't know. As you say you also need to be careful whenever really heaving on something as it's quite possible to pull the vehicle off the stands. In my early days I worked at the kerbside and I well remember the horror of seeing one of my axle stand legs starting to sink into the tarmac as I was wrestling the gearbox out of my Anglia on a hot summers day in Chiswick back in the '60's. The next day I took the stands in and made up wee plates which I welded on the end of each leg:

P1090063.JPG

P1090064.JPG

I now have 3 sets of stands including these ones and these old friends are my favourites. All of which I've modified with leg plates. No more problems with "sinking" stands now.

I'm quite happy to jack up just one side, and have never had a problem doing this, but I do leave the jack in contact with the sill as an extra safety measure. Putting the spare wheel and the wheel you've just removed under the sill is something I learned very early on and to this day I will always do it if I'm risking part of my body under a vehicle.

Way back when, I used to jack up a whole end at a time but now a days the cars are so low to the ground this is very difficult and it's considerably more difficult to find strong points to jack on. The old cars sometimes had massive chassis which you could jack on anywhere and even the earlier mono bodies were much more robust. I recently took the plunge and bought a low entry trolley jack at one of Machine Mart's VAT free events and it's wonderful!

Welding, Oh welding, I love welding things! - Don't like molten underseal dripping onto my chest or arms so much though! Over the years I've acquired quite a comprehensive collection of welding plant and paraphenalia. I've mothballed my gas gear due to the problems around keeping the gas bottles as I don't want to invalidate my household insurance. The oldest piece of kit I have is an SIP 140 "stick" welder which I bought in the early 70's to weld new wings on my chariot of the moment (a DAF 33 van) - quickly discovered it wouldn't do that! What it did do very well though was help me build my own two wheel trailer. These small welders are very common and can be bought very cheaply second hand. They are also very robust and quite versatile once you acquire a reasonable level of proficiency. I've modified mine considerably over the years and I'm just thinking, as the weather is really too miserable for me to be working on the cars outside just now, I should do a small feature on it for you all - if you would be interested?
 
Securely supporting the vehicle is sometimes about the last thing on your mind when tackling a problem with your vehicle - especially if you are young, inexperienced and eager to just get on with the job. Working on a firm solid surface is essential but how you can tell there is a void under that bit of concrete or tarmac I don't know. As you say you also need to be careful whenever really heaving on something as it's quite possible to pull the vehicle off the stands. In my early days I worked at the kerbside and I well remember the horror of seeing one of my axle stand legs starting to sink into the tarmac as I was wrestling the gearbox out of my Anglia on a hot summers day in Chiswick back in the '60's. The next day I took the stands in and made up wee plates which I welded on the end of each leg:

View attachment 205961

View attachment 205962

I now have 3 sets of stands including these ones and these old friends are my favourites. All of which I've modified with leg plates. No more problems with "sinking" stands now.

I'm quite happy to jack up just one side, and have never had a problem doing this, but I do leave the jack in contact with the sill as an extra safety measure. Putting the spare wheel and the wheel you've just removed under the sill is something I learned very early on and to this day I will always do it if I'm risking part of my body under a vehicle.

Way back when, I used to jack up a whole end at a time but now a days the cars are so low to the ground this is very difficult and it's considerably more difficult to find strong points to jack on. The old cars sometimes had massive chassis which you could jack on anywhere and even the earlier mono bodies were much more robust. I recently took the plunge and bought a low entry trolley jack at one of Machine Mart's VAT free events and it's wonderful!

Welding, Oh welding, I love welding things! - Don't like molten underseal dripping onto my chest or arms so much though! Over the years I've acquired quite a comprehensive collection of welding plant and paraphenalia. I've mothballed my gas gear due to the problems around keeping the gas bottles as I don't want to invalidate my household insurance. The oldest piece of kit I have is an SIP 140 "stick" welder which I bought in the early 70's to weld new wings on my chariot of the moment (a DAF 33 van) - quickly discovered it wouldn't do that! What it did do very well though was help me build my own two wheel trailer. These small welders are very common and can be bought very cheaply second hand. They are also very robust and quite versatile once you acquire a reasonable level of proficiency. I've modified mine considerably over the years and I'm just thinking, as the weather is really too miserable for me to be working on the cars outside just now, I should do a small feature on it for you all - if you would be interested?

Any tips on welding would be useful. I had a 12v Rawlplug stick welder for years but found it was better at 1/2 in ch plate than car bodies which it used to blow to bits. Recently bought a Mig welder from screw fix but after one use it ceased working. My need to weld is not great but I would like to learn. It has saved out ironing board for many years from broken feet. Not knowing what to get is a disadvantage when just tinkering.
 
Hi Jock,

When I was young, inexperienced and keen to just get the job done, I'm sure I took chances, not supporting vehicles safely, not wearing eye protection etc. My grandfather, one of the 1st Mechanics in Ireland (Rolls-Royce trained) whenever he caught me, used to repeat his favourite saying 'You can't put an old head on young shoulders'. Sometimes this was followed by a sudden sharp pain in the vicinity of the back of my head :)

I too, have always welded little feet on the legs of the axle stands to spread the load. I did a basic welding and fabrication course at a technical institute before joining the motor trade. Here I was shown how to weld using oxy-acetylene (Gas) and electric arc (stick). When I attended technical college while serving my mechanic's apprenticeship, I received tuition in welding, fabrication and basic lathe work. In the dealership where I worked, apprentice mechanics were encouraged to become reasonably proficient at welding. We used to be given lots of practice in repairing holes in otherwise ok exhaust systems, plus some bodywork rust repairs for our less-well-of customers, mainly floor/sill repairs, mightn't have been pretty but would have been strong and safe.

Jock, I love your posts and reminiscences of how things used to be done - we seem to have many shared similar experiences. By all means, post something about welding if you can find the time, but you're probably busy with preparing the 4 cars that are approaching MOT time :)

Regards,

AL.
 
Any tips on welding would be useful. I had a 12v Rawlplug stick welder for years but found it was better at 1/2 in ch plate than car bodies which it used to blow to bits. Recently bought a Mig welder from screw fix but after one use it ceased working. My need to weld is not great but I would like to learn. It has saved out ironing board for many years from broken feet. Not knowing what to get is a disadvantage when just tinkering.

I don't think Screwfix offer a repair service but iirc (I'm not in the U.K.) Machine Mart and possible some other tool/equipment suppliers can do repairs - they used to advertise they could repair/supply parts for anything they sold.

Are you sure the problem isn't just with the wire feed - I've heard this can be a problem with the less expensive units and can require careful setting up.

Re - learning to weld? Have you checked if there are any short evening courses in welding available at a local technical college?
Some welding equipment suppliers can provide training in the use of their equipment but this might only apply to professional level equipment and customers would likely be expected to know at least the basics.

Best option is probably to ask around and try to find someone who is experienced at welding, they don't have to be a professional just competent.
You might find someone locally, perhaps recently-retired who might be willing to drop over, set up your equipment and give some tuition/pointers. It can be a huge benefit to have a competent welder watch what you're doing initially and guide you. On your own, it can be a bit overwhelming, sometimes the equipment can seem to have a mind of it's own :bang: Most welders and welding instructors say the key to being able to weld is to get some initial instruction and then practise, practise, practise.....

Whatever you do, please be safety conscious at all times especially fire safety and most important of all, eye safety, never look or allow anyone else incl. a pet, to look directly at the electric arc - there's automatically darkening welding helmets available at reasonable cost nowadays, no need to rely on the very cheap and nasty shield that typically comes in the box with the welder.

Al.
 
Last edited:
Jock has it covered pretty well. (y)
If you have an owner's handbook or workshop manual for you car, read the section on jacking up and supporting the vehicle. Sometimes there are dimples/notches on the vehicle sills/pinch welds to show where the standard issue car jack should be used, (sometimes there's a sticker/decal on the jack showing pictorially, the correct positioning of the jack)
Al.

On the 500X these dimples ARE ONLY FOR the supplied emergency jack. This jack has a deep central cut-out to bypass the sill seam and flange and two saddles to support the car at the floor to sill intersection.

For trolley jacks, garage lifts, axle stant etc there are other designated locations NOT shown in the owners handbook and ONLY shown in the Fiat official workshop manual (which people can't get anyway).
 
This thread has turned out to be full of practical information and I'm finding it very interesting. Thanks for all the contributions chaps - and thanks Al for your kind words, we do seem to have had very similar life experiences, including "abuse" from our elders and betters!

Regarding broken machines. I do all my own repairs and it's one of the reasons I like Machine Mart because they seem to supply bits for everything they sell (as long as it's worth repairing). I bought my big compressor from UKHS (Wolf) - somewhere on here there's a thread about it - and it arrived with a damaged compressor pulley/fan. I had no problem getting them to supply a new one (free) In fact they offered, without me asking, to simply exchange the whole unit. As I was talking to them by 'phone I took the opportunity to ask about spares for their gear and they said they could supply most spares for most of their stuff. Haven't had reason to try them yet but I was impressed by that initial contact and the outcome (the pulley arrived very quickly).

Learning to weld? There's nothing like actually doing it with someone looking over your shoulder to guide you, and then doing it again, and again, and again. I'm not the worlds best welder and I'm never going to weld north sea pipelines but I've done quite a bit of it professionally (like you Al, welding up floor pans, sills and reinforcing seat belt anchorages. I've also built my own unbraked trailer (5ft by 3 ft) and made lots of "useful things" and modified tools). In my midlife period, with a wife, 3 children a mortgage to support and insufficient funds to keep the boat afloat, I stumbled across my local council community education department. They were very interested in my experience and qualifications and I ended up teaching evening classes for them. A beginners welding class, an "artistic" welding class (that was a really interesting one), a basic car maintenance class, an advanced car repair and maintenance class and a Ladies car maintenance/appreciation class - That was the biggest "Hoot" I've ever had. It's a good job our family plans were complete by then because what with working full time during the day and running the classes in the evenings I was hardly home for long enough to grab a cup of tea in passing! I did that for about 10 years and one of the great strengths of the welding classes was that I used to get people to bring in their own machine - if they had already bought one. Every machine has it's own little "foibles" and, if you're not learning to be a professional welder, it's invaluable to learn on your own machine. So my advice would be to see if there's a community ed or college course on the go near you. Then, again as Al says above, practice practice practice. There's a lot on you tube too but better if you've got the basics under your belt with someone to correct your errors first.

Al's final paragraph about safety is spot on too. It's frighteningly easy to set fire to a car - I know, I've done it twice! You'd think once would be enough wouldn't you! I've got 8 fire extinguishers dotted around the place now! Another plus here for attending a course as your instructor will "scare" you with all the things that can go horribly wrong - Arc eye isn't funny I can also tell you!

Being an old "git" I had a poor night's sleep with my arthritis last night and lay awake from about 5 o'clock thinking about "things". One of those being that I hadn't washed the cars for weeks. So, having taken Mrs J her morning cup of tea and biscuit in bed, (something I started years ago and now couldn't stop even if I wanted) I was out early washing them and thinking about this thread and welding and decided to "do" the bit I threatened you all with on my stick welder when I'd finished. I also realized I had a new tool which I've not had a try of yet, although I bought it months ago. So after I'd finished the washing I got my camera and started snapping.

I'm off now to start a new thread here in tech talk about them. See you there?
 
This post contains affiliate links which may earn a commission at no additional cost to you.
One of these by any chance:

https://www.ebay.co.uk/itm/Vintage-...934911?hash=item4b6f6c97bf:g:f4YAAOSwDg9d2~~h

I remember being mightly impressed by an advert for these in Car Mechanics, or was it Practical Motorist? too long ago for me to be sure. Being a student at the time I couldn't spare the dosh to buy one though.

That's the thing. I never thought I would see that again. It uses 2 12 volt batteries in series. The ability to weld was surprising but no adjustability so some skill is needed and I have little or none. I did a lot of jobs with it though over 40 years or so and only chucked it out about 3 years ago when it broke and I couldn't see how to repair it. I bought a Screw Fix Mig welder but I went to use it again recently for only the second or third time and its dead as a door post. Very tempted to try Aldi?? or Lidl Parkside welder at £79 as this would have a decent guarantee on offer this week too. Has variable power but I need to look closer I would also need a new face mask shield so I suppose that doubles the cost.

The Rawls plug meded my trailer numerous times, did a subframe repair onan old 1100 and lots of little jobs over the years including repairs on the inner wing of my daughters old micra so we had lots of value. I think back then it was about £12.
 
This post contains affiliate links which may earn a commission at no additional cost to you.
I don't think Screwfix offer a repair service but iirc (I'm not in the U.K.) Machine Mart and possible some other tool/equipment suppliers can do repairs - they used to advertise they could repair/supply parts for anything they sold.

Are you sure the problem isn't just with the wire feed - I've heard this can be a problem with the less expensive units and can require careful setting up.

Re - learning to weld? Have you checked if there are any short evening courses in welding available at a local technical college?
Some welding equipment suppliers can provide training in the use of their equipment but this might only apply to professional level equipment and customers would likely be expected to know at least the basics.

Best option is probably to ask around and try to find someone who is experienced at welding, they don't have to be a professional just competent.
You might find someone locally, perhaps recently-retired who might be willing to drop over, set up your equipment and give some tuition/pointers. It can be a huge benefit to have a competent welder watch what you're doing initially and guide you. On your own, it can be a bit overwhelming, sometimes the equipment can seem to have a mind of it's own :bang: Most welders and welding instructors say the key to being able to weld is to get some initial instruction and then practise, practise, practise.....

Whatever you do, please be safety conscious at all times especially fire safety and most important of all, eye safety, never look or allow anyone else incl. a pet, to look directly at the electric arc - there's automatically darkening welding helmets available at reasonable cost nowadays, no need to rely on the very cheap and nasty shield that typically comes in the box with the welder.

Al.

Screw fix are a big pain. They sold petrol strimmers a few years ago and those had about a 99.7% failure rate you can buy them by the rack ful new or nearly new for nearly nothing... I should have taken note. I will more selective about who I buy from next time.
 
One of these by any chance:

https://www.ebay.co.uk/itm/Vintage-...934911?hash=item4b6f6c97bf:g:f4YAAOSwDg9d2~~h

I remember being mightly impressed by an advert for these in Car Mechanics, or was it Practical Motorist? too long ago for me to be sure. Being a student at the time I couldn't spare the dosh to buy one though.

Then you'll possibly remember the ad for the device that had 2 carbon rods and could be used to braze rather than weld - I can't recall if it was car battery or mains electricity powered - probably dangerous regardless of the power source. :)

Al.
 
This post contains affiliate links which may earn a commission at no additional cost to you.
That's the thing. I never thought I would see that again. It uses 2 12 volt batteries in series. The ability to weld was surprising but no adjustability so some skill is needed and I have little or none. I did a lot of jobs with it though over 40 years or so and only chucked it out about 3 years ago when it broke and I couldn't see how to repair it. I bought a Screw Fix Mig welder but I went to use it again recently for only the second or third time and its dead as a door post. Very tempted to try Aldi?? or Lidl Parkside welder at £79 as this would have a decent guarantee on offer this week too. Has variable power but I need to look closer I would also need a new face mask shield so I suppose that doubles the cost.

The Rawls plug meded my trailer numerous times, did a subframe repair onan old 1100 and lots of little jobs over the years including repairs on the inner wing of my daughters old micra so we had lots of value. I think back then it was about £12.

I saw a tv programme recently about the long-distance truck drivers in Australia and the problems they can face on a daily basis. They were a very resourceful, self-reliant group. One of them carried out a welding repair under his truck (possibly an air brake chamber mounting bracket) using the 2? truck batteries and what looked like standard jumper cables and a welding rod - repair looked serviceable enough, especially considering how little he had to work with (y)

I've bought tools from both Aldi and Lidl, incl. some welders.

Lidl over here (Ireland) have recently had welders, they do so several times each year. Their standard Arc Welder was Euro 50, Gasless MIG was Euro 100, they've also had ARC-TIG (don't know what this term means) for Euro
100? iirc.

Afaik all their welders come with one of the basic welding masks/shields in the box. (some also have a wire brush/slag chipper or a slag hammer incl. also).

Lidl recently had Auto-Darkening Welding Helmets recently for iirc Euro 40
They also had welding supplies e.g small 1kg rolls of various diameter fluxed gasless MIG wire, welding gauntlets, welding magnets, slag hammers etc.

One point to bear in mind is the Lidl and Aldi returns policy and 'guarantee' Over here (Ireland) you have 28 days to return an item for refund or replacement (assuming they still have one in stock) to Lidl. With Aldi , over here,(Ireland) you have 60 days. Any repair under guarantee will require you to contact the service centre listed in the instruction book or packaging and arrange return - you cannot simply return the item to the store where purchased.

I don't know if the above terms are the same are the same in the U.K. but previous checks on the Irish vs U.K. websites have shown that the same items are available more of less on the same dates in both countries (sometimes a week or so earlier/later) For £ equivalent prices, reduce the Euro price by 25%, so Euro40 = £30.

My suggestion, buy it, try it, return it if not happy, just remember you have 28 days with Lidl and 60 days with Aldi for returns.

Al.
 
Back
Top