Jacks and axle stands - supporting your vehicle.

Currently reading:
Jacks and axle stands - supporting your vehicle.

I saw a tv programme recently about the long-distance truck drivers in Australia and the problems they can face on a daily basis. They were a very resourceful, self-reliant group. One of them carried out a welding repair under his truck (possibly an air brake chamber mounting bracket) using the 2? truck batteries and what looked like standard jumper cables and a welding rod - repair looked serviceable enough, especially considering how little he had to work with (y)

I've bought tools from both Aldi and Lidl, incl. some welders.

Lidl over here (Ireland) have recently had welders, they do so several times each year. Their standard Arc Welder was Euro 50, Gasless MIG was Euro 100, they've also had ARC-TIG (don't know what this term means) for Euro
100? iirc.

Afaik all their welders come with one of the basic welding masks/shields in the box. (some also have a wire brush/slag chipper or a slag hammer incl. also).

Lidl recently had Auto-Darkening Welding Helmets recently for iirc Euro 40
They also had welding supplies e.g small 1kg rolls of various diameter fluxed gasless MIG wire, welding gauntlets, welding magnets, slag hammers etc.

One point to bear in mind is the Lidl and Aldi returns policy and 'guarantee' Over here (Ireland) you have 28 days to return an item for refund or replacement (assuming they still have one in stock) to Lidl. With Aldi , over here,(Ireland) you have 60 days. Any repair under guarantee will require you to contact the service centre listed in the instruction book or packaging and arrange return - you cannot simply return the item to the store where purchased.

I don't know if the above terms are the same are the same in the U.K. but previous checks on the Irish vs U.K. websites have shown that the same items are available more of less on the same dates in both countries (sometimes a week or so earlier/later) For £ equivalent prices, reduce the Euro price by 25%, so Euro40 = £30.

My suggestion, buy it, try it, return it if not happy, just remember you have 28 days with Lidl and 60 days with Aldi for returns.

Al.

Gas arc Tig is just another name for a Tig welder
 
Then you'll possibly remember the ad for the device that had 2 carbon rods and could be used to braze rather than weld - I can't recall if it was car battery or mains electricity powered - probably dangerous regardless of the power source. :)

Al.

The Rawlplug set had these and could indeed braze. I think it was capable of welding stainless as well. I never used these things as 45 years ago I was frightened of such new fangled gadgets...
 
Then you'll possibly remember the ad for the device that had 2 carbon rods and could be used to braze rather than weld - I can't recall if it was car battery or mains electricity powered - probably dangerous regardless of the power source. :)

Al.

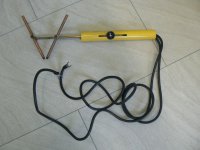
I remember these well Al. In fact, amazingly, I have one!

P1090094.JPG

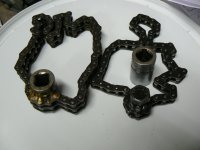
When I bought the SIP 140 it came bundled with one. I had learned at college how to braze with gas and had subsequently made a number of "useful" tools etc. Here's my oil filter "strap" made from a Cooper "S" duplex timing chain brazed to an old 1/2" drive socket - it's the one on the left. Unfortunately I quickly discovered that, because it's so broad it spreads the load on the canister too much and so tends to slip instead of biting in. My pal had made one using a simplex A series chain so I made another - the one on the right. It occurred to me that I didn't need to waste a socket so I just welded a 3/4 bolt to the chain and use it with a 3/4 AF socket. It works wonderfully well.

P1090093.JPG

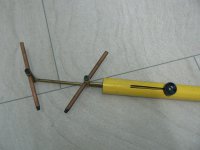
After college I no longer had easy access to gas welding gear so I was pleased to get the carbon arc kit. It's a simple idea. With the slider set so the terminals (with the allen screws) are as far apart as possible, you insert the carbons until they are approx 1/4" apart.

P1090095.JPG

They need to be pushed into the allen keyed terminals a bit more than shown here. Prior to this the connectors on the leads will have been connected to your welder outputs. The welder is set to a low output (maybe 30 to 40 amps), if you set it too high the rods disappear at a ferocious rate, and you push the slider up with your thumb until the rods just touch and immediately draw them back until you establish an arc. Sounds easy? it's not. also, if you do manage to sustain an arc you have to continually, slowly and smoothly, advance the movable rod to maintain the gap (and so the arc) as the rods burn back. This, of course is a "side show" as what you are actually trying to do is heat the job with the arc so you can melt the brazing rod against it. It's somewhat analogous to rubbing your tummy whilst patting your head! I never did master it! On the few occasions when my efforts did meet with some sort of success there's another problem to contend with - carbon contamination of the metal, which is a whole other problem! There is also the problem that the whole thing is so bulky you can't get into any tight corners with it. I worried about electrocution too with all those exposed parts but I can tell you I've touched both this and normal rods with bare hands (unintentionally of course) and never felt more than a slight AC tingle. By the way, I wouldn't advise electric weld in the rain, standing in puddles, or any other situation like that just in case a bit of mains "leaked" through.

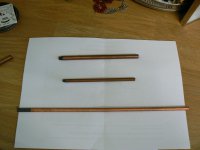
The tool originally came with one set of thick and one set of thin carbon rods. They disappeared very quickly and I soon discovered that replacements were actually quite expensive. I thought I'd hit the jackpot when one of my welder friends gave me a full box of gouging rods. They looked the same but were at least twice as long.

P1090096.JPG

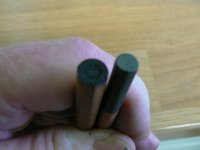
The arc they strike is very harsh and nothing like as stable. I found they didn't really work. If you look closely at the proper rods (the one on the left) you can see that there seems to be something quite different about them. They seem to have some sort of core material which the gouging rod (on the right) does not have.

P1090102.JPG

I guess it "burns" giving a softer and more flame like arc.

Anyone else remember these or even used them with success?
 
Last edited:
Gas arc Tig is just another name for a Tig welder
TIG - stands for Tungsten Inert Gas, it's a kind of mix of MIG/MAG and gas in technique - My next challenge. I had a very brief go at it once at our local technical college. When I was running my community ed welding classes I would occasionally have a student who wanted to take things further and I had a very nice tie up with Bob who was the welding instructor at our local Tech. I would take my student up to see him and Bob would take him (unfortunately I never had a "her" who wanted to weld professionally) round the welding section. On one of those occasions there was a TIG class in full swing and I was allowed to "play" for a wee while. Made an absolute Horlicks of it, blowing holes all over the place - very embarrassing! If you can master it though it is generally considered to be the "Rolls Royce" of welding gear.
 
Hi Jock,

Thanks for the detailed description of how the carbon rod brazing device worked and your experience of using one - you're the only person I've ever encountered who actually bought one.

I had forgotten how it was powered, you reminded me and also why I didn't 'invest' in one, - I could afford one, but couldn't afford an arc welder at the time (typical impecunious apprentice car mechanic trying to buy good quality mechanic's tools while earning a pittance). Why, oh why, don't garages supply toolkits to apprentice or indeed qualified mechanics. After all, other employers supply what ever is needed to their workers to do their assigned work - imagine if office-workers/civil servants had to provide their own desks, office chairs, computers, pens ,staplers, paper punches, telephones etc. It's not fair :mad: (Favourite rant over, for the moment....).

Like you I learned to braze using oxy-acetylene equipment. Very useful in certain applications, e.g. joining very thin to thick materials. I've used it to successfully repair cracked cast iron castings, re-attach broken mounting lugs etc. I've heard mention recently of using oxygen and propane gas to braze - I haven't tried it myself yet, but if you think about it, oxy-propane is capable of heating metal to red heat so might just work?

I had a go using TIG equipment at an acquaintance's home workshop. He said I was a 'natural' :) . However, his equipment was top level professional gear and he was an expert, so the equipment was correctly set up for the material I was welding. (He had recently sold his fabrication business, just kept a few pieces of equipment to use at home for small jobs/hobby.
He did give me some advice about what to buy, if I wanted to start TIG welding - don't bother with cheap equipment,- professional equipment has features that make it easier to use/gives better results e.g. pulsed arc? various timers? various programs? His advice was buy v.good equipment and get training (the professional level welding equipment supply houses often have training available in-house).

Regards,

Al.
 
Last edited:
Hi Jock,

Your mention of making oil filter removal tools using old? timing chains reminded me :- back in the mid1970's I was working in a Fiat main dealership. Many Fiats used timing belts not chains. I used to hate throwing away old timing belts and wondered what could I use them for.

My idea for an oil filter removal tool, used a section of old timing belt formed into a loop with the teeth facing outwards, with both ends passing through a rectangular slot cut in a piece of thick wall metal tube (old electrical conduit).
The reason for having the belt teeth on the outside was so that they would grip the edges of the rectangular slot in the tube.
To turn it, I drill out a large used Fiat hub nut (27?mm hex) and brazed it in place onto the tube, the length of tube could be varied to suit different applications. If you wanted a jumbo-sized strap wrench for some application, you could utilize the full length of a timing belt. :)

If I knew how to post normal size pics, :eek: I'd dig out this old home-made tool and post a pic. (I don't like these thumbnail images).

Regards,

Al.
'Mornin Al.

I really like the idea of that filter removing tool. Although I've had those home made chain filter removal tools "for ever" just very occasionally I've run into a filter where there is not enough clearance to get the, relatively thick, chain round it. I've bought 2 strap type tools to tackle this over the years but, on both, the strap webbing failed after a while leaving me with this:
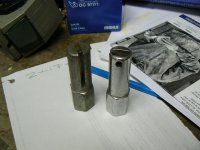
P1090113.JPG

I have a collection of "trophy" timing belts, fan belts and cam/rocker cover gaskets which I tend to just throw up here:
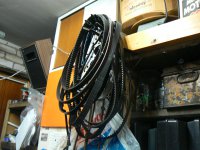
P1090112.JPG

until enough of them accumulate to be worth adding to my heap of stuff to take down to the recycling centre. I'm going to see if one of the timing belts could be easily adapted. I bet it would last a nice long time.

You can see I'm very keen to post illustrations - a picture paints a thousand words as they say - I'd love to see a picture of the tool you mention above. I too struggled with this until another forum member helped me through the process - Was it you PB? Apologies if it was someone else.

The way I compose and post pictures to the thread is:
1) Click "reply" at the bottom of the post you are replying to
2) Click the box "Quote message in reply" as this gives you the option later to modify the original poster's entry to suit what you are replying to.
3) Click "Go Advanced" where you will see things displayed a little differently. Scroll down until you get to the box that has imogis on the right side.
4) At the top of this box you will see a paper clip? Click on it and a "manage attachments" box will appear. Click the top "Choose File" box and your computer will display options from your hard drive for you to manipulate and choose from. Highlight, by clicking on the image you want, and click "open" at the bottom of the box.
The Forum will then display the file no. in the "Choose File" box.
5) Click the upload button to upload this image - if you watch the bottom of the page you'll see how it's doing. When it's finished don't jump in too quickly or you'll loose it. Wait 'till you see the file appear in the "current attachments" box (which will only appear after you upload the image.)
The file can now be placed in your text.
6) Move your cursor to where you want the image to appear in your text and click - you'll see the flashing line appear.
7) Take your cursor arrow up to the paper clip and click on it. A list will appear, headed by "manage attachments" - which you should click if you want to add, or remove, more files.
8) Click the file you want and the picture will appear where you just "planted" that cursor in No. 6.
You're done! Now click on the "preview Post" box and you can view exactly what you've done with the option of going back in and altering it before you hit "Submit Reply".

I found that, when you are viewing forum posts, these images, either your own or those posted by other members, can be viewed in much greater detail if you click on the small image displayed in the text. Just hover your cursor over the image and click. after a moment of "sorting itself out" you'll see a larger image displayed in a box. Click on this and it looses the box surrounds and gets a little bigger. Click on this again and it gets a lot bigger, so big in fact that the whole image more than fills the screen! Of course not everyone is as ignorant regarding computers as me! So apologies if you already know how to do this.

Voyeur that I am I find it very enjoyable to do this and then search for "stuff" lurking around the periphery of the image. It's amazing what some people have lurking in the dark corners of their garage/workspace!

This all sounds quite daunting if you've not tried it before and it took a few tries before I really got my head around it. Now though I can take a picture on my camera (I don't have a smart phone), upload it to my laptop and be posting it within minutes.

Do give it a go, I'd love to see that filter tool. Hopefully that ability to expand the image will help overcome your aversion to thumbnails?

As ever, kindest regards
Jock
 
Why, oh why, don't garages supply toolkits to apprentice or indeed qualified mechanics.

Like you I learned to braze using oxy-acetylene equipment. Very useful in certain applications, e.g. joining very thin to thick materials. I've used it to successfully repair cracked cast iron castings, re-attach broken mounting lugs etc. I've heard mention recently of using oxygen and propane gas to braze - I haven't tried it myself yet, but if you think about it, oxy-propane is capable of heating metal to red heat so might just work?

He did give me some advice about what to buy, if I wanted to start TIG welding - don't bother with cheap equipment,- professional equipment has features that make it easier to use/gives better results e.g. pulsed arc? various timers? various programs? His advice was buy v.good equipment and get training (the professional level welding equipment supply houses often have training available in-house).

Regards,

Al.
My first job, when I came off the shop floor and started teaching mechanics, was in the old Skillcentre set up. I started by teaching the basic entry course and, for all it's many faults, one of the really good things about it was that once the trainee had completed his/her course they all got a very basic tool kit. It was just about enough to give you a start and included a basic socket set by Gaedor, or maybe Gordon and other tools of similar quality. Inevitably the occasional socket would turn up tucked down the back of a workbench or in my high value tool cupboard where it's owner would not claim it. I still have a number of these "orphans" on one of my own socket rails and they've lasted well.

Oxy/propane welding/brazing? There are kits advertised which claim they can do this using "Mapp" gas:

https://www.lbsbmonline.co.uk/120l-...dxMVPJ3yC6Tw0gcs0nIXPu6vEPreFjcsaAguKEALw_wcB

When I first gave up my BOC Portapak cylinders I didn't realise how much I used them for freeing off siezed fittings and I became aware of MAPP Gas through one of my American friends (My sister married an American back in the '60's and went to live on the east coast near Boston also my daughter and husband lived in Southern Maryland for years whilst he worked over there so I have a number of aquaintances over there who are into cars). He told me that one of the reasons it was developed was for use in submarines in WW2. It is much safer, not being inherently unstable, like acetylene, so does not need to be held in special cylinders - Acetylene gas is not in a "free" state inside it's cylinder, it's disolved in acetone (if I remember correctly?) which is itself contained in something like Kapoc (a type of cotton?) which completely fills the cylinder. There is no "free" gas in an acetylene cylinder, one reason why an acetylene cylinder must never be used on it's side and if it has been lying down it must be stood up for a while before using to allow the acetone to settle. Also you must not pull high quantities of the gas out of small cylinders - like the Portapak - or you are likely to get acetone comming out too. MAPP can simply be compressed in a cylinder just like oxygen.

I bought a small cylinder of Mapp gas (still got it and it's about half full even now) and borrowed a friend's oxygen cylinder to try it out. It produces a flame with a longer central cone and is not quite so hot but you can weld stuff like body panels with it and it brazes really very well. Almost as soon as I'd "discovered" it the factory in America, which was the only one in the world producing it, stopped making it! - Story of my life really (my wife delights in telling anyone who will listen that everywhere I have worked has either closed down as I left or closed shortly afterwards!) - The gas wasn't cheap either. So I concentrated on other solutions like my recently aquired Vibroshock socket set. I see that people are still marketing gas bottles labeled "MAPP" but I believe they are little more than a type of propane so not nearly as hot as true MAPP. There's a very interesting bit in Wikipedia about it:

https://en.wikipedia.org/wiki/MAPP_gas

Finally. Your guidance regarding buying only quality gear when it comes to TIG plant is well taken. I just couldn't justify the price and anyway I get on just fine with the SIP MMA machine and my Cebora 130 turbo "pocket MIG" which is my other main "partner in crime" these days. Bob is now retired, like me, and lives, amazingly, at the top of our street. We have become good friends over the years. I'm sure if I really, really wanted to learn it he could "smuggle" me into the college by the back door somehow.

Stay safe and healthy
Jock
 
I've bought tools from both Aldi and Lidl, incl. some welders.

Lidl over here (Ireland) have recently had welders, they do so several times each year. Their standard Arc Welder was Euro 50, Gasless MIG was Euro 100, they've also had ARC-TIG (don't know what this term means) for Euro
100? iirc.

Afaik all their welders come with one of the basic welding masks/shields in the box. (some also have a wire brush/slag chipper or a slag hammer incl. also).

Lidl recently had Auto-Darkening Welding Helmets recently for iirc Euro 40
They also had welding supplies e.g small 1kg rolls of various diameter fluxed gasless MIG wire, welding gauntlets, welding magnets, slag hammers etc.

One point to bear in mind is the Lidl and Aldi returns policy and 'guarantee' Over here (Ireland) you have 28 days to return an item for refund or replacement (assuming they still have one in stock) to Lidl. With Aldi , over here,(Ireland) you have 60 days. Any repair under guarantee will require you to contact the service centre listed in the instruction book or packaging and arrange return - you cannot simply return the item to the store where purchased.

I don't know if the above terms are the same are the same in the U.K. but previous checks on the Irish vs U.K. websites have shown that the same items are available more of less on the same dates in both countries (sometimes a week or so earlier/later) For £ equivalent prices, reduce the Euro price by 25%, so Euro40 = £30.

My suggestion, buy it, try it, return it if not happy, just remember you have 28 days with Lidl and 60 days with Aldi for returns.

Al.

Aldi and Lidl are very much in evidence here in Edinburgh with a number of stores spread throughout the city. I should imagine they are a real thorn in the side of the likes of the established stores. I've bought a number of tools from them and they have proved to be of generally as good quality as other lesser known brand names. The only problem I ever have had was with an 18 volt drill/driver which I bought when we were renovating my son's first flat years ago. After a few days of heavy use the bearing under the chuck collapsed. It was still well in warranty and Lidl just gave me a new one when I went into the store. It lasted just a couple of days of heavy use too before the same bearing collapsed. (installing double glazing and real wood flooring etc - heavy stuff - It was probably unrealistic to expect a cheap drill to survive) they replaced that one for me too. So I can attest to their excellent returns guarantee. I side lined it at that (it still works but the batteries are goosed now) and bought a Ryobi to replace it which is still working, amazingly on it's original batteries, to this day.

I would imagine something like an MMA machine would be a good bet from them because of it's simplicity but something like a MIG with drive motors and doides etc I'd be less sure about not for reasons of manufacture but access to timely repairs. These days I buy almost exclusively from Machine Mart with Northern Industrial Alloys as a back up. I used to buy a lot from them when they had a depot in town but now they are out in Broxburn they are not so convenient - good people though. Both these organisations are first class for spares and repairs. My "left field" choice might be UKHS from where I bought my big compressor. I had quite a chat with them when it turned up with a bent pulley on the compressor pump and their customer care was excellent. I was also told that they carry a full range of common spares for all their gear and I would tend to believe them as the replacement pulley arrived very quickly. (to their further credit they initially offered to simply replace the entire compressor but I reasoned that the next one might just turn up with more damage than the one I already had - it was only a slightly bent pulley).

On the subject of welding plant, I have to say I don't like the "no gas" MIGs too much. Mostly if it's something thick I default automatically to the SIP stick welder and if it's thin, like car bodywork, I haul out the Cebora MIG. No gas machines are course compared to the gas shielded machine and I wouldn't choose to use one on bodywork myself. Still miss the gas though, you can weld "thin air" with gas when you get good at it!
 
Hi Jock,

Many thanks for the detailed description on how to post pics. I was aware of how to post and enlarge thumbnail size pics but find it tedious and imagine others just moving on if faced with a lot of them, especially if viewing this forum on a smartphone. I may give your 'system' a go :).

I haven't a clue where that old timing belt based oil filter removal tool might be,(I'm somewhere between a clutterholic and a hoarder with 4 possible locations to search for any item whose location I can't remember), but if/when I find it, I'll try to post a full-size pic.

Thanks again and best regards,

Al.
 
Last edited:
Mornin Al.

Being a "clutterholic/hoarder seems to be part of what comes with being a long term "caraholic" (vehicle enthusiast) I'm afraid my situation is further complicated by an interest in vintage horticultural machinery - which has to be stored indoors somewhere. I even extended the shed, when I was deeply into Hillman Imps, to give more room to keep the engines, gearboxes, suspension bits, etc which I'd accumulated. All gone now but their place has been taken by old lawnmowers, cultivators and spares etc!

Mrs J jokes (I think she's joking anyway?) that we've had houses with garages most of our life together but apart from the first year or so (before I'd collected enough "stuff") she's never been able to park a car in one. It stops there though. I was forbidden to ever bring car parts into the house again after it took me over a month to rebuild the Anglia's engine on the kitchen table - and most of the floor - when we lived in a flat back in the '60's. She says when I die (and please dear God, let me be the first to go) she's going to let my boys take what they want but neither has an interest in mechanics so then she's going to invite my car friends and the lads from the 2 garages where I'm well known to come round and take what they want. Then she's going to get at least one skip, but more likely two, and bin the rest.

Hope I won't be able to look down (or maybe it'll be up?) and watch that happening, it would break my heart!

Stay safe all
Jock
 
Back
Top