I changed the cam-belt on my JTD over the weekend. Since the captive nuts for the wheel arch/engine shield were all rusted, I didn't complete re-assembling the beast for a test drive.. but it all started and ran okay.
But I have a few questiones which may be interesting/always cause me a head-scratch.
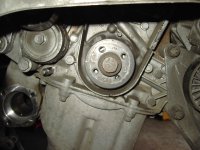
1) My crank pulley (i.e. not the aux-belt pulley) has a line on it. The engine case has a notch in it. You'd think that at TDC (according to the camshaft pulley) the line would point at the notch.. but no.
The notch is dead south ... the line is pointing somewhere close to 270 or 275 degrees. There's no other mark in the vicinity, other than a line I scraped myself in the past, to line up with it. All the pulleys in there seem to have locating pimples, so they can only go on one way.... so I dunno how the pulley could be fitted 90 degrees out... but could it? Or do I have a missing mark? Or is the line or the notch (or both) nothing to do with the engine timing?
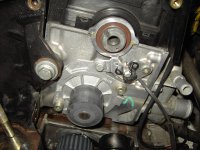
2) When I fit my (admittedly cheap and made for an indeterminate Vauxhall (16v?) ) locking tool on the crank at TDC (or +90 degrees, as above, anyway), it doesn't line up with the pimple on the pulley, or the reference bolt hole. I have to squeeze the motor round a gnat's franger's width more to get the tool on. That makes the little white mark up on the camshaft pulley no longer point at the white painted pointed on the plastic cover behind it.
I *think* in the past I adjusted the cam backwards by 1 tooth, so that the crank tool and the pulley were locked and the cam-pulley mark pointed to the white arrow... but while it started okay, it ran like a box of spanners... so I think this is just an anomaly of my tool... (or I may have remembered it wrong) so curious if anyone knoes better.
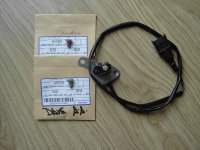
3) The TDC sensor - I forgot what a Mo-Fo mine is. The countersunk Torx head screw that holds it on (after the bolt on the water pump is removed) was rounded off a long time ago and I've never been able to remove it. I change the water pump by bending the TDC sensor backing plate out of the way slightly, to get the ear of the pump in and out.
Now.. a previous mechanic and I have both nicked the water pump o-ring fitting a new pump around the moody sensor... and this time, I noticed that I'd had the usual slight water leak from the pump which had dripped onto the tensioner and seized it in the "perfectly adjusted" position. Belt tension was still good.. but the tensioner was seized/could have ended badly.
What's the best way to get a moody screw out? I suspect I'll have to remove the injection ECUs and/or the wing.. to be able to get a drill/tool on it... and I also suspect the TDC sensor itself will suffer collateral damage (you never know though). Has anyone done the same job?
4) Part number for those captive nuts? ePER is a bit slow and then gives an error. They're the two holding the L shaped plastic guard to the inner wing.
Ralf S.
But I have a few questiones which may be interesting/always cause me a head-scratch.
1) My crank pulley (i.e. not the aux-belt pulley) has a line on it. The engine case has a notch in it. You'd think that at TDC (according to the camshaft pulley) the line would point at the notch.. but no.
The notch is dead south ... the line is pointing somewhere close to 270 or 275 degrees. There's no other mark in the vicinity, other than a line I scraped myself in the past, to line up with it. All the pulleys in there seem to have locating pimples, so they can only go on one way.... so I dunno how the pulley could be fitted 90 degrees out... but could it? Or do I have a missing mark? Or is the line or the notch (or both) nothing to do with the engine timing?
2) When I fit my (admittedly cheap and made for an indeterminate Vauxhall (16v?) ) locking tool on the crank at TDC (or +90 degrees, as above, anyway), it doesn't line up with the pimple on the pulley, or the reference bolt hole. I have to squeeze the motor round a gnat's franger's width more to get the tool on. That makes the little white mark up on the camshaft pulley no longer point at the white painted pointed on the plastic cover behind it.
I *think* in the past I adjusted the cam backwards by 1 tooth, so that the crank tool and the pulley were locked and the cam-pulley mark pointed to the white arrow... but while it started okay, it ran like a box of spanners... so I think this is just an anomaly of my tool... (or I may have remembered it wrong) so curious if anyone knoes better.
3) The TDC sensor - I forgot what a Mo-Fo mine is. The countersunk Torx head screw that holds it on (after the bolt on the water pump is removed) was rounded off a long time ago and I've never been able to remove it. I change the water pump by bending the TDC sensor backing plate out of the way slightly, to get the ear of the pump in and out.
Now.. a previous mechanic and I have both nicked the water pump o-ring fitting a new pump around the moody sensor... and this time, I noticed that I'd had the usual slight water leak from the pump which had dripped onto the tensioner and seized it in the "perfectly adjusted" position. Belt tension was still good.. but the tensioner was seized/could have ended badly.
What's the best way to get a moody screw out? I suspect I'll have to remove the injection ECUs and/or the wing..
to be able to get a drill/tool on it... and I also suspect the TDC sensor itself will suffer collateral damage (you never know though). Has anyone done the same job?4) Part number for those captive nuts? ePER is a bit slow and then gives an error. They're the two holding the L shaped plastic guard to the inner wing.
Ralf S.
Last edited: