Technical Wiring Connect Nav Stilo

Currently reading:
Technical Wiring Connect Nav Stilo

japioo

Member
Joined
May 30, 2011
Messages
25
Points
59
Location
The Netherlands
Hi,
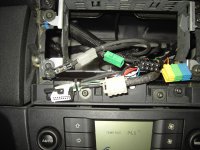
Does anyone know where the green and grey connectors are for at the back of the Connect nav+ unit ?
The two at the bottom of the photo I mean.


Thanx


connect-nav-1.jpg
 
They are for the phone (GSM) and satellite navigation (GPS) aerials. They should be in the enclosure behind the CN+, as in the first picture below.

There are also intermediate connectors for all 3 aerial leads above the dashboard fuse box, as in the second picture.

Although there are 3 leads, they all go to the same aerial, as can be seen in the third picture.

If the car wasn't originally fitted with a CN+, then the GSM and GPS leads and the 3 way aerial will also not be fitted.
.
 

Attachments

  • PICT1040.JPG
    PICT1040.JPG
    1,009 KB · Views: 448
  • Aerial Leads 2.JPG
    Aerial Leads 2.JPG
    613.6 KB · Views: 487
  • CN+ Aerial.JPG
    CN+ Aerial.JPG
    134.2 KB · Views: 363
Last edited:
Thanks for all input. Sorry for my bad English, I'm Dutch.
The reason I ask this because I am replacing the Connect Nav+ of my Stilo Abarth for an aftermarket Android radio.
I don't use Canbus for the radio because I don't need the steering wheel control, so I am going to remove the Connect Nav+ unit and do a Proxi Allignment with Multiecuscan, the settings from the Connect nav should be available than in the menu at the left panel ( or the right in UK ? ) of the dashboard.
I will take power 12 V permanent ( pin 7 ) from the battery and the other12 V ( pin 4 ) from the ignition switch.


Strange for me is that in the wiring diagram, connector C, pin 5 = 12 V for automatic aerial ( left of the red 12V wire ) but as you can see in the picture of me pin 5 is empty.


connect-nav-3.jpg


Where does the antenna takes the power from ?


Also, how to remove the antenna plug without damage ?


Schema connect-nav-3.jpg


Many thanks so far.
 
Last edited:
Stilos were never fitted with automatic electric aerials so connector C, pin 5 was always empty.

If you want to fit an automatic electric aerial, then you would need to fit a wire from that pin 5 to the sensor terminal of the automatic electric aerial. You would also need a 12v power supply to the aerial motor. Then, when you switch the radio on, the automatic electric aerial would rise and when you switch the radio off, it would lower.
.

OK Davren,
I thought it was 12 V for an antenna amplifier.
Maybe I can use that antenna for the GPS of the aftermarket radio.


I also see in the diagram Connector D, pin 13 : Crash -ve Signal from Airbag ECU ?
No problems when the Connect Nav+ is removed and Proxi Allignment is done I hope ?
 
Last edited:
I also see in the diagram Connector D, pin 13 : Crash -ve Signal from Airbag ECU ?

A -v signal is sent from the airbag ECU to Connector D, Pin 13 of the CN+ if the ECU detects a crash that fires an airbag. The CN+ will then automatically phone the emergency services (112, 999 etc.) or whatever phone number you program into the CN+.


No problems when the Connect Nav+ is removed and Proxi Allignment is done I hope ?

Correct.
.
 
Hi Davren,
You are my hero !


Two more questions for now if I may.


The Stilo antenna, is it amplified or normal ?


How do I remove the antennaplug ( before I break it ) ?


antennaplug.jpg
 
The Stilo antenna, is it amplified or normal ?

Normal aerial, there's no amplifier.

How do I remove the antenna plug ( before I break it ) ?

It just pulls out, there are no retaining clips. You can see the inside of it in my first picture in post 2 above. Click on the picture to enlarge it.
.
 
Normal aerial, there's no amplifier.


It just pulls out, there are no retaining clips. You can see the inside of it in my first picture in post 2 above. Click on the picture to enlarge it.
.
I see now, Thanx again.
Have a good weekend.
 
Hi,
It's me again.


I heard taking out the standard Connect nav bracket is not easy ?
It seems the connect nav is a bit smaller than a 2din radio.
Anyone has tips to take it out ?
 
Anyone has tips to take it out ?

The only problem getting the cradle out is the large plastic pin the goes through the hole in the bottom cradle bracket.

When I took one out a few years ago I considered sawing the bracket off, but didn't want to risk metal dust falling into the climate control panel. So I used a hacksaw blade to saw the plastic pin off, then bent the bottom of the cradle up enough to get it out. I needed to refit the cradle, so bent the bottom of it back down, then sawed the bracket off outside the car.

The plastic pin and metal bracket doesn't seem to serve any useful purpose.
.
 

Attachments

  • PICT1037.JPG
    PICT1037.JPG
    664.9 KB · Views: 185
The only problem getting the cradle out is the large plastic pin the goes through the hole in the bottom cradle bracket.

When I took one out a few years ago I considered sawing the bracket off, but didn't want to risk metal dust falling into the climate control panel. So I used a hacksaw blade to saw the plastic pin off, then bent the bottom of the cradle up enough to get it out. I needed to refit the cradle, so bent the bottom of it back down, then sawed the bracket off outside the car.

The plastic pin and metal bracket doesn't seem to serve any useful purpose.
.


Hey Davren,
That te best advice I ever heard !


Thanx.
 
The only problem getting the cradle out is the large plastic pin the goes through the hole in the bottom cradle bracket.

When I took one out a few years ago I considered sawing the bracket off, but didn't want to risk metal dust falling into the climate control panel. So I used a hacksaw blade to saw the plastic pin off, then bent the bottom of the cradle up enough to get it out. I needed to refit the cradle, so bent the bottom of it back down, then sawed the bracket off outside the car.

The plastic pin and metal bracket doesn't seem to serve any useful purpose.
.


Hi Davren,


Hope you can give me some advice.


I removed the plastic pin with a small soldering iron, it took me 5 min.


But now my problem.
I have to replace the Connect Nav+ unit of the Stilo Abarth for a Joying 2 din headunit.
I tried several brackets & fascias, none of them fitted.
Now, a carradioshop adviced me this one :


autoparts.jpg


Would this one be the right one for a Stilo Abarth ?


How is the bracket mounted into the dashboard ?
Or will it be fitted to the fascia and than completely fitted into the dashboard with the two screws ?
I have not seen it yet because it's very hard to get here in Holland and they have to order it for me but I have to buy it .


Any help is very appreciated.
 
The left plastic surround looks to be the correct shape for a Stilo, but, as you already know, the original Stilo CN+ cradle is secured in the dashboard with 5 screws. The cradle in your picture does not have the 5 corresponding holes.

Perhaps it's designed to fit inside the original cradle and secured by the other 2 metal parts. Before ordering it, ask the company for the exact outside dimensions, then compare them with the inside dimensions of the original cradle.
.


Yes, I'm almost sure that the plastic part is the right one for the Stilo.
I think the cradle is the same size as the original because I have tried the new 2 din radio into the original cradle, does not fit completely into ( half ) but the new one cannot fit inside the original.
I think it will be secured bending the little flips form the cradle.
Well, tomorrow I go to the shop and ask them to order it but I want to check it first before I buy it.


Thanx for the help and I keep you posted.
 
Last edited:
Back
Top