

cmm.sedici
New member
Anyone noticed how pathetic the boot light is in the Sedici? It was really getting on my nerves and so set about solving it.
I looked around for solutions and nothing really made sense to me. The independent PIR light/torch would be rubbish, changing the bulb wouldn't do much and may blow fuses, and maintaining a small fire in the boot just seemed impractical day to day.
So my bright idea was to use LEDs. Not the rude-boy style LEDs/Neons for headlights or side skirts, just normal, flat white LEDs. I'd be able to parallel them to the existing light without drawing too much extra juice.
You will need:
- 2 x 20cm strip of warm white LEDs (available from Maplins here)
- 7m (approx) of electrical wire (I used stuff I had lying around in my toolbox)
- Soldering iron and solder
- 1 x large cable tie (or equivalent, see below)
- CD Marker Pen
- good quality double sided tape
- sewing needle
Cost:
I had everything except the LEDs so my grand total was £13.52
From Maplins you can get the LEDs in Yellow, Warm White, Blue, Red or Green. As much as i'd like a funky colour I thought i'd keep it sensible and go for white.
Step by Step:
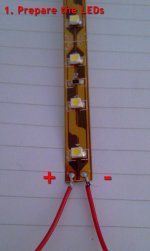
1. Prepare the LED Strips
These LED strips need to be soldered to the wire. You only need to do it at one end but they're quite small and fiddly to do. Each section comes pre-punched with small holes but they're not big enough to fit a wire through so I stuck a sewing needle through to make the hole wider and then soldered the wire on.
You'll need to attach around 3.2m of wire to each contact on the LED strip for the left of the car and 30cm to each contact on the LED strip for the right. (I'll show where the wire is routed further down so you can measure and make your own estimations).
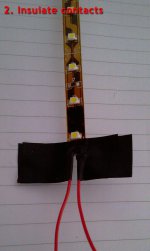
2. Insulate LED contacts
I then covered each side with insulation tape. Make a note of the + and - so you know which is live and ground (although with LEDs you're allowed a bit of trial and error because they don't die if you wire it up wrong).
3. Paint LED circuit board (Optional)
I used a black CD marker to colour in all the brown circuit board. I only did this because I knew it would annoy me if the brown showed up. CD pen worked well. i gave each strip two coats! I didn't colour in the LEDs themselves, obviously!
4. Attach double-sided tape to the underside of LED strips
The LED strips already have a peel off side so in theory you could stick them straight onto the interior, but i tried it and it wasn't strong enough. Prepare the strips with some good double sided tape.
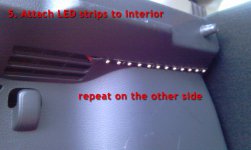
5. Stick both strips to the lip under the parcel shelf
I found two convenient places for the LED strips on a panel underneath the parcel shelf. Good for two reasons; when you're standing up the strip is out of sight, and it's in close proximity to some 'air vents' where you can route the wiring.
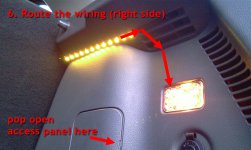
6. Route in the right hand side wiring
The right hand side is easy because you can pop open the square access panel and the boot light panel to stick you hand in and pull the wiring down through the vent and out through the boot light panel.
Remember the interior plastic is very soft so be careful if using flat head screwdrivers to pop open the panels.
The left is a little trickier........
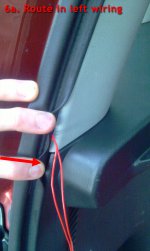
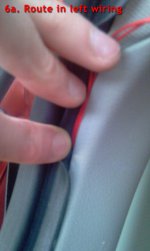
6a. Route in the left hand side wiring
I saw a few ways to get the wiring over to the right but the easiest and least destructive seems to be going around the top of the boot.
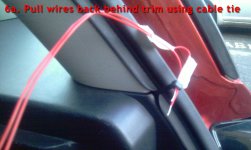
I stuck a rather large cable tie in through a gap in the trim and managed to get it to poke out the air vent. I attached the ends of the wires and pulled them through.
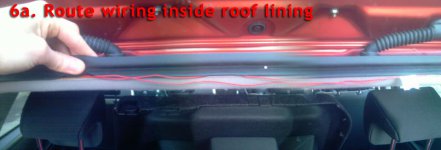
I then pushed the wires around the back of the cream panel, across the top behind the roof lining, back down behind the right side cream panel, and then reversed the cable tie process to get the wires into the back of the boot light area.
Be careful again with the interior plastic and make sure you put the rubber flaps back where they should be otherwise the boot might lose some water resistance. More importantly it makes it look crap.
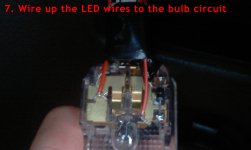
7. Attach the wiring to the boot light circuit
I did this in a few attempts so you'll be able to do it a lot tidier than me, but I essentially wrapped the ends around the contacts on each side of the bulb and insulation taped up. I'd have liked to solder them in properly but I don't have a portable one and I still see this as a trial so I can still easily rip it all out.
I attached the wires so that the LED circuit included the little switch for the boot light. This way you'll be able to switch off all the boot lighting with that switch.
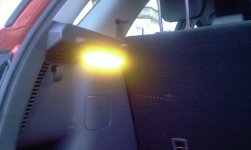
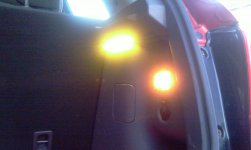
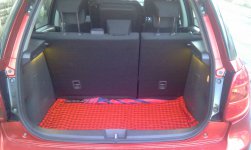
8. Stand back and admire your creation!
Thought i'd document this just incase someone else fancies doing it. I makes a lot of difference, especially if you do both sides.
Let me know what you think! Enjoy the Sedici Hack! Pictures attached!
I looked around for solutions and nothing really made sense to me. The independent PIR light/torch would be rubbish, changing the bulb wouldn't do much and may blow fuses, and maintaining a small fire in the boot just seemed impractical day to day.
So my bright idea was to use LEDs. Not the rude-boy style LEDs/Neons for headlights or side skirts, just normal, flat white LEDs. I'd be able to parallel them to the existing light without drawing too much extra juice.
You will need:
- 2 x 20cm strip of warm white LEDs (available from Maplins here)
- 7m (approx) of electrical wire (I used stuff I had lying around in my toolbox)
- Soldering iron and solder
- 1 x large cable tie (or equivalent, see below)
- CD Marker Pen
- good quality double sided tape
- sewing needle
Cost:
I had everything except the LEDs so my grand total was £13.52
From Maplins you can get the LEDs in Yellow, Warm White, Blue, Red or Green. As much as i'd like a funky colour I thought i'd keep it sensible and go for white.
Step by Step:
1. Prepare the LED Strips
These LED strips need to be soldered to the wire. You only need to do it at one end but they're quite small and fiddly to do. Each section comes pre-punched with small holes but they're not big enough to fit a wire through so I stuck a sewing needle through to make the hole wider and then soldered the wire on.
You'll need to attach around 3.2m of wire to each contact on the LED strip for the left of the car and 30cm to each contact on the LED strip for the right. (I'll show where the wire is routed further down so you can measure and make your own estimations).
2. Insulate LED contacts
I then covered each side with insulation tape. Make a note of the + and - so you know which is live and ground (although with LEDs you're allowed a bit of trial and error because they don't die if you wire it up wrong).
3. Paint LED circuit board (Optional)
I used a black CD marker to colour in all the brown circuit board. I only did this because I knew it would annoy me if the brown showed up. CD pen worked well. i gave each strip two coats! I didn't colour in the LEDs themselves, obviously!
4. Attach double-sided tape to the underside of LED strips
The LED strips already have a peel off side so in theory you could stick them straight onto the interior, but i tried it and it wasn't strong enough. Prepare the strips with some good double sided tape.
5. Stick both strips to the lip under the parcel shelf
I found two convenient places for the LED strips on a panel underneath the parcel shelf. Good for two reasons; when you're standing up the strip is out of sight, and it's in close proximity to some 'air vents' where you can route the wiring.
6. Route in the right hand side wiring
The right hand side is easy because you can pop open the square access panel and the boot light panel to stick you hand in and pull the wiring down through the vent and out through the boot light panel.
Remember the interior plastic is very soft so be careful if using flat head screwdrivers to pop open the panels.
The left is a little trickier........
6a. Route in the left hand side wiring
I saw a few ways to get the wiring over to the right but the easiest and least destructive seems to be going around the top of the boot.
I stuck a rather large cable tie in through a gap in the trim and managed to get it to poke out the air vent. I attached the ends of the wires and pulled them through.
I then pushed the wires around the back of the cream panel, across the top behind the roof lining, back down behind the right side cream panel, and then reversed the cable tie process to get the wires into the back of the boot light area.
Be careful again with the interior plastic and make sure you put the rubber flaps back where they should be otherwise the boot might lose some water resistance. More importantly it makes it look crap.
7. Attach the wiring to the boot light circuit
I did this in a few attempts so you'll be able to do it a lot tidier than me, but I essentially wrapped the ends around the contacts on each side of the bulb and insulation taped up. I'd have liked to solder them in properly but I don't have a portable one and I still see this as a trial so I can still easily rip it all out.
I attached the wires so that the LED circuit included the little switch for the boot light. This way you'll be able to switch off all the boot lighting with that switch.
8. Stand back and admire your creation!
Thought i'd document this just incase someone else fancies doing it. I makes a lot of difference, especially if you do both sides.
Let me know what you think! Enjoy the Sedici Hack! Pictures attached!
Attachments
-
 01 Prepare LEDs.jpg336 KB · Views: 63
 -
 02 Insulate Contacts.jpg372.6 KB · Views: 45
 -
 05 Attach strips to interior.jpg450.2 KB · Views: 92
 -
 06 Route right wiring.jpg485.4 KB · Views: 56
 -
 06a Route left wiring.jpg462.6 KB · Views: 49
 -
 06a Route left wiring 2.jpg405.9 KB · Views: 47
 -
 06a Route left wiring 3.jpg170.8 KB · Views: 49
 -
 06a Route left wiring 4.jpg428.7 KB · Views: 49
 -
 07 Wire into boot light circuit.jpg231.5 KB · Views: 85
 -
 08 finished.jpg419.9 KB · Views: 49
 -
 08 finished 2.jpg449.4 KB · Views: 45
 -
 08 finished 3.jpg441.5 KB · Views: 62
") a very neat and tidy job too!
a very neat and tidy job too!