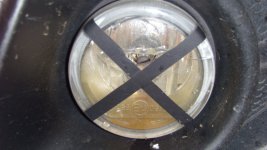
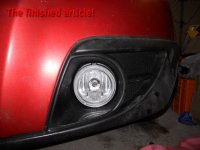
So my fog lights are now fixed!
I rang around some local garages including a few Fiat garages and got quotes for replacing both the fog lights. Majority of them came in around £330 fitted. There was no way I was going to pay that!
Instead I ordered the nearside part from shop4parts which came to £78.13 and thought i'd try fitting it myself. I didn't bother with the offside one because it's not that bad.
To fit it there's a useful thread on the SX4 Club forum where one chap fitted it using some official Suzuki instructions which involves taking the whole bumper off. I didn't like that idea and there's another guy on that thread that says it can be done without taking everything off, so I tried it that way.
Here's the thread:
http://http://goo.gl/XRCkW
So here's what I did:
(disconnect the battery if you want to. I didn't, but there is electricity knocking around the lights!)
Pictures attached.....
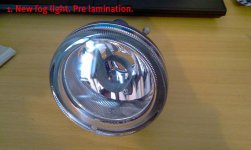
1. To save the new foglight meeting the same fate as the previous I covered it in some clear light protection film (basically laminate) from here
http://goo.gl/M8IWe. I went for the thick stuff and it cost £11.98 delivered. Was easy to stick on and will chill me out when i'm following a quarry lorry or gritter!
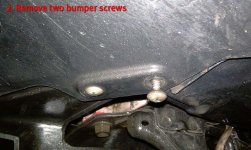
2. With that ready I unscrewed two screws near the nearside wheel arch. They don't quite correlate with the Suzuki bumper but they're in that general area.
3. I turned the wheels to full anticlockwise lock so I had better access, laid on my back and put my hand up into the bumper. The wheel was actually a nice headrest! Very comfy!
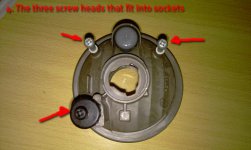
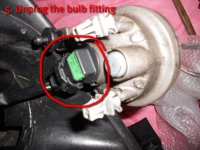
4. Now at this stage I spent half an hour messing around with the light trying to work out how to get it out. There are three screw heads that need to be squeezed out of their socket but they're very tight so this is how I did it... squeeze the top two horizontally with your right hand and try and pull it out with your left hand. The top two are quite easy to dislodge but the bottom one is a sod so I got my hand out and with the back of a hammer and some protection for the plastic, levered the light from the bottom to get the bottom screw to pop out. This should work but go careful! (hammers, glass, face etc)
5. Twist the bulb fitting anticlockwise to take the bulb out.
6. Give the bulb a little clean if it needs it... mine did.
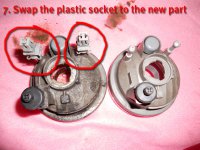
7. Swap the sockets from the old foglight to the new one. Make sure they're lined up the same.
8. Twist the bulb fitting clockwise onto the new foglight.
9. Line up the screws and push the foglight back into the sockets. It needed quite a hefty push.
10. Screw the screws back into the bumper.
Done!
Total cost: £90.11
Expensive but if you times that by 2, I'm still around £150 better off!
Hope this is useful to someone at some point!


") Nice 'How To' mate........... this is what the forum needs.....
Nice 'How To' mate........... this is what the forum needs.....