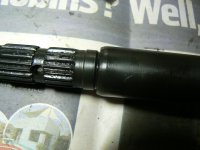
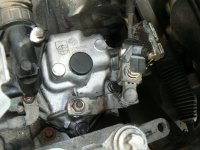
This is a continuation of the posts I started in the Panda section "what shared the drive with your Panda" which started with Becky, our Panda, and led on to being about my son's Punto which he's left with me whilst he's on his happy hols.
If you'd like to read the posts in the Panda section you can catch up with what I've done so far. Having completed the service work, there's still outstanding the poor clutch action, leaking gearbox selector shaft seal and cooling fan slow speed not working. The rusty sump (not leaking yet) and rusty front pipe are going to have to wait.
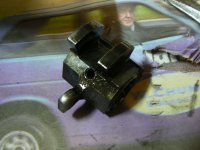
Air con versions have a two speed radiator cooling fan which you can drive using the "actuators" function in MES (Multiecuscan). When I did this I found the fan ran at full speed but not at the slower speed. It achieves the slower speed by switching the current through a resistor I could hear the relay clicking inside the under bonnet fuse box (N/S) so suspected it might be the resistor pack which had croaked. (my experience of resistor packs is that they do tend to burn out after a while - the one on the heater fan is particularly prone to it if you perpetually drive around with the heater fan on slow speeds.) I unplugged the connector at the resistor, it's a simple 2 wire job, so the current comes in on one wire, through the resistor and out to the motor on the other wire. Setting my multimeter to DC volts (20 volt setting on mine) I plugged one lead into one of the plug connections and the other into the other. So now the multimeter is taking the place of the resistor. If the rest of the circuit is OK I should see battery voltage on the meter when I activate the relay with MES. Yippee! that's exactly what happens so the relay is probably ok. I say probably because the voltmeter is passing virtually no current at all so is not really putting the contacts in the relay to any meaningful test. I could have bridged the relay plug with a bit of wire in which case I would expect the fan to run when triggered. I removed the resistor pack and this is what I found:
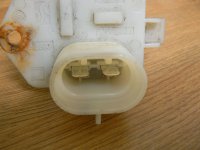
The male connector terminals and the plug were in good order with no signs of corrosion.
However the circuitry - which you can't see when the resistor is installed in the radiator shroud, just under the coolant expansion tank - was badly corroded and doing a continuity check on the terminals (Ohms scale on Multimeter) showed it to be open circuit.
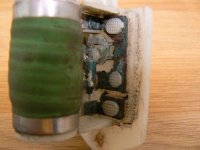
Also there were some signs of the coil itself being "distressed"
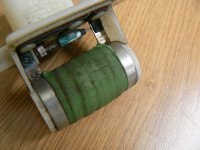
So, new resistor pack needed - anyone know where I can get a good quality one cheaply?
Then I started thinking seriously about this clutch problem. The clutch itself bites well and doesn't slip. No "funny" noises either (as in release bearing, screeching lining, etc) it's just that the pedal is about two thirds of the way to the floor before it frees and conversely it bites almost as soon as you start to lift the pedal. It's exactly like there's air in the system - even feels a little on the spongy side. I've bled it comprehensively using at least half a litre of fluid and it's made absolutely no detectable difference! I'm thinking master cylinder? DaveMcT has suggested this also. Expensive to be mistaken though with a cylinder at local factor being over £60 and even on line still around £50. As I'm sitting here it's just occurred to me that the mechanism - master and slave cylinder, actuating arm, swivel, release fork and bearing is pretty much identical to our Panda. Tomorrow I'm going to measure the distance the actuating arm moves on the Panda over a full stroke of the pedal and compare it with the Punto. I suspect I'm going to find that the Punto will not be moving anything like as much. If so I will feel much more confident to buy that M/Cylinder.
First job in the morning though will be to strip out the gear selector and renew that leaky seal. Would have done it today but the weather was not at it's best. Tomorrow looks much better. Still feeling a little nervous about tackling this as it's the first Fiat gearbox I've ever actually taken "bits" to pieces on.
If you'd like to read the posts in the Panda section you can catch up with what I've done so far. Having completed the service work, there's still outstanding the poor clutch action, leaking gearbox selector shaft seal and cooling fan slow speed not working. The rusty sump (not leaking yet) and rusty front pipe are going to have to wait.
Air con versions have a two speed radiator cooling fan which you can drive using the "actuators" function in MES (Multiecuscan). When I did this I found the fan ran at full speed but not at the slower speed. It achieves the slower speed by switching the current through a resistor I could hear the relay clicking inside the under bonnet fuse box (N/S) so suspected it might be the resistor pack which had croaked. (my experience of resistor packs is that they do tend to burn out after a while - the one on the heater fan is particularly prone to it if you perpetually drive around with the heater fan on slow speeds.) I unplugged the connector at the resistor, it's a simple 2 wire job, so the current comes in on one wire, through the resistor and out to the motor on the other wire. Setting my multimeter to DC volts (20 volt setting on mine) I plugged one lead into one of the plug connections and the other into the other. So now the multimeter is taking the place of the resistor. If the rest of the circuit is OK I should see battery voltage on the meter when I activate the relay with MES. Yippee! that's exactly what happens so the relay is probably ok. I say probably because the voltmeter is passing virtually no current at all so is not really putting the contacts in the relay to any meaningful test. I could have bridged the relay plug with a bit of wire in which case I would expect the fan to run when triggered. I removed the resistor pack and this is what I found:
The male connector terminals and the plug were in good order with no signs of corrosion.

However the circuitry - which you can't see when the resistor is installed in the radiator shroud, just under the coolant expansion tank - was badly corroded and doing a continuity check on the terminals (Ohms scale on Multimeter) showed it to be open circuit.

Also there were some signs of the coil itself being "distressed"

So, new resistor pack needed - anyone know where I can get a good quality one cheaply?
Then I started thinking seriously about this clutch problem. The clutch itself bites well and doesn't slip. No "funny" noises either (as in release bearing, screeching lining, etc) it's just that the pedal is about two thirds of the way to the floor before it frees and conversely it bites almost as soon as you start to lift the pedal. It's exactly like there's air in the system - even feels a little on the spongy side. I've bled it comprehensively using at least half a litre of fluid and it's made absolutely no detectable difference! I'm thinking master cylinder? DaveMcT has suggested this also. Expensive to be mistaken though with a cylinder at local factor being over £60 and even on line still around £50. As I'm sitting here it's just occurred to me that the mechanism - master and slave cylinder, actuating arm, swivel, release fork and bearing is pretty much identical to our Panda. Tomorrow I'm going to measure the distance the actuating arm moves on the Panda over a full stroke of the pedal and compare it with the Punto. I suspect I'm going to find that the Punto will not be moving anything like as much. If so I will feel much more confident to buy that M/Cylinder.
First job in the morning though will be to strip out the gear selector and renew that leaky seal. Would have done it today but the weather was not at it's best. Tomorrow looks much better. Still feeling a little nervous about tackling this as it's the first Fiat gearbox I've ever actually taken "bits" to pieces on.
Last edited:


