General First oil change in 10 years(!)

Currently reading:
General First oil change in 10 years(!)

PoorlyPunto

New member
Joined
Feb 14, 2021
Messages
20
Points
6
Hi all,

My 02 reg Punto has been quite neglected and hasn't had an oil change in ~10 years. In this time it's done fairly low mileage (about 12,000 miles, total mileage is 68,000) but I realise it's probably in a terrible condition, it's jet black on the dipstick.

I'm about to do this task this week and change the rocker cover gasket which is leaking in the corners. My dilemma is which oil should I use? I'm happy to spend more and put synthetic oil in like Castrol GTX Ultraclean but I'm worried about disturbing hardened sludge and it clogging the engine and making things worse. Would semi-synthetic or even regular oil be a safer bet at this point? I was considering using some sort of product to flush out the engine but I've since read this is probably a very bad idea.

Also is there any benefit to me changing the rocker cover gasket whilst the oil is drained i.e should I expect there to be visible sludge which I can remove?

Many thanks in advance!
 
Last edited:
Semi-synthetic oil is good, it's what I use mostly.

Regarding the flushing, when I got my Punto 04 plate, I noticed every year during it's service they flushed it with some product (could be a lie but who knows) and the engine seems fine.. and they've done this for maybe 4-6years. I doubt anything bad could happen with one flush but it really depends on your engines condition inside. But like you, I also did research and noticed there's a lot of cons to it so I'm staying away from it, especially due to how many times they flushed it.

You could just let the oil leak out for 24 hours or something, as that'll probably be your safest bet. Make sure if you do this, you don't have any gaskets just open for anything to fly in though.
 
Hi all,

My 02 reg Punto has been quite neglected and hasn't had an oil change in ~10 years. In this time it's done fairly low mileage (about 12,000 miles, total mileage is 68,000) but I realise it's probably in a terrible condition, it's jet black on the dipstick.

I'm about to do this task this week and change the rocker cover gasket which is leaking in the corners. My dilemma is which oil should I use? I'm happy to spend more and put synthetic oil in like Castrol GTX Ultraclean but I'm worried about disturbing hardened sludge and it clogging the engine and making things worse. Would semi-synthetic or even regular oil be a safer bet at this point? I was considering using some sort of product to flush out the engine but I've since read this is probably a very bad idea.

Also is there any benefit to me changing the rocker cover gasket whilst the oil is drained i.e should I expect there to be visible sludge which I can remove?

Many thanks in advance!
Any oil will be better than what is in there!
Replace the oil with the correct spec.

After 100miles replace the oil and oil filter .

Check again after another 200 miles if it's black again change it and filter again.

During the driving make sure engine gets up to normal temperature and keep it there for a decent length of time ie try not to do lots of short journeys.

I wouldn't bother with the valve cover gasket until oil is staying clean...ish
 
Last edited:
Hi all,

My 02 reg Punto has been quite neglected and hasn't had an oil change in ~10 years. In this time it's done fairly low mileage (about 12,000 miles, total mileage is 68,000) but I realise it's probably in a terrible condition, it's jet black on the dipstick.

I'm about to do this task this week and change the rocker cover gasket which is leaking in the corners. My dilemma is which oil should I use? I'm happy to spend more and put synthetic oil in like Castrol GTX Ultraclean but I'm worried about disturbing hardened sludge and it clogging the engine and making things worse. Would semi-synthetic or even regular oil be a safer bet at this point? I was considering using some sort of product to flush out the engine but I've since read this is probably a very bad idea.

Also is there any benefit to me changing the rocker cover gasket whilst the oil is drained i.e should I expect there to be visible sludge which I can remove?

Many thanks in advance!

Well, I’m not a fan of oil additives, but in this case what I’d do would be... Get the car warmed up, dump old oil, fill with engine flush oil and an engine flush additive and let it idle for a while, dump that oil and let drip for ages, even overnight. Fill up with oil again changing filters as you go. I would agree with Jack and change the oil and filter quite regularly after that for a while. Every 200 miles or so sounds like a plan as suggested. It may take a while.

In an ideal world, removing the sump would tell you what’s going on in there, but that’s a big hassle. Hope it goes well.
 
Thanks all for your replies. I think I'll go with the extra frequent oil change option, I'm not brave enough to attempt to flush it out. Spent too much money these last few weeks to risk blowing up the engine. Would it be a good idea to change it first with regular oil, drive it for a couple of days then change it again using synthetic oil? Then change it again after a couple of months?
 
Thanks all for your replies. I think I'll go with the extra frequent oil change option, I'm not brave enough to attempt to flush it out. Spent too much money these last few weeks to risk blowing up the engine. Would it be a good idea to change it first with regular oil, drive it for a couple of days then change it again using synthetic oil? Then change it again after a couple of months?
No just use cheap oil that's the right grade until you are happy it's no longer getting dirty quickly then use something you like that's branded .

The engine in your car is a well made very durable unit that doesn't need fancy oil- just clean oil of correct grade.

Do not use cheap filters though!!
 
Oh I assumed it's a 1.2 petrol, sorry which engine is it?

You really really should do a coolant change to stop engine dissolving internally due to corrosion
 
No just use cheap oil that's the right grade until you are happy it's no longer getting dirty quickly then use something you like that's branded .

The engine in your car is a well made very durable unit that doesn't need fancy oil- just clean oil of correct grade.

Do not use cheap filters though!!

Sorry I should have stated, it's a petrol 1.2 8v. Is this the correct filter?

With regards to the coolant, should I use a pre-mixed product or a mixture of coolant + water? Does it just need draining and refilling or does it need to be flushed out with something? How difficult of a job to do is it?

Thanks for all your help!
 
Last edited:
This post contains affiliate links which may earn a commission at no additional cost to you.
Sorry I should have stated, it's a petrol 1.2 8v. Is this the correct filter?
I don't know

Try partsinmotion.co.uk put your reg number in and look at filters.
 
This post contains affiliate links which may earn a commission at no additional cost to you.
Sorry I should have stated, it's a petrol 1.2 8v. Is this the correct filter?

With regards to the coolant, should I use a pre-mixed product or a mixture of coolant + water? Does it just need draining and refilling or does it need to be flushed out with something? How difficult of a job to do is it?

Thanks for all your help!
I had a quick look at filters , it appears that there are a few options depending on specific engine-may I suggest looking at the one that's on there for make and part number.

Someone else can explain about coolant as how easy /difficult depends on type of tank where you add coolant.
 
This post contains affiliate links which may earn a commission at no additional cost to you.
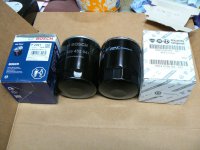
In relation to your filter. Trying to identify/match a specific manufacturer's product without their references - either on line or from the manufacturer's written info - can be difficult. I buy my filters either from Shop4parts (sorry folks, I'm plugging them again, but they really are just so helpful) or from my local motor factor. So it's up to them to supply the correct filter from the reg no of my vehicle. I really don't get any problems doing it this way. Most of my FIAT knowledge relates to the F.I.R.E. engines and I've found the filters are pretty much interchangeable - which is to say they mostly will satisfactorily screw on but some filters are much shorter than others so obviously don't contain so much filter medium. When you cut them open they all seem to have exactly the same spring loaded bypass valve in the bottom too. So as long as the thread (which seems to be metric 20 on all ours) is correct and the diameter of the sealing ring is correct for the face it seals too then likely it will work. I keep the "long" version in my spares box whenever I see them going at a good price. Here's a Bosch on the left (I got a 2 for 1 offer on those and the other one is on the Punto right now) the one on the right is a genuine Fiat one from S4p:

P1090652.JPG

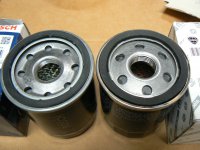
P1090653.JPG

Interesting to notice the Bosch is made in South Africa and the Fiat/Lancia is made in France. I don't think it matters, Location of manufacturing plant is so diverse now a days. I think it's the quality control insisted on by the brand name that's now probably more important? Difficult for the "punter" to judge quality, I think you just have to buy a trusted name, but one thing to look for is that, because these filters fit to the engine horizontally, that there is an anti drain back flap under the ring of holes in the top - look at the images above and you can't see the filter medium through the holes can you? that's because what you are seeing is the material of the rubber disc which is a flap closing off the return path for any oil trying to leak out and return to the sump when the engine is not running. Oh, and if there is even a hint of swarf or "foreign bodies" inside where you can see down the big hole in the middle then reject it.

I'm one of those who is not keen on flushing additives being used in "dirty" engines. I think there is a good case to be made for their use in "clean" engines where the oil is being changed regularly and they will keep the insides of such an engine spotlessly clean. However in an old and dirty engine where heavy build up of sludge etc is suspected I don't like the idea at all for all the well known reasons. I've worked a lot on small horticultural engines - lawn mowers etc - and it's only on the larger professional machines that you'll find oil filters are used. Small machines - your average domestic lawnmower with perhaps a 3 or 4 Hp IC engine - are sadly abused terribly with many never having their oil changed and just topped up when the owner notices it's level is low. When you strip one of these engines you'll find the sludge stacked up in all the corners and dead ends. On some it's really amazing how much there is, but it's been happily sitting there, perhaps for years, without bothering the engine at all. The last thing you want to do is loosen this stuff up so it can merrily travel round with the oil! So, I think that if you're not going to strip and clean an engine "properly" then just let sleeping dogs lie! My boy's 2012 1.4 8valve Punto is quite a low mileage example and when I took the cam cover off to lock the cam doing a cam belt on it, it was very noticeable that there was a fair amount of crusty black deposits on the head and cam carrier castings etc. I'm pretty sure this car has been a "shopping" car, which would explain the low mileage (in the high 30,000s when bought) I was not at all tempted to try to clean this as "bits" would be almost certain to fall into the engine internals and anyway, there's going to be more "gunge" in other bits of the engine internals I can't possibly reach. Instead we are doing regular oil changes every 5,000 miles approx with new filter each time and in time the detergent in the new oil will very slowly "melt" the deposits, just a little bit at a time, and it'll come out with the used oil. More importantly though, we are not likely to get solid particles swimming about in the oil and, maybe, partially blocking up the oil pickup strainer gauze. Any deposits that "prefer" to just stay where they are are quite welcome to do so! Interestingly my higher mileage - mid 60,000 miles - 2010 1.2 Panda was beautifully clean when I took it's cam cover off to do it's belt, almost certainly because it had done longer journeys where it had got "properly" up to temperature.

By the way, when you renew the cover gasket, clean out the groove and surface on the head with a degreaser - brake or carb cleaner works well - and sparingly apply a little sealant to the end corners. It doesn't need any on the side flat runs of the gasket but the corners and up over the "hump" you'll find it tends to leak here if you don't use sealant.

regarding what oil to use? These F.I.R.E. engines are pretty robust - but keep an eagle eye on coolant level, they do not like getting too hot and are well known for blowing head gaskets if you let the coolant run low - If you want to get really technical about it you need to find the fiat spec for your engine - It's FIAT 955535-S2 for both of ours, look in your manual - but they'd be happy on almost any 5w-40 weight to European spec ACEA C3 or, if you prefer the American spec API SN/SM. My personal preference is for Fuchs GT1 5W-40 which meets all these specs and can be often found at a good price on ebay.

Renewing your coolant? first off, how long do you suspect it's been in there. If for the 10 years then you need to do it as the additives will be all used up although it may well still prevent freezing. However, how long has it been since it had a cam belt, if ever? a rough guide would be every 5 years or 50,000 miles, which ever comes first. I start looking for an opportunity to do ours when they pass 4 years or 40,000 miles, If the answer is 10 years, or more, that needs done like yesterday! If the cam belt is being done soon then the water pump really should be done at the same time and in that case the coolant will need to be drained so this is an ideal time to do it. The difficult bits doing the coolant change are usually getting the bottom hose off to drain the old coolant and doing the heater bleeding once you've refilled it. If you're going to get a garage to do the belt just leave the coolant change up to them at the same time - and, unless the auxiliary (fan) belt looks like it's been renewed recently just put one on at the same time - they'll have to take the old one off to do the timing belt anyway so the only additional expense is the trifling amount for the belt itself.
 
Last edited:
Thank you so much for your detailed reply. I was looking at the oil filters on Parts in Motion and can see 2 size options (well, 3 technically but one says engines up to 09/2000) so I've ordered one of each but as you've said the thread diameter is the same I may end up using both this year if regular changes are to be done.

The condition of the coolant has me a bit worried because I'm sure it hasn't been changed in the past 10 years and it's possible it's never been changed at all. I think this job will prove tricky for me and my friend who is doing most of the work but we could come back to it when some of the other stuff is out of the way. How much do you think a garage would charge to do it? I think I remember reading a thread on this forum about how difficult it is to bleed the radiator.

The timing belt I wasn't planning on doing because it's probably beyond my abilities but again I could come back to it later on if it really is a ticking time bomb. How much should I expect to pay at a garage and would they definitely change the coolant at the same time?

I don't want to sink too much money into it because it might only have ~2 years left before corrosion catches up with it. Both subframes look quite bad, rear coil springs, brake hoses all mentioned on MOT advisories in the last few years. Oddly last year's MOT was a straight pass with no advisories but none of these components have been replaced and I'm sure the corrosion hasn't magically disappeared. It's had minor welding done to the floor in the past. Once it starts needing major repairs I'll probably scrap it. So I'm a bit reluctant to spend £200 - £300 on a timing belt that might not fail in that time. Although ideally it would be nice to have peace of mind that it won't fail driving down the motorway!

Thanks again for all your advice it is very helpful. :)
 
Last edited:
The condition of the coolant has me a bit worried because I'm sure it hasn't been changed in the past 10 years and it's possible it's never been changed at all. I think this job will prove tricky for me and my friend who is doing most of the work but we could come back to it when some of the other stuff is out of the way. How much do you think a garage would charge to do it? I think I remember reading a thread on this forum about how difficult it is to bleed the radiator.

The timing belt I wasn't planning on doing because it's probably beyond my abilities but again I could come back to it later on if it really is a ticking time bomb. How much should I expect to pay at a garage and would they definitely change the coolant at the same time?

So I'm a bit reluctant to spend £200 - £300 on a timing belt that might not fail in that time. Although ideally it would be nice to have peace of mind that it won't fail driving down the motorway!

Some people seem to get themselves in a terrible mess bleeding the air out of the cooling system after it's been completely drained and refilled. So far I've had no problem with the various Pandas we've owned and my boy's 2012 Punto. The problem area seems to be getting coolant to circulate around the heater system largely because the pipes are slightly above the engine and radiator level. I'm not completely familiar with the earlier Punto but when I'm doing this, once I'd drained the old coolant and reconnected the bottom hose, probably with a new hose clip - Jubilee type - (I like to just disconnect the hose itself where it goes into the bottom of the radiator to drain) Then the bleed screws need to be opened. There is usually one on the inlet hose to the heater matrix - this will be a smaller pipe than the radiator hose and will come from the cylinder head, often near the thermostat and go through the bulkhead to inside the car. There is also often, but not always, a bleed on the radiator top tank which you should also open. These are most often small plastic thumb screws and easy to break, so don't get violent with them! Perhaps I should say it's also a good idea to flush fresh water through the engine, radiator and heater matrix to shift any sediment before you reconnect hoses and fill with new coolant.

If you are making up coolant from concentrate then premix it (I always do a 50/50 mix). I use 2 litre soft drink bottles which are easy to pour into the radiator tank. So now add coolant until the system seems to be full. It won't be because there will be trapped air. If time is not an issue, now let it sit for 15 to 20 minutes. Some of the trapped air will find it's way out during this time so top up the header tank again. Now, with both bleeds still open, start the engine and run it at a fast idle (1500 to 2000 rpm is more than enough. If your set up has a bleed on the radiator you'll probably find a little bubbly aerated water will be expelled and then it will stop bubbling and clear coolant will start to be expelled. Now close the bleed - don't snap it off by being ham fisted, it only needs to be "nipped up". If there is no bleed on the radiator you don't need to think about this. Top up the header tank again if needed.

Now the bit everyone seems not to understand. The bleeding of the heater. Ok, you've still got the header tank cap off. (you don't need to have the header tank/radiator cap on while you are doing this). and the engine has only been run quite briefly so far so it will still be cold. Because it's cold the thermostst won't be open so no circulation is possible through the top radiator hose, radiator and bottom hose. When cold the engine is pumping coolant from the cylinder head through the small heater pipe we mentioned earlier - which has the other bleed on it - into the heater matrix (a wee "mini" radiator inside the heater unit inside the car) and back out through the return hose to the engine block again. It's with the engine cold and thermostat closed that you've got the best chance of flushing air out of the system through the heater hose bleed because the water can't go anywhere else. Again what should happen is that bubbly water/air should be expelled from the bleed. When the bubbling stops then close down the bleed screw. Now, keeping a hand on that heater hose, continue to run the engine at fast idle and the hose should start to heat up quite quickly as the engine heats the coolant. During this phase you need to keep watching the header tank level and top up if necessary. This hose will continue to get hotter until the water in the engine is hot enough to cause the thermostat to open (around 90 degrees C - so it's going to get pretty hot to the touch) Up to this point the top radiator hose will stay cold because the thermostat is closed so no water can flow. If you hold on to the top hose as well as the heater hose you will find that, all of a sudden, it - the top hose - will get very hot very quickly (this is because the hot water in the engine is now able to come past the thermostat as it opens and flow into the radiator. At this point it's not unusual to find a big "burp" of air which has been in the top hose will bubble up through the header tank and you will need to top up the level again. After she's run for a few minutes with the top hose and radiator hot to the touch top up the header again if needed and screw down the cap. Get in the car and check the heater is blowing hot air. If not you've either got air still in the heater circuit or, maybe, a blocked heater matrix core. If you think you still have air in the heater circuit it's maybe best to let her cool down again and try rebleeding the heater hose. I say to let her cool down before doing this because if you let her cool enough to let the thermostat close again then you'll get a much more vigorous circulation of water through the heater pipes. If you had a working heater before you drained her and you don't after refilling then almost certainly you've still got air in the heater pipes somewhere - just keep on bleeding!

During filling and bleeding you need to have the header tank/radiator cap off so you can top up. I've not found this gives any problems. However once the cap is replaced and screwed down your system will pressurize and it's never good to take a coolant cap off when there's pressure in the system. So, if you subsequently find you need to top up later - there is often a small amount of trapped air which will find it's way through to the header tank for a wee while after a coolant change so you may find a wee top is needed later, maybe even a couple of days later - DON'T take the cap off when the system is up to working temperature or you may find hot coolant squirting out which will burn you! Also worth mentioning to look out for rotating stuff and belt drives and also the electric cooling fan which might kick in with no warning, Life's much easier with all your fingers and thumbs!

Timing belt? As far as I know the 1.2 F.I.R.E. engine only became an "interference" engine when they introduced the 69hp VVT version (around 2011?) so your's is almost certainly not going to bend valves if the belt packs in. Still extremely annoying and quite dangerous if it "lets go" in the fast lane of a busy motorway though! If you look in the Grande Punto section and search the "Guides" (look for the wee hammer symbol) you'll find Andy Monty's excellent guide to changing a cam belt on the later model engines. It's listed as "1.2 8V EVO 2 Engine Cam Belt replacement" This will give you some idea of what is involved in doing a belt on one of these engines. I think It's possible your engine may be early enough that it will have timing marks on the crank and cam pulleys? if so it's simpler to do in that you don't need the kit of timing tools, all you do is line up the pulley marks when fitting the belt. My old 1992 Panda was like this. The good thing is these are very simple belts to do so nearly any small competent garage could do it. Occasionally though there is a timing issue to resolve after the new belt is fitted and specialized diagnostic equipment will be needed. For that reason I would advise you to get a trusted independent Fiat specialist to do the job if you are not going to have a go yourself.

Of course, not having seen your engine it's difficult for me to tell but I think this may be the same as yours? https://www.youtube.com/watch?v=K5cZ7rrsw10 Even if it's not it gives you the low down on doing the older engines which don't need the locking tools. By the way, if you are going to change the belt then be aware it's very often a failure is due to the bearings in either the water pump or idler packing in and allowing the belt to slacken and skip teeth on the pulleys. It's very tempting to buy just the belt because they can be bought very cheaply. However if a bearing fails it won't make any difference if the belt is new or old!
 
I was just re-watching the Continental video clip I posted the link to above and it occurs to me that less experienced people will be thinking "Well, without that electronic sonic tension checking tool I won't be able to do this". Nothing could be further from the truth!

Tensioning the belt correctly on these older designs is just a little more demanding than on later designs because the later designs incorporate a spring tensioner within the setup. The tensioner applies pressure to the belt because it's mounting bolt is excentric to the axis of the bearing so rotating it about it's mounting bolt alters the tension on the belt. On later setups the correct tension is usually applied when the tensioner is rotated until two pointers are in line and the locking nut tightened up. The integral spring arrangement allows the tension to be uniform as it allows small movements of the tensioner under the influence of the spring when the engine is running and requires very little judgement to be exercised by the installer, just line up the pointers.

On the earlier setup there is no automatic spring tensioner so the tensioning roller, once it's locking nut is tightened, will be applying whatever tension has been achieved by the installer during instalation.

I got very obsessed with belt tensioning when I first got involved with doing timing belts back in the '70's - cars like the Fiat 128, Ford Cortina (Pinto engine) Leyland Princess & Marina with the "O" series engine etc, etc. My recollection is that most of these engines had "fixed" tensioners (I seem to remember the Pinto had an interesting spring which applied pressure to the tensioner before you tightened it's locking nut to try to eliminate the "rogue" element of inexperienced fitters, but once tightened it was fixed.

My old '92 Panda Parade had a fixed tensioner. Our newer 2010 Panda Dynamic eco has the more modern "automatic" spring type tensioner and I think the spring type "automatic" tensioner is a very big improvement because, as long as you line up the marks/pointers you will achieve correct tension. Fixed tensioners pose a bit more of a problem for the inexperienced.

There are numerous videos showing you how to adjust the tension until you can twist the longest run of the belt through a quarter of a turn by applying "reasonable" force to it by hand. This video shows the test at about 20 seconds in: https://www.youtube.com/watch?v=9RAUtE2aztk and it's quite a good way to check a belt for tightness.

However, always a "however" isn't there? it occurred to me that engines get very hot when they are working and hot things, in general, expand don't they? So I started wondering if the centre distance between the crankshaft sprocket, camshaft sprocket, water pump sprocket (if it's the type of engine that incorporates the water pump in the cam drive) and the tensioner changes noticeably when the engine is hot compared to when it's cold. So I observed several engines fitted with automatic spring tensioners and guess what? Yes it does! Most tensioners are set up with the engine cold where the pointers on the tensioner are set to line up/overlap or whatever. When the engine is fully up to temp - so after a good drive when the block etc will be fully heat soaked, the pointers are substantially offset. Of course the automatic tensioner compensates for this with it's spring but I started thinking then "what about the older "fixed" type which lacks this feature. So i started experimenting with Felicity - our '92 Panda which has the "fixed type" tensioner. If you set the belt to the 90 degree twist when cold then it's really "bow string" tight when full up to temp. This worried me so I evolved this way of doing them.
1. Fit the belt, tensioner etc and adjust until the belt is not actually loose but not "tight" either. The engine can now be run up to full temperature with no fear of the belt getting too tight. Needs to be run for maybe 15 minutes after achieving normal temp on the gauge or better still, taken for a wee drive but that might be inconvenient if a lot of guards and mounts etc need to be replaced and then stripped off again.

2. Stop the engine and let it sit for maybe 5 minutes for the heat to generally equalize throughout.

3. With a spanner/socket on the crank bolt slightly turn the engine DOR to make sure the "driving side" of the belt is fully tensioned with no slack and slacken the tensioner locking nut about half a turn or so - just enough so the tensioner can be easily moved.

4. Select the longest run of the belt on the "slack" side - on our Pandas etc this would be on the left looking at the "front" of the engine between the crank sprocket and tensioner - and place your forefinger on one side of the belt and thumb on the other. Now SLIGHTLY slacken the tensioner and "waggle" the belt between your finger and thumb. You'll feel a small amount of "slack".

5. Slowly and gently rotate the tensioner until the slack you are feeling is completely eliminated but you are not attempting to "stretch" the belt either. As a matter of interest if you try the quarter turn test now you'll find it works perfectly. However what you will find when the engine is completely cold is that there is a just perceptible, infinitesimally small, amount of "slack" in the belt if you try waggling it because, of course, there is no spring loading to take it up.

Note. Describing the cold belt as having "slack" is not really right, a slight lack of tension might describe it best? I've adjusted belts on a wide variety of older engine using this method and never known of a problem being caused. My "worry" with fixed (non automatic) tensioners is that if you adjust the belt tightly with the engine cold it will then be very much too tight when the engine is hot and I think this worry is well founded as you used to hear tight belts "singing" at traffic lights and when in slow moving traffic quite often, but these days, with most tensioners being of the automatic type, I can't really remember when I last heard a singing/whining belt?
 
Last edited:
Back
Top