Technical MAP sensor known good?

Currently reading:
Technical MAP sensor known good?

El Capitano

New member
Joined
Feb 24, 2021
Messages
11
Points
2
Hi,

Can anyone advise me what a ‘known good’ MAP sensor reading is at hot idle on a 2004 8v 1.2 engine?

My scan tool shows 4.2 psi at hot idle (OBD2 data) which looks plausible but if someone could confirm that would be great.

The reason for asking is that there are huge -ve fuel trims at idle, STFT is -15 and LTFT is -100 so my first port of call is an air leak, I can’t find one but that doesn’t mean that there isn’t one!

Many thanks,

Colin
Your scan tool is highly likely to be confused by fiat software especially the long term trim - ignore it.

If you are not getting a eml on dont worry about it.

Do you have any fault codes?
 
Thanks for the reply.

No EML or fault codes but the MOT emissions test indicates high CO and high lambda after the second fast idle test which are indicative of overfuelling and the reason I looked at the fuel trims in the first place.

The cat has been confirmed as good by a garage.
 
Some thoughts.
If injectors are leaking, you'll get excess fuel. The large negative trims could be compensation for this.
High CO is excess fuel isn't it? Excess air makes it weak, which should give lower CO and high oxygen readings. If the problem is after the high idle, does that mean the injectors are leaking more fuel after they've been told to shut?
 
Hi,

Thanks for your reply.

Leaking fuel injector(s) are on my list but are not easy to test so I’m going for the easy stuff first.

A high MAP pressure reading generated from an air leak will fool the ECU into delivering too much fuel as it thinks that the load on the engine is higher than it actually is. The fuel trims try to peg back the excess fuel.

I can’t cross an air leak off my list until I know what the MAP reading should be.

Thanks,

Colin
I think the map pressure reading is about right.

With a maf sensor air leaks can be a real problem if the leak is between the maf and inlet.

Map sensor less prone to air leak problems because the ecu calculates the amount of air entering the engine from the map reading. The map sensor gives a correct reading if the air is entering the manifold via the throttle butterfly or through a leak.

The map sensor is not a load sensing device.
 
What engine coolant temperature does scan tool show engine warm?

Air inlet air temp?

Enter closed loop?

Stay in closed loop while at idle for a few minutes or drop in and out of closed loop?

Does voltage output of precat o2 sensor switch between around 0.2v and 0.9v ?
 
I don't have the MOT emissions sheet to hand so can't upload it yet. From memory everything OK apart from CO and lambda.


ECT 176 F

IAT 61 F (seems a bit high as ambient air temp about 38 F)

In closed loop and steady - although I didn't watch it closely.

Pre cat O2 sensor switching as expected.

Post cat O2 sensor fairly steady around 0.6 - 0.7V

Running the engine at 2200 rpm reduces the STFT to 0 and the LTFT to -28
 
El Capitano;4582846 I can’t cross an air leak off my list until I know what the MAP reading should be. Thanks said:
A MAP reading on idle should be under 0.3 bar and above I think 0.25 bar. 4.2 psi is 0.29 bar so your MAP reading is good.
 
Pre cat O2 sensor switching as expected.

Post cat O2 sensor fairly steady around 0.6 - 0.7V

Running the engine at 2200 rpm reduces the STFT to 0 and the LTFT to -28

If your reading is not a steady line, but an oscillating one between those numbers 0.6-0.7V, that is a good reading, the O2 sensor works fine.
 
Last edited:
I found a recorded graphic I took some time ago.
No particular problem at the time, just a very bad quality petrol I've put in.
 

Attachments

  • image.jpeg
    image.jpeg
    108.8 KB · Views: 54
I think a cleaning of cat would help your cause. I did a very effective cleaning and posted the "how to" here too.
If you are interested, this is how I did it: washed the cat with vinegar.
I've prepared the car by taking off lamda 1 sensor, the one before cat, on cold engine because that is where you pour the vinegar in. Then, put the lambda back on, without tightening it too much to be easy to take it off again when engine is hot. I've prepared a funnel on which I attached a heat resistance pipe, I used the small part of an old breather and some other hose between it and the funnel. Tested it on cold engine and it could fit nice, giving me space to pour the vinegar directly into the cat.
Then, with lambda back on and connected I've turned on the engine and let it run until it heated up to the working temperature.
Next, turned the engine off and carefully got the lambda 1 off and poured 1 litre of vinegar into the cat. You have to be careful because the engine and exhaust (including cat) are very hot.
After that, put the lambda back on, connected it and start the engine again.
Revv the engine above 3000 RPM for about 5-10 mins and that was it.
Put the shield and everything back in its place and have a cleaned cat, the very obvious result is the acceleration response is as it should be, in real time with no lag.

And yesterday I cleaned my injectors, I'm very satisfied with the result and if you are interested I can tell the how to.
 
Sounds like the MAP reading is correct although I will continue to check for an air leak just to make sure.

Although the cat has been deemed OK I might clean it in the future so thanks for explaining your process.

I would be interested in your injector cleaning process as I think I’ll be going down that route - as portland_bill suggested.

When I’ve got to the bottom of the problem I’ll report back - it’ll take some time as the vehicle is almost constant use and I can’t get to work on it!

Cheers everyone.
Please post a photo of the mot emission test print out.

Did it pass the mot test ?as you are continuing to use it.

Cheers

Jack
 
One last detail that I forgot to mention about cleaning the cat is not to forget to clean the precat O2 sensor too, with a cloth and vinegar.

The injectors cleaning process: first of all, I'll put the link of an youtube video with the method, the explaining in this video is in Romanian, but the images speak louder than the voice:
youtu.be/RgfcghsAjG8
So what you do is to spray carb cleaner through a sealed system into injectors and connect the injector to DC to open it, so the cleaning to be properly done. The system in this method is a syringe of which you take the piston out and put the injector instead and on the tip of the syringe you fix the carb spray's pipe. When all is in place, push spray in, it will be under pressure, then connect the injector to open and let the spray go through and do the cleaning.
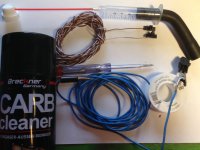
Basically that is the method I used and I made some little adjustments to be able to use it. I have a photo with these.
First of all, I couldn't fit the injector in the syringe and I used a piece of hose that I found around, something from an old car. Luckily that hose was a perfect fit and it has one end wider than the other, that is where I put the injector and the other end fits perfectly into the syringe. I don't have an injector at hand now as I've placed them back on the car and I took the picture now. One thing to be careful here, when you do the cleaning, hold the injector and hose in the hand, as by spraying cleaner, pressure builds up and when I've tested if the pressure stays in, I pressed a bit too much in and the injector was projected out of the hose with a "boom" sound. It hit the table that was close underneath and luckily it didn't get damaged.
At the other end, the tip of syringe, I used some teflon tape on the pipe because it was thinner than the inside of the syringe's tip. Placed that tip with teflon in and then, what you don't see in the picture, I taped together the pipe and the tip with a little bit of power tape so that pressure won't open them apart.
So this is the sealed system that you use, to push spray inside the injector.
Now for that part I think that another similar system could be made and maybe is a little bit easier to use. That is to place the same syringe on the injectors' rail, instead of the fuel line and let all the injectors connected. Then one at the time, conect the DC to the injector and that is it.
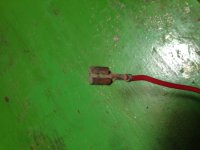
For the wiring (and for picture's purpose I found this old injector's plug that broke off) I used the wires with those little black plastic pieces on tip. I don't know were that came from, it was a cross-kind thing that I cut in half and it fit very good on the injector's connectors. I think you can fit some little plugs on them as well (plugs being connected to wires) or as in the picture, you can use two cables from checking lamps and put the little pliers on the connecter. If you use little pliers, the best is to put some tape so that pliers won't touch when you move injector around.
So that's kind of it. I didn't take the battery down, just performed the cleaning on the car. I've connected a wire to - negative voltege on batery and the + one just touched the battery's + when needed. Took a cloth in hand, at the tip of the injector, hold the injector and the hose steady, sprayed carb cleaner and connected the positive contact wire. At first the jet coming out of the injector was really poor and in a few seconds it got really good. Disconnected the + wire, sprayed some more cleaner and connected again until it was good. Did that to all injectors, then placed them back on. The result is good, I like it, the car runs smoother now and at this time it shows an improvement in fuel consumption. I know is early for that as I took only a little trip but I compare it with how it was before. And before, for the early kms done (up to about 50) the computer always showed me a higher fuel consumption than later on, so it was alway way above 10l/100km, even 15. Now for 13.3 km done it is 9l/100km.
One little tip: to be able to get the injectors out with ease, after you get all the screws out, grease the tip of injectors. I used engine oil, there is place to put a little bit of oil towards the injectors' o-rings. After I got the rail with all the injectors out, I did the same to get them out of the rail, used oil. And I did the same when placing them back on, I've oild the o-ring and they've just popped in very easily. If you don't grease them it's really hard to put them in (and also to get them out) and you can even tear the o-ring.
The time to do this cleaning was about 1 and a half hour but that includes the time to have the sealed system done (and I adapted the video presented method with adding the hose).
 

Attachments

  • image.jpeg
    image.jpeg
    1.2 MB · Views: 20
Hi Jack,

I'll post when I can, the car isn't mine and it, and the paperwork, is in a town about 15 miles away so I can't put my hands on it right now.

It did pass the MOT but my concern is that overfuelling will eventually destroy the cat so I want to find and rectify the fault sooner rather than later.

Hi Mike1alike,

The procedure looks interesting and I might give it a go. The hardest bit for me will be finding the right connector but even that shouldn't be too difficult.

I was in Timisoara a couple of years back on a motorcycle trip, nice place.

Cheers,

Colin
 
The procedure looks interesting and I might give it a go. The hardest bit for me will be finding the right connector but even that shouldn't be too difficult

I must admit I found that bit to be hard too, before I got to it. Luckily I found that plastic bit that fit.
But here's an idea: you could use connectors like the one in the picture. The injector's connectors are really small, like 3mm or so. If you don't find such small ones, you can use bigger ones like that in the pic, that is a 6mm, but cut half of the part that connects, one wing. For the purpose, one wing on will suit you nice, you place it on the outside on injector's connector and that way you are assured they won't touch between them to make a shortcut. If that remaining half is too loose for the injector's small connector, you can press it to close tider befor putting it on. I think you'll manage.
 

Attachments

  • image.jpeg
    image.jpeg
    1.1 MB · Views: 17
Back
Top