General Punto sporting 1.4 Temperature sensor housing replacement

Currently reading:
General Punto sporting 1.4 Temperature sensor housing replacement

sponger

Member
Joined
Dec 8, 2013
Messages
48
Points
59
Location
New Zealand
I have a 2005 fiat punto sporting 1.4.

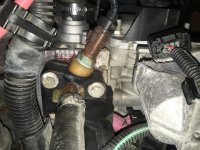
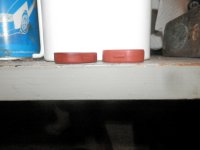
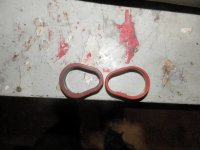
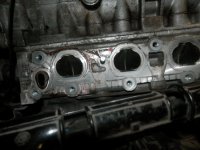
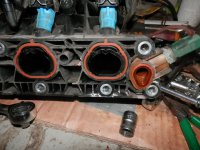
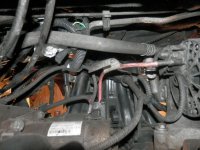
When I recently replaced the thermostat I noticed coolant residue near the temperature sensor. Having cleaned up the area and having kept an eye on it, it seems to be losing a small amount of coolant from the temperature sensor housing rather than the sensor itself. (by small I mean a few drops under the housing after 50km of driving, no noticeable level drop in the coolant tank).

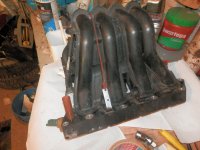
Has anyone replaced this housing before? It seems to be held in by the intake manifold, so I think this would need to be removed to replace the housing. Is this correct? If so, does the fuel rail need to be de-pressurised?
(I have seen some 1.4 engines with the temp sensor housed in the thermostat, this 1.4 is different).


Before I start taking things apart I thought I would seek advice/instructions/suggestions on the best process.

Any suggestions or instructions greatly appreciated.:)
 
Thanks for the reply Judderbar.


Having finally had a bit of time to start looking at it, the leak is not from the hose. It is seeping from the housing itself - I presume a micro-crack or a failure of the gasket behind it.

From what I have discovered from removing the airfilter assembly and having a better look at the housing, it is held on by the intake manifold. From searching online it seems there were at least three variations - a separate housing held on by two bolts (like you seem to suggest); a housing/branch of the thermostat housing; and the one found on my car - the worst one to replace, just my luck;).

There is a mention of this on the forum - https://www.fiatforum.com/punto-ii/356730-leak-temp-sensor-housing.html?356730=#post3541090

If you go to
https://www.fiatforum.com/attachment.php?attachmentid=35275&d=1196701373
you can see the part - it is referred to as a heater hose.

Unfortunately there was not much in the way of detail in getting it all apart.
From what I can see the fuel rail is attached to the intake. Am I right in assuming I can leave that attached and take it off as part of the intake manifold itself?
The intake is hard up against the alternator I am hoping I don't have to remove that to get it off!;)

Thanks in advance for any suggestions (my brother's suggestion is "throw it away!":yuck:

If the leak is very small it will have almost no damaging impact on your cooling system providing you have the correct corrosion preventing antifreeze in the car - which might not be obvious when you are living in New Zealand.

Have you tried tightening the bolts holding the housing?


Getting the fuel rail off is not difficult if you have the ribe sockets needed - I am not sure it needs to come off anyway to get to the top inlet bolts. The best way to see the lower bolts for the inlet is by lying under the car.


I tend to be a person who fixes things but given the amount of work to stop this small leak and your brother thinks you should throw the car away I think it best to enjoy the car as it is.

By the way. On my car you cannot see the housing is a separate part to the manifold until you start taking things apart. It is just impossible to see into that area. My 1.2 16V car has the same cylinder head extension part number as the 1.4 engine. The cylinder head extension is on top of the cylinder head. You might be lucky and find you do have the removeable housing.
 
Last edited:
Thanks for the suggestions Judderbar. I am definitely considering leaving it alone and keeping an eye on it (the lazy way out;)). Although the leak is very small, to me the danger is air getting in. I suppose I could just occasionally bleed the system. I know the coolant is in good condition because I replaced it when I did the thermostat a month ago.

I started dismantling things and it is definitely a manifold off job. (hopefully the photo shows this). I tried tightening the manifold bolts near the housing but there was no movement at the highest force I was comfortable subjecting them to.
I had a look from underneath and can manage to access all the bolts holding it on, although I may have to remove the starter motor to gain better clearance.

I have ordered the part and some new manifold gaskets. The New Zealand Fiat agent quoted the equivalent of 125euro with a 6 week wait while they get sent from Italy!:eek:
Luckily I found someone else who had the parts in stock at a third of the price.(y)

When the parts turn up I will have to make the decision to proceed or not. I have used the opportunity to give the car an oil and filter change today. Will probably change the gearbox fluid tomorrow - a bit of routine maintenance whilst waiting for parts to arrive.
 

Attachments

  • IMG_4009.jpeg
    IMG_4009.jpeg
    2.3 MB · Views: 59
It never rain, it pours!!!

Yesterday I went to put my sump plug back in having sourced a new crush washer after draining the oil. Having started it by hand, and getting a ratchet on it, it had just started to tighten up when it went loose. Oh no. Unwound it to find that the previous person to work on it must have stripped the thread - the helicoil they had used to repair came out.

Having never dealt with this type of thing, I take it my options are another helicoil or to retap the hole and source an oversized plug.
Any suggestions??

The thread in the sump could be good and you unknowingly unwound the helicoil to remove the bolt. Potentially you can refit the helicoil but they come with a part that you use to fit the helicoil and then you break off. A garage could give you the same size helicoil and you could do it up with some needle nose pliers.

So there should be an ordinary looking thread inside the sump if the sump repair is still good and you just need to refit a helicoil. The tool you use to remove the part that breaks off is magnetic so you dont lose that part in the sump.
 
Last edited:
Thanks for the suggestions Judderbar. I am definitely considering leaving it alone and keeping an eye on it (the lazy way out;)). Although the leak is very small, to me the danger is air getting in. I suppose I could just occasionally bleed the system. I know the coolant is in good condition because I replaced it when I did the thermostat a month ago.

I started dismantling things and it is definitely a manifold off job. (hopefully the photo shows this). I tried tightening the manifold bolts near the housing but there was no movement at the highest force I was comfortable subjecting them to.
I had a look from underneath and can manage to access all the bolts holding it on, although I may have to remove the starter motor to gain better clearance.

I have ordered the part and some new manifold gaskets. The New Zealand Fiat agent quoted the equivalent of 125euro with a 6 week wait while they get sent from Italy!:eek:
Luckily I found someone else who had the parts in stock at a third of the price.(y)

When the parts turn up I will have to make the decision to proceed or not. I have used the opportunity to give the car an oil and filter change today. Will probably change the gearbox fluid tomorrow - a bit of routine maintenance whilst waiting for parts to arrive.

Sponger, I found today that I have the same kind of inlet manifold as you have and there is a very small bit of crustiness. :eek: But it is not wet. The heater hose is leaking in the sealed area under the valve. I was thinking that complicated hose would be expensive to buy but fairly cheap at €22 delivered for a Gates one.
 
You have my sympathies, Judderbar!:D

I got the replacement pipe and manifold seals delivered for the equivalent of 42Euro. I still have not fitted them - have been too busy and have had the luxury of another car to drive (not as fun as the Punto though). I think I will take your advice and just keep an eye on it and drive it for a while. When I get the motivation/time or it begins to leak at more than 5ml every 1000km I will fit the parts I have.

After a great deal of internet searches and considering options I repaired the stripped threads by using an over size piggyback plug (+.2mm). By slowly winding in half a turn then out, it cut an improved thread. It is compact enough and sits quite neatly and most importantly is not leaking! (at least not yet:D)

I decided while the car was in the garage to replace my passenger side headlight bulb which blew shortly before I found the coolant problem. After trying to remove the electrical contact in situ with out success I had to pull the bumper half off. I do not wish that job on anyone :yuck:.
 
I must have hypnotised myself into thinking I had the easier to fix sensor housing.


I have the t-shirt for taking the bumper off. Many people here say some of these complicated jobs can be done very quickly. Perhaps half of the screws are missing before they start?


I am planning to take the inlet manifold off. :eek: O rings on order. I noticed the throttle body has wear where the o-ring goes and I occasionally get a flat spot accelerating. The throttle o ring is still soft and the injector o rings are still as good as new but i found the o-rings in the top of the engine under those hex caps were brittle and broke easily. Could be the o rings are hardening or shrinking contributing to the leaking problem. I think the throttle body o ring should be thicker than it is now.

I will measure stuff and take some pictures.
 
Last edited:
Merry Christmas!

Concerning the bumper -
I think I counted 15 fasteners in all - 8mm,10mm, torx, and phillips screws. The problem I found was one of the 10mm "hidden" bolts being a bit time consuming. Also I was unsure how much I could flex the bumper to pull it down to release the headlight. My concern was that a fifteen year old bumper might be a bit brittle.
I am sure next time it will be a bit quicker:)

After you get the job done on yours I would appreciate a run down - it will surely prove useful when I get around to doing mine.;) Is there a necessity to remove the injectors? I was under the impression they could be left in and lifted off still attached to the manifold.

merry Christmas to you too! I think the injectors can be left in. I will definitely provide some pictures. The gaskets will arrive in 4 days time.


Going from memory, for the bumper, other than the hassle of removing the mudguard, I found I could get to the 10mm bolt? between the most rear bolt and the headlight by lying under the car with all my socket extensions where I could see the bolt and undo it relatively easily by looking straight up. And the headlight bolt can be seen quite easily from the wheel arch?
 
I replaced the gaskets. There was no water leak inside the manifold. The water must have been coming from the hose and travelling inside the housing. It was a very minor leak anyway.

I found it was totally impossible to do this job from under the car. I did however release the right hand electrics clip from under the car. I had to use a bracket to get the other clip off. It is just not possible to get your fingers in there.


When i started the car it ran terribly for about 1 minute and slowly got better. I was sure I had made a mistake but now it is running better than ever. i have had a flat spot on the accelerator since forever. Touch wood it has gone and I can even come up the steep hill from the main road to my house in third gear rather than first. Seems too good to be true however.

The metal surface to my throttle body was worn by the seal so I sanded that out. There was a minor air leak in one gasket judging by the dirt. But otherwise neither the engine or the manifold needed cleaning other than a determined wipe with an oiled rag. the water connection was perfectly clean.

Taking the manifold off is a bit of a mission. To do the work from the top I took everything off the manifold that could get in the way. the quick release petrol connections are undone by pressing the tabs and pulling very hard on the pipe away from the connector. Taking the mass air flow sensor off is a good idea but i left it in and moved the connection sideways and pulled it off. I took off the inertia? sensor on the wing and the earth on the compressor plus released the crank sensor cable from the cover so i could get as much play in the electrics as possible. i also unclipped the electrics at the battery end by the manifold. There is almost no room to move so you need to get as much out of the way as you can.

The middle top bolt is right next to the petrol connector which makes it easier to get the socket on it as you can clearly see it from above. Most of the bolts are relatively easy to feel by hand but it took me for ever to get them all undone. There is one above the starter solenoid I was using an endoscope on. if you have somebody to help you it would be a good idea to mark the inlet manifold so you can see where this bolt is from below and get your mate to help you line the socket up. it is just impossible to get your finger in there to find the hole and put the socket in at the same time.


My technique for the invisible bolts was to hold the socket extension in my left hand and feel for the bolt with a finger from my right hand. But this did not work for a bolt above the solenoid. I used the endoscope with the bolt taped to the socket and pulled the socket off before fully tightened. I used tape for a few of the bolts.


You will need to redo the loctite on the manifold bolts as you cannot get a torque wrench in there and they are only 15nm and you just have to do it reasonably tight without destroying the aluminium threads.


There is a lot of work to get this job done!
 

Attachments

  • PC291185.JPG
    PC291185.JPG
    409 KB · Views: 33
  • PC291187.JPG
    PC291187.JPG
    426.8 KB · Views: 31
  • PC291189.JPG
    PC291189.JPG
    435.7 KB · Views: 34
  • PC301191.JPG
    PC301191.JPG
    410.4 KB · Views: 35
  • PC301192.JPG
    PC301192.JPG
    416.1 KB · Views: 33
  • PC291184.JPG
    PC291184.JPG
    381.8 KB · Views: 30
  • PC291183.JPG
    PC291183.JPG
    436.1 KB · Views: 38
  • PC291181.JPG
    PC291181.JPG
    418.7 KB · Views: 41
  • PC291180.JPG
    PC291180.JPG
    440 KB · Views: 38
  • PC291177.JPG
    PC291177.JPG
    421.6 KB · Views: 33
  • PC301193.JPG
    PC301193.JPG
    431.5 KB · Views: 35
Last edited:
Many thanks for this post Judderbar:D. :worship:
I was envisaging having to undo the lower manifold bolts from underneath so very interesting to see you getting them out from the top.
Were there any other parts/seals you had to replace other than the plastic heater pipe and the manifold seals?
With the plastic manifold located on the top of a hot engine for some 15 years I was concerned it may have become brittle - did you encounter any problem with this?

There were the 4 inlet seals to the engine and the sensor housing seal to the engine. The packet came with the throttle body seal which I also replaced.

The seals were still flexible. Even though my inlet manifold bracket to the top of the engine was cut off about 2009 the manifold is still fine.

By the way I tied the cables and ECU to the brake reservoir as i have left hand drive. If I had moved the cables to another place it is possible I might have got my head in that space to see what I was doing but I never thought of it at the time. This job might be much easier if you can get your head in there.

If you replace the heater pipe put some washing up liquid on before you do it. The heater ones are unbelievably difficult otherwise.
 
When i started the car it ran terribly for about 1 minute and slowly got better. I was sure I had made a mistake but now it is running better than ever. i have had a flat spot on the accelerator since forever. Touch wood it has gone and I can even come up the steep hill from the main road to my house in third gear rather than first. Seems too good to be true however.

You better belive it, Judderbar.
Those gaskets are extremely important. They seal the engine combustion chamber so the combustion to take place in the specified condition, with exact amount of gas and air and exact timing of the spark.
Those worn out gaskets failed to proper seal the engine combustion chamber and extra air was getting in also in small quantity. If it was to be more air to get in, the engine would have run bad, jerking and juddering.
I changed mine while having bad idle problem and realising it's worse in high humidity whether. That made me think of those gaskets and after replacing them, all worked like a charm.
So yeap, those little gaskets influence a lot how engine is running and influences very negative if they are worn out!

Mike you are right. For a long time now I have had problems in traffic with juddering in first gear or another gear. Whereas today I can be hardly moving and the car still moves smoothly.

I have not though completely solved the occasional very minor hesitation when accelerating in 2 and 3. I know the injectors dont always spray consistantly......
 
I have not though completely solved the occasional very minor hesitation when accelerating in 2 and 3.

I can give you an advise on how to fix that.
First of all, for injectors you can use petrol aditive. I used the one in the picture below, had good results.
I don't think it's coming from the injectors though. I think it comes from dirty cat.
I've cleaned mine very simple and efficient, after cleaning I instantly get a better acceleration response, real-time, no lag.
This is how I did it: washed the cat with vinegar.
I've prepared the car by taking off lamda 1 sensor, the one before cat, on cold engine because that is where you pour the vinegar in. Then, put the lambda back on, without tightening it too much. I've prepared a funnel on which I attached a heat resistance pipe, I used the small part of an old breather and some other hose between it and the funnel. Tested it on cold engine still and it could fit nice, giving me space to pour the vinegar directly into the cat.
Then, with lambda back on and connected I've turned on the engine and let it run until it heated up to the working temperature.
Next, turned the engine off and carefully got the lambda 1 back again and poured 1 litre of vinegar into the cat. You have to be careful because the engine and exhaust pipe (including cat) are very hot.
After that, put the lambda back on, connected it and start the engine again.
Revved the engine above 3000 RPM for about 5-10 mins and that was it.
Put the shield and everything back in its place and as I've said, the acceleration response is now in real time, with no lag.
 

Attachments

  • image.jpeg
    image.jpeg
    732 KB · Views: 16
I can give you an advise on how to fix that.
First of all, for injectors you can use petrol aditive. I used the one in the picture below, had good results.
I don't think it's coming from the injectors though. I think it comes from dirty cat.
I've cleaned mine very simple and efficient, after cleaning I instantly get a better acceleration response, real-time, no lag.
This is how I did it: washed the cat with vinegar.
I've prepared the car by taking off lamda 1 sensor, the one before cat, on cold engine because that is where you pour the vinegar in. Then, put the lambda back on, without tightening it too much. I've prepared a funnel on which I attached a heat resistance pipe, I used the small part of an old breather and some other hose between it and the funnel. Tested it on cold engine still and it could fit nice, giving me space to pour the vinegar directly into the cat.
Then, with lambda back on and connected I've turned on the engine and let it run until it heated up to the working temperature.
Next, turned the engine off and carefully got the lambda 1 back again and poured 1 litre of vinegar into the cat. You have to be careful because the engine and exhaust pipe (including cat) are very hot.
After that, put the lambda back on, connected it and start the engine again.
Revved the engine above 3000 RPM for about 5-10 mins and that was it.
Put the shield and everything back in its place and as I've said, the acceleration response is now in real time, with no lag.

I changed the cat for no difference. Anyway the exceleration is not lagging. it is more like misfire. A brief moment of weakness.

It was a bit better after I got second hand injectors but i noticed the replacement injectors were also not perfectly spraying. It is on my list of things to do..........
 
So it is from injectors then. Don't you think using a fuel additive that cleans them, before replacing them might do the trick and you'll not have to replace them? Although if they are broken, you will need to buy new ones. The good part is that new injectors work like a charm, the bad part is that changing them all at once would be a little expensive.
 
Back
Top