OP
OP
- Joined
- Jun 8, 2014
- Messages
- 96
- Points
- 21
Thanks Judderbar you're a star ")


Just wondering about the timing on the 16V. If you didn't set anything before stripping down of the engine how would you go about setting the timing correctly when you came to assembling it?
You would need to rotate the camshaft until you can get the locking pin in. There is only 1 notch per 360 degrees so you don't need to worry about being out of phase here.
Then you need to align cylinder 1 and 2 to the exact same high at half their stroke by turning the crank shaft pully. I can't remember if cylinder 1 needs to be on its inlet or exahst stroke - the haynes manual tells you. It is very important you get the right stroke otherwise you could be 180 degrees out of phase with the camshaft.
Stick it all back together and follow standard timing alignment procedures using the piston position indicator tools. As it's an interference engine it's very important your timing is correct. Make sure to crank by hand for a few cycles. If your timing is off you will reach a point where you can't turn the crank anymore as a piston is touching a valve.
Does the engine rotate in a clockwise direction as viewed from the near side (drivers side on RHD)?
Still assembling the parts needed for this job! Takes a while here. Having trouble locating a head gasket kit. I can see those on ebay etc but am concerned about fitting a non genuine gasket. Do these pattern part gaskets do the job ok?
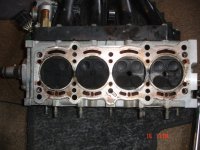
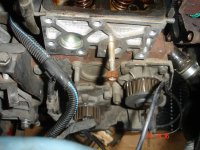
OK so I made a start and have removed the cylinder head. Went ok but I decided to remove the head with the inlet manifold attached. Also had a problem getting the belt off the aircon pump but eventually removed it by unbolting the crankshaft drive pulley and then taking off the alternator drive belt.
I didn't bother with the flat tools for the head extension and was lucky that only 5 tappets dropped out onto the cylinder head and I was able to put them back in the correct ports.
Seeing as I don't yet have the timing tools I used a couple of knitting needles in cylinders 1 and 2 to get the engine to MDC and a mirror to check the camshaft 'notch' was in the right position. I'll fit the lock when it arrives.
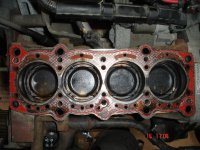
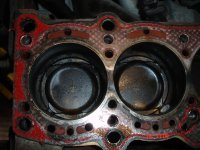
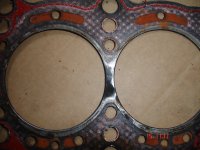
Looking at the head and gasket it seems that there was some transfer going on between cylinders 1 and 2, the head gasket is a bit more eroded on the underside in that blackened area on the photo.
I can't tell what make the gasket is, are there any markings I should look for to see if it's a genuine Fiat item?
Total time taken so far is about 5 hours.
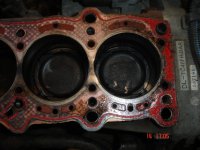
Another photo of cylinders 3 and 4 with old gasket still fitted, you can easily see the red gasket residue.