How to change the HVAC control unit bulbs
Items you will need:
1 x set of radio keys
1 x needle nose pliers
1 x flat screw driver (for prying, or use prying tools)
1 x torx screwdriver (not sure on size bit)
2 x New replacement bulbs

Disconnect the battery. Remove the radio from the dash using the radio keys and a flat head screwdriver for prying, mine was quite stuck and needed lots of prying to come loose. Be careful to not mark the surrounding centre console.


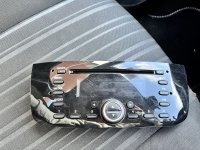
With the radio now out, begin removing the housing by removing the torx screws that hold it in place. There are 7 in total.
Remember to remove the screw in the right side wall. The housing can now be removed by simply pulling it out. It is held in place by two clips at both top corners (need a quick sharp tug to remove).

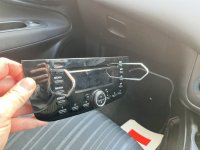
Now the housing is removed, push down on the orange/red lever on the connector to remove it from the socket.

Remove the cable from the housing by squeezing and pushing the black plastic clip though the metal frame, this helps to keep the area tidy and not risk snapping wires due to the housings weight etc. Its quite tricky.

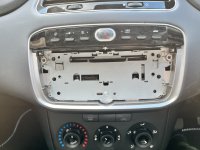
Tie/tape the wires up to keep them away from the HVAC control unit, as this helps a lot. First, remove the top two screws that hold the HVAC unit in place, then remove the two that are under a black plastic piece of dash, near the cupholder under the bulging out part of the bottom of the centre console (Just feel under and pull off a little black panel). I used a torx bit and the corresponding ratchet bit to get the two torx screws loose and then finished unscrewing by hand. The left screw is the hardest to remove as the lip of the cup holder is in the way.

Now, next to where you removed the top two screws, use the flat head screwdriver to push in the plastic clips that hold the HVAC unit in place.

With the HVAC unit free, push it in and tilt it up to see the bulbs at the bottom, in-between the dials

Using a flat head screwdriver, remove the wires from the wire holder/tidy clips on the back of the HVAC unit.

Using needle nose pliers, grip the grey bulb socket (NOT THE WIRES) and pull (quite hard) and the bulbs should pop out.


Swap the bulbs with the replacements, and then connect the battery and test to see if they work before putting them back into the HVAC control unit.


Just follow the instructions backwards to put everything back again. When you come to put the radio back in, you’ll notice there is a large black plastic piece on the back of the radio. You’ll need to ensure that this can freely fit back into the hole in the back of the radio housing, and that no wires are in the way, otherwise the radio will not fit back in. I found the best way is to push all the cables to the left, and then connect the radio to the cables very close to the housing, and then slowly push back into place. It may take a few times to get it back in so its flush to the rest.