Just done mine yesterday. The Hayne's excerpt is ok as rough guide, but misses out some of the more subtle points so I have taken it upon myself to write one myself. So here's exactly how for the 899cc:
Tools required:
Removal:
Adjustment:
") DONE
DONE
Some pics to follow!
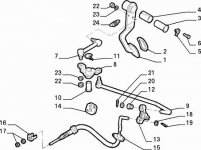
899 Clutch Cable Renewal
- 13mm socket ¼” or ½” drive
- 10 mm socket ¼” or ½” drive
- Short extension bar ¼” or ½” drive
- Ratchet – ¼” or ½” drive
- ‘Medium’ Phillips screwdriver – ideally 1 ‘normal’ shaft length and one either really short - shorter than 3” OR really long – bigger than 9”
- Long nose pliers – ideally angled ones
- 2x10mm spanners – ideally one of which should be an ‘open-ender’
- A torch or inspection lamp.
- Wheel key or suitable breaker bar with 19mm (3/4” socket)
- Jack and an axle stand
- WD40 or similar
- Wire brush (optional)
- Paper towel/rag
- M5 Nuts (10mm across) – optional
- Multi-purpose grease - recommended
- 2mm Split pin – DO NOT use the old one
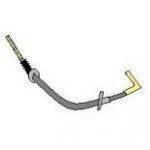
- Clutch cable
- If you are working in the roadside, make sure the passenger side is nearest the kerb.
- When you park it up to do this, try to get the wheels to point to the extreme left.
- Make sure you have some daylight hours to do this
Removal:
- Open the bonnet and undo the 13mm nut that holds the air box in (to the right as you look at it). No need to open the air box or remove the air filter!
- Gently pull the air box straight up, a forward and backward wriggle helps get it out of the rubber inserts it seats into. There are 2 pipes which are a push-on fit that have to be carefully removed. The 1st is a rubber pipe which comes from the front of the engine bay and attaches onto the lower-half of the air box. The 2nd is a corrugated warm-air feed from the exhaust manifold
- With the air box free, it will flex on the main air pipe (gently now) and lie on top of the engine, with a little wedging.
- With that out the way, look down through the air box supporting frame and you should be able to see the clutch cable come through the pivot arm and rubber ‘stop’ and be secured with an adjuster and locking nut.
We will now move to inside the car and release the cable from the pedal mechanism. - Move the passenger seat all the way back and wind the seat down onto the rear seat. Next, take one of your floor mats out to kneel down beside the car at the passenger footwell. Take a look under the passenger side of the dash, specifically under the little metal frame document ..er.. shelf and you’ll see a metal cover on the bulkhead. Use your torch if it’s too dark. Use a Phillips screwdriver to unscrew the 3 screws that hold this one. The two bottom ones can be removed with any length screwdriver, but the top one is a little more tricky to get. You can use a very short-length screwdriver on it, up the back of the shelf, a really long one to go through an open part of the shelf frame or a crank-shaped screwdriver to get at it from below.
- Put the 3 screws and washers (yes, dig out that 3rd one that rolled into the corner of the floorpan) and put them in the metal cover that you just took off, and put that onto the dash.
- You should now be able to see more of the elaborate pivot and lever system of the clutch. The bit you are looking for looking at you end-on, with a split pin (or possibly clevis pin) going through it.
- Using your long nose pliers fold the split pin straight again and pull it out by the eyelet end. The washer behind it may slide off – no probs, put it in a safe place. Also, the cable may pop backwards out of the quadrant it’s in – don’t worry if that happens either. If it doesn’t come out by itself, push it out of the quadrant using a suitable poking device(!), then turn the now-revealed-to-be-right-angled cable end so that it points towards the driver’s side. You may notice that the clutch pedal has fallen to the floor… ignore that for now. If your cable has broken it will already be there
Now we move to the passenger side front wheel. If you closed the bonnet – open it again to get more light down where you’re working. - Crack off the wheel bolts then jack the car up at that corner. Lower the car onto an axle stand – DO NOT work under the wheel arch with the car supported only by the jack. Remove the road wheel and put it to one side along with the bolts.
- Look at where the clutch cable leaves the pivot arm from where you seen it from above and follow it towards the bulkhead. It bolts onto it with 2, 10mm flanged nuts at a strange angle (try and remember this for re-fitting). You may need to clean these off with a wire brush and give them a good scoot with WD40 or similar. You DON’T want to snap these. If you look at your new cable, you will see that the farther away mounting point is actually a slot. I thought I could take off the nearer one and only need to slacken the other one off a little…. Guess again. After you take off both, keep them safe – they’re teeny! Give a little tug on the cable and break the dust/mud/rust seal which may have formed.
- Return to the bonnet and look for the two nuts on the threaded section of the cable. Give the thread a clean to help nut-removal. Grab the nut furthest away from (adjuster nut) you with an open-ended 10mm spanner and put the 2nd spanner on the nearest nut (lock nut), ensuring one spanner-per-nut. Move the nearer spanner to your left and either hold the back one still or do a scissor-action on it to separate the two nuts. Remove both nuts and grab the square section piece of metal before it falls under the car. I presume the rubber stop comes off too, but mine just stayed in place with the power of old age.
- Push the threaded part through the pivot arm and through the bracket on the bell housing and tuck it out of the wheel arch where you were sitting a moment ago.
- Go back to the wheel arch and carefully remove the cable from the front-end 1st (you may need to untangle the cable from the flexi-hose and side repeater wiring) before removing the cable from the bulkhead (most likely the hooked part of the cable WILL catch on the hole it goes through – show it who’s boss) and remove the cable from the car. Sorry looking thing isn’t it?!
- Grab a hold of the new cable and carefully feed it back up the way the old one came out – the object here is to get as little rubbish on the threaded end of the cable and down the outer sheath. Do the threaded end 1st so it is poking out where you can grab it from above.
- Return to the under-bonnet and find the end u just fed-up. Carefully guide the threaded section through the bell-housing bracket and pivot arm at all the way, then the concertina boot, all the way until the big rubber stop comes up against the bell-housing bracket. Be especially careful not to split the concertina boot section as this will allow all kinds of demonic ingress. Put on the square-section washer and then either refit the old ‘adjust’ and ‘locking’ nuts (after a clean) or, as I did, replace them with M5 new ones (10mm across).
Important: only put the nuts on the very tip of the cable at this point – you’re going to need all the slack you can get to re-attach the other end!
Side note – on the old cable I took off and also on the (OEM) replacement I got, what looks like the word “SNAP” is stamped onto the bulkhead side of the fixing plate. No wonder people complain about them breaking – that’s a blatant jinx! - Go back to under the wheel arch and carefully guide the right-angled other end of the cable through the bulkhead before pushing the fixing plate back over the studs (I am SO glad FIAT made these studs and not threaded holes for bolts!).
- Take a bit of multi-purpose grease and put a thin smear on the studs before re-fitting the 10mm flanged nuts. DO NOT over tighten – those studs would be a nightmare to replace.
- Refit the road wheel and take the car off the axle stand so that it is back down on the ground.
- back beside the passenger footwell, you should see the new right-angled end of the cable smirking at you in the corner. With the help of an assistant, or a carefully selected object, prop up the clutch pedal as high as it will go.
- This next part was tricky for me – you need to guide the cable back through the quadrant from whence the old one came. With the quadrant fixed in place, either with nimble fingers, or nimbler long nose pliers, gently grab the cable end and pull/push it through until it is all the way back. Don’t give it a chance to jump back out - take a suitable object – I used a fat-handled screwdriver to keep the end as far though the quadrant as it can go.
- Now, the REALLY fiddly bit: you need to put the gold washer back over the bit that’s sticking through and then secure it with a NEW split pin. DO NOT use the old one – you are asking for trouble. I lay upside down under the dash to do this – a torch really helps as does the angled long-nose pliers. The split pin feeds in from the side nearest the driver. Once that bad boy is in place bend his little legs back round the pin.
- Remove your cable end prop and move your clutch pedal prop-up so that the pedal is sitting roughly where it should be (11cm from one source or just above the brake pedal height from another source) then refit the metal cover under the dash – use all 3 screws, don’t chuck that top one – it looks as though that cover would cause an annoying rattle if it were left out!
Adjustment:
- Return to the engine bay and coat the threaded part lightly with multi-purpose grease. Try to avoud getting any on the cable gaiter just behind here. finger tighten the adjuster nut (back one as you look at it from the front of the car) till it is up against the square metal washer.
- Go to the driver seat and remove your makeshift pedal prop. MAKE SURE the car is in neutral and the hand brake fully on start the car. Depress the clutch pedal and tentatively try 1st gear. For me, it went in no probs, with a nice, low biting point of about 2cm from the floor. With the old one, it only bit about ¾ of the way up.
- This really is a personal preference thing. If you want to make the biting point higher, tighten the lock nut (back one) till the desired point is found. Once you have, finger tighten the lock nut (front one as you look at it from the front of the car).
- Tighten the lock nut onto the adjuster nut by placing an open-ended spanner on the adjuster nut to hold it still then tighten the lock nut onto it (turn towards the passenger side). Give a generous coating of grease to the threads for future adjustment
- Split the box as though you were changing the air filter element by unfastening the four catches.
- Tuck the top-half around the front of the engine. Carefully remove the filter element and put it somewhere clean and dry. You should be left with the lower airbox in your hand.
- Carefully lower it down onto the 1st few centimeters of long threaded stud that it came from. Dip it towards you at the front and refit the cold-air feed.
- Next, push it farther down the fixing stud feel whilst feeling underneath to make sure that the pegs on the bottom of the box are lining up with the grommets on its supporting frame before fully seating it back into its original position. Refit the corrugated warm air feed from the exhaust manifold. Replace the upper portion of the air box and secure it with the fastners.
- Put on the washer and 13mm nut that came from the stud back on and tighten it finger tight then give it a further little turn - it needn't be over-tight.
DONESome pics to follow!