Technical Timing belt damage fix (hopefully)

Currently reading:
Technical Timing belt damage fix (hopefully)

BrianMcL

Member
Joined
Dec 20, 2009
Messages
662
Points
132
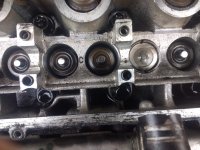
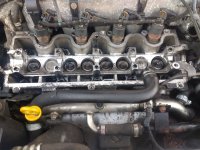
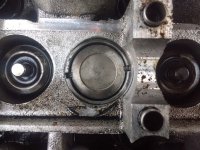
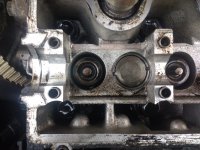
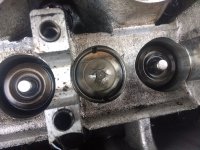
I've started this thread to document the issues I encounter trying to repair whatever damage my engine - the 1.9d 8v jtd / z19dt - has suffered following a water pump failure and consequent snapped timing belt.

The various issues I've encountered leading up to this point are documented on another thread (broken down various fault codes) so this one starts from having the camshaft cover off and I'm going to try and take things from there.

I expect I'll need much help, advice and encouragement along the way so thanks in advance.

Wish me luck.
 
Last edited:
Got the camshaft out ok, process as follows (once the cam cover is off)
Remove 10 X 10mm bolts
Wiggle the metal pipe loose
From OSF to NSF wiggle 4 of the 5 brackets loose until you get to the NSF one.
It's held in place by the metal plate at the left hand side. It's secured by 3 x T40 or T45 bolts which are partially restricted by a hose. Undo them, and lift the bracket free.
The camshaft then just lifts out.

6 of the 8 lifting tappets (I think they are called) lifted out with a magnet. 2 of the shims were broken. From OSF to NSF the two that are broken are nos 2 and 7. I lifted the broken shims out but the tops of the lifting tappets are bashed upwards and the tappets won't lift out.

Not sure how to get those 2 out, anyone got any ideas? Obviously they'll need to be replaced so I don't mind if I need to damage them.
 
Had another go at them this evening and they seem to be stuck fast.
Does anyone have any tips to try and break whatever seal there is before I have to think about taking the head off?
 
Hi Brian.

A picture or will help immensely.

We will also then know if your motor is old bravo-marea ish.. or a saabalike ;)

Charlie

Hi Charlie,
Please see pics of 8 valves, 6 of which the lifting tappets came out easily and 2 of which are tight. The adjusting shims are off, just the tappets to come.
 
Pictures 2nd time lucky
 

Attachments

  • IMG_20190410_193407759.jpg
    IMG_20190410_193407759.jpg
    4.5 MB · Views: 75
  • IMG_20190410_193520311.jpg
    IMG_20190410_193520311.jpg
    4.3 MB · Views: 61
Another one
 

Attachments

  • IMG_20190410_193435791.jpg
    IMG_20190410_193435791.jpg
    4.9 MB · Views: 37
  • IMG_20190410_193419780.jpg
    IMG_20190410_193419780.jpg
    4.7 MB · Views: 87
Last one for now. You can see the damage to the top of the lifting tappet on the one I'm calling no.7 quite clearly in this one. No.2 on the left isn't as bad.
 

Attachments

  • IMG_20190410_193446193.jpg
    IMG_20190410_193446193.jpg
    4.8 MB · Views: 63
I'm thinking maybe attach a magnet and then drill a few small holes, maybe not even all the way through just to weaken it enough to lever it out or maybe drill a self tapper in and give it a good pull?
 
Looking at the pictures it certainly looks like both tappets/followers has tilted over in the valve/tappet bore?

The right one with the more damaged centre has most probably deformed from cylindrical shape.

Have you tried to gently tap the raised sides down to see they will square up in the bore?

They also have those notches/cut-outs. You could try knocking up a key to engage with the cut-outs and see if the tappets can be twisted in the bore. You may be able to wiggle them out.

As for drilling / cutting then the tappets/followers will be pretty hard steel and/or case hardened. Could be tough going.
 
Finally started stripping off the various bits attached to the cylinder head before (hopefully) removing it tomorrow. Never done anything like this before and I've not been able to find any YouTube videos for the 8v 1.9mjet so I'm just working my way along the various bits that I can see as I go.

Only encountered 1 siezed but or bolt so far but it's half way up the heat shield so not entirely sure what's going to be the best way to get it off.

Fairly sure the exhaust manifold is going to be tough going once I get the heat shield off and then I'll see what else I've missed.

Quick question for anyone who has tackled something like this before, is it easier to take the fuel rail etc off the head or should I just keep disconnecting everything as I go?
 
Sorry Brian I've not tackled a diesel cylinder head job before.

Generally speaking though when I've done petrol cylinder head jobs in the past I've found it better and easier to strip as much down and off the head whilst it is still on the block.

By doing this way you have the block correctly and firmly supported. Doing it the other way you will need a good sturdy work bench and possibly some clamps to hold the head when undoing more stubborn items.

You may find that after the head work is done and reassembly begins it is easier to start refitting items at the bench. Only down side to this is that all the bits soon add weight to an already heavy lump of metal and replacing the head on the block and not disturbing the head gasket becomes more difficult. I recall some heads I've worked on had pesky little "O" rings on the block to head oil feeds that were easy to dislodge.

When you have the head gasket kit and the head off the block things may turn out to be more favourable. e.g. no little "O" rings and some nice dowels to hold the head gasket in place and help align the head to the block.
 
Last edited:
It's proving a slow process s130 and I was stopped dead for much of today by a rusted bolt on the heat shield which I can't even get grips onto or access with a drill to grind it off. Very annoying. Hoping to get some help tomorrow as I can't wait to get it off and see what delights await on the exhaust manifold.
 
That No 7 does look a right mess doesn't it Brian - commiserations!

You'll find components like cam followers are very hard indeed and can't be drilled with ordinary drills such as the likes of you or I might own.

I've been magnifying up the image you've posted of that No 7 and looking carefully at the left side of the follower bore. I think I can see a small curl of picked up metal at around 8 o'clock, as if the top edge of the follower has dug into the bore? If this is the case, as S130 suggests, it's likely the follower is tilted in it's bore and if this is the case probably the head is scrap (sorry). Tapping it with a hammer and, maybe, punch, at around 2 o'clock might just straighten it and shear off the swarf curl so you can get it out but I suspect it'll be a lot of effort for nowt if the bore is damaged?

Of course it is extremely likely these (No2 and No7) valves will be bent and there may well be others less obviously bent. When a valve is hit hard by the piston it's not unusual to find damage to their guides too, maybe even piston damage.

Could be your easiest - and most satisfactory - solution will be a used head from a scrapie? I've actually never done a Fiat diesel but BMC/BL were my bread and butter with some earlier VAG (VE engines) too. So, just to alert you, in case you don't know (and I don't know if Fiat are like this) but there are often a selection of head gasket thicknesses on diesels depending on piston protrusion (you have to measure TDC piston height relative to the block face and use the appropriate thickness of gasket.

Good luck with it all. I will be following your posts with great interest and will let you know immediately if I see any way I can be of help.

Kindest regards
Jock
 
Hi Pugglt,
Love the name, exactly how I feel tonight after another 2 hours trying to work out how to get that last nut off the heatshield. I'll try and take a picture of it tomorrow.
Once I've got the head off plan is to check what the block looks like and if OK order a scrap head and salvage best bits from both.
Fingers crossed for tomorrow.
 
Finally got a chance to spend some time on it over the weekend and the main holdup was the 2 exhaust manifold studs at the bottom of the bracket, both of which I ended up destroying to get the manifold loose.
That and finding brackets and connectors aplenty.
As expected 2 of the valves are bent but the others seem ok and the block looks and turns over ok.
Now the process of rebuilding starts ?
One thing that does amaze me is just how inaccessible the glow plugs are - even with the head loose in the engine I still ended up disconnecting the relay from the bulkhead to get at the left hand side one.
Will definitely check and change, along with cleaning the injectors, before I start to reassemble.
 
Back
Top