

Tie Rod ball joint replacement (Steering)
Tools required for this are:-
17mm Spanner or Socket.
One pair mole grips.
Plumbers type Spanner.
Ball Joint seperator.
Hammer (just helps )
)
Also a little grease required either standard or copper slip.
First whatever Tie rod you decide to work on turn the steering wheel full lock on the opposite direction i.e. working on right wheel turn steering full lock to the left.
Next chock the front & rear road wheels on opposite side your working on loosten wheel bolts, jack up the car (ensure an axle stand is used and car is secure), remove the front wheel bolts & remove wheel.
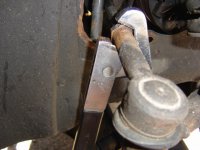
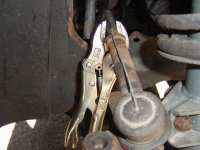
1. Using a plummers spanner or simmilar (an open ended spanner will slip I gaurantee it) loosten the tie rod locking nut Which will appear as clockwise(Pic 1).
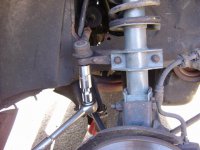
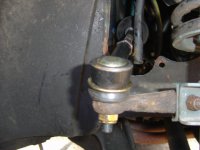
2. Remove Tie rod ball joint nut (Pic 2).
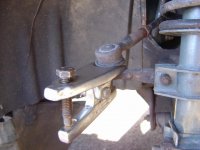
3. Use Ball joint seperators to seperate ball joint from steering arm (pic3) the ball joint will be thrown so no need to worry about destroying it.
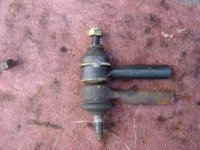
4. Normally at this point you would remove the ball joint and count the turns it takes to come off so when it is put back on the ball joint is in the same position BUT Not all Tie Rod ball joints are the same size (pic4) so it's better to measure a set distance to ensure the wheels will align simmilar to before removal. A simple method is to cut a piece of solder measured from the locking nut to the centre of the ball joint (pic 5)
5. Now just after the thread stops towards the steering rack gator there is a hex section, clamp on the mole grips as tight as you can and hold to prevent it turning, then using the plummers spanner undo the ball joint, this can often be tight and difficult to remove if you find this.....heat the stem with a blow torch and then remove (Don't burn your fingers :nutter. (pic6).
6. If you did use heat leave the stem and thread to cool down for a few minutes then use some grease spread into the NEW ball joint and thread it on till you think it's about the same distance as before, then check the correct measurement with the piece of solder from before. If it is slightly out turn it in or out till the measurement is correct (pic 7)
7. Now put the new ball joint into the steering arm and tighten the tie rod locking nut, ensure only the nut turns and not the thread so best to keep the molegrips attached at this time or the alignment can be put well out (pic 8)
8. Now tighten the ball joint nut, a light tap with a hammer will help stop the ball joint thread turn as it's being tightened. (pic 9).
9. Replace the wheel and drive to your local tyre centre to get the wheels properly aligned (don't think for one sec no matter how good your judgement was that you can skip this step).
JOB DONE
Tools required for this are:-
17mm Spanner or Socket.
One pair mole grips.
Plumbers type Spanner.
Ball Joint seperator.
Hammer (just helps
)Also a little grease required either standard or copper slip.
First whatever Tie rod you decide to work on turn the steering wheel full lock on the opposite direction i.e. working on right wheel turn steering full lock to the left.
Next chock the front & rear road wheels on opposite side your working on loosten wheel bolts, jack up the car (ensure an axle stand is used and car is secure), remove the front wheel bolts & remove wheel.
1. Using a plummers spanner or simmilar (an open ended spanner will slip I gaurantee it) loosten the tie rod locking nut Which will appear as clockwise(Pic 1).
2. Remove Tie rod ball joint nut (Pic 2).
3. Use Ball joint seperators to seperate ball joint from steering arm (pic3) the ball joint will be thrown so no need to worry about destroying it.
4. Normally at this point you would remove the ball joint and count the turns it takes to come off so when it is put back on the ball joint is in the same position BUT Not all Tie Rod ball joints are the same size (pic4) so it's better to measure a set distance to ensure the wheels will align simmilar to before removal. A simple method is to cut a piece of solder measured from the locking nut to the centre of the ball joint (pic 5)
5. Now just after the thread stops towards the steering rack gator there is a hex section, clamp on the mole grips as tight as you can and hold to prevent it turning, then using the plummers spanner undo the ball joint, this can often be tight and difficult to remove if you find this.....heat the stem with a blow torch and then remove (Don't burn your fingers :nutter
. (pic6).6. If you did use heat leave the stem and thread to cool down for a few minutes then use some grease spread into the NEW ball joint and thread it on till you think it's about the same distance as before, then check the correct measurement with the piece of solder from before. If it is slightly out turn it in or out till the measurement is correct (pic 7)
7. Now put the new ball joint into the steering arm and tighten the tie rod locking nut, ensure only the nut turns and not the thread so best to keep the molegrips attached at this time or the alignment can be put well out (pic 8)
8. Now tighten the ball joint nut, a light tap with a hammer will help stop the ball joint thread turn as it's being tightened. (pic 9).
9. Replace the wheel and drive to your local tyre centre to get the wheels properly aligned (don't think for one sec no matter how good your judgement was that you can skip this step).
JOB DONE
Attachments


Last edited: