Technical Mk1 Dashboard Removal

Currently reading:
Technical Mk1 Dashboard Removal

Joined
Jul 7, 2004
Messages
13,105
Points
2,041
Location
Watford
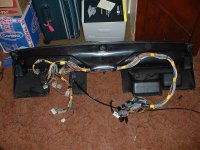
Well, this was a job I wasn't looking forward to. Swapping over my chocolate brown dashboard for the nice black SX dashboard with centre console, plus plumbing in the wiring to run electric windows (from a turbo) and front fog lights (from an SX).

I wanted to make the wiring loom look factory standard, so no Scotchlocks or crimp on connectors allowed!

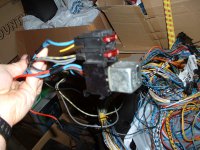
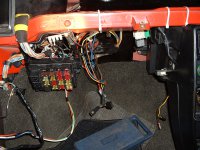
I had to pull out the big plastic grommet that feeds the loom into the engine bay so I could add extra wires, then add the new power lead and also the wires for the fogs.

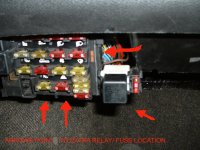
I ended up using the under dash wiring loom that came with the SX dashboard, and swapped that over with the 45S standard loom, then reconnected it all to the back of the fuse box.

Everything worked, except that the light switch now put on main beam when I selected parking lights! After some headscratching and another look at the wiring diagram I found that post 87 models had a dim/ dip system that wasn't compatible with my loom. So I've now got to pull it all out again, refit the 45S loom and add the fog light wiring and relay. That will keep me busy at the weekend...

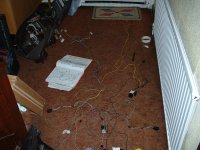
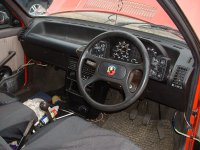
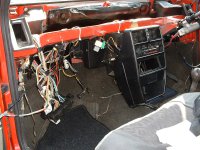
Attached is a pic of my car less dashboard! It's all back together now, minus the stereo. But as mentioned I've got to do it all again. Bugger.
 

Attachments

  • Dscf0012.jpg
    Dscf0012.jpg
    420.7 KB · Views: 962
Heh, thanks Louie! It's not a fun job I can tell you...

Still, it will be good when I finally get it back together with electric windows and front fogs. Though I probably won't even use the fogs much (legally you can't use them unless certain conditions allow), but they do look good in the bumper (y)

Will post some pictures when I finally get it all back together.

Oh, and I fitted the turbo plastic hatch as well. Slowly but surely my little 45 is being brought up to scratch ;)

Next week anti roll bar hopefully!

How are you getting on with Bianca? Been waiting to hear an update and see some pics of the progress. You do still have her don't you?
 
Chas,

That looks like a fun project... the centre console is the same as the one in my Turbo. I found that my radio housing was a bit flimsy - the plastic is too brittle and it had cracked. Filling it up with fibre-reinforced filler has made it much more solid! I just put the console face-down on the floor and packed in the filler up to the level of the radio hole.

You have me completely puzzled with the dim-dip incompatibility problem! I've been studying wiring diagram 5 (page 14.5 of Haynes) and wiring diagram 16 (page 14.10). Then I've realised that you'll also be looking at wiring diagram 8 (page 14.6) as that shows the headlight wiring for models without dim-dip.

In diagram 16 we see that 60204 is a 'four-place fusebox' - great. I wonder where that is? If you have installed it, maybe that explains why you have a link between the side-light output from the switch (grey wire) and the high-beam wiring for the right side. Compare diagram 5 with diagram 15. It seems that dim-dip versions have an extra grey wire from the lights switch that the earlier versions did not have.

Oh hell, this is getting ridiculous! It's been half an hour now and these diagrams are no clearer at all! :D

For some reason, the light switch has been depicted completely differently in diagram 16 compared with the other two diagrams. Just for fun, the moving contact of the bottom switch doesn't seem to be connected to anything. I think that it's supposed to be connected to wire 'RG'. The five-pin plug has the bottom terminal being the sidelights - this has an elongated contact so that it gets power with the switch at 'sidelights' or 'headlights'. At 'sidelights', there seems to be this grey wire (H) that also gets power (as mentioned above). This grey wire tours around the 'bonus' fusebox and tools through a cutout relay (where?) where it turns into the power for the dim-dip transformer.

Meanwhile, back at the switch, there's also a third contact that gets power with the switch at 'headlights', and this contact is connected internally to the dipped/main beam switch.

My conclusion? I think you should pull the light switch from the dash, and look at the connectors on the back. Is there a grey wire separate from the other five? If so, I suggest pulling it out. You should also check whether the small parking light bulbs are actually coming on with the switch in the 'sidelights' position. If they are, then it seems like you have too many wires connected to the 'sidelights' position.

I reckon it's a case of 'less is more' - with the switch at 'sidelights', just disconnect wires until your headlights go out, and then test in the 'headlights' position, reconnecting if/where necessary.

For what it's worth, all my Unos have had the dim-dip feature. It's not required over here (and it's not required over there either, these days). It poses a problem if you add relays to the headlights, since then the relays click 'on' with the switch at 'sidelights', and you get full-power headlights. The solution is simply to unplug the dim-dip transformer (umm, resistor-pack, since a transformer is only AC ;))

I wonder if you remember the days of, say, the FIAT 128 Haynes manual? It has the complete wiring diagram (the entire loom) on a single page. There are three or four different models, but it's wonderful being able to see the whole lot at once! The Uno, on the other hand, is almost as bad (but not quite) as my Lancia Thema. Twenty-six pages of wiring diagrams were enough for hours of hair-tearing - I see that the Uno lighting has only been an hour or so! ;)

Anyway, let's hope you don't have to remove that dashboard again. And, by the way, do you find that you can just lift the dashboard off the hooks below the windscreen, or has it put up a fight? I seem to have great difficulty getting it to lift out; the hooks tend to snap off instead.

-Alex
 
  • Like
Reactions: ben
Hey Alex,

Great post! Your musings of the wiring diagram sounded like my exact thoughts as I was sitting on my hallway floor trying to make sense of zillions of different coloured wires lying before me.

I'm away from home at the moment, so will write more about what exactly I did to get it all working when I get back.

In a nutshell, I did pull my dashboard out again last weekend. This time I pulled out the underdash SX wiring loom that I'd fitted, removed the foglight loom section and relay, then incorporated the fogs loom into my original 45S loom. Put it all back, attached the fogs and it all works!!!!!!!

The problem before was that my 1986 loom did NOT have the dim dip system, whereas the SX loom (1988 I think) did. Therefore my headlight underbonnet harness wasn't compatible with the SX underdash loom, hence the parking light incompatibility. I also didn't have the headlight transformer under the bonnet.

But by studying the wiring diagram for both, I found the the fog light loom was the same for both the dim dip harness and the early non dim dip harness. All I had to do (ALL?! It took hours!) was to remove the fog light wiring harness and incorporate it into my 1986 45S loom.

Even though the SX light switch pod had the extra grey wire, it still hooked up to my earlier S underdash loom and all systems work perfectly now. Including having the fog light warning light come on the dash panel too.

Yes, the centre console from the SX is the same as the turbo. I also have the little console that covers the gear lever and joins up to the centre console. I will fit this at a later date.

And yes, those two lugs that fit the dashboard to the top left and right corners are a pain in the ass to get out. If you're not careful you can break them. The Haynes manual states something like 'lift the dashboard off the two locating catches'. If only it were that simple...

There is a way to get them off, but you need a very long flat blade screwdriver. You squeeze it past the side of the dashboard and try and get the blade into the bottom of the lug, then twist. It takes a few tries, but it should just pop the lug out of it's holder when you get it right.

Anyway, gotta get to bed. Will write more when I get back home for anyone else contemplating removing a mk1 dashboard/ fitting front fogs/ fitting electric windows. In essense it is fairly easy once you know what to do.

'Old Fiats never die. They just get upgraded'!!!!!!!!!!!!

Chas
 
Ah yes,

Thanks for the post... I'll dig the dashboard out of my 45 (or at least get those hooks out) because I think it makes fitting the windscreen easier. You know the 'rope in the seal' trick, where you desperately tug at slippery bits of nylon cord threaded around the windscreen rubber, while a friend imparts greasy handprints on the outside? Well, I've found it all comes unravelled if the dashboard is in place: there isn't the room to pull the cord out.


Steve: cheers for the moral support... trust you know what it's like trying to work out FIAT wiring diagrams... ;)

At first I thought "surely that's easy" - then I discovered the true haphazard nature of the components (like, the switch that is basically the same but drawn completely differently, and the "four-place fusebox").

On the subject (well, almost) - and definitely on the subject of 'old FIATs not dying, just getting upgraded!' - I am entertaining the thought of fitting a Mk2 dashboard to the Mk1 45. Now, we're not exactly talking about sat-nav and dual-zone climate control here. Such an upgrade (Mk1 45 to Mk2 60S) could only possibly be significant for those that feel the difference between a one-speed heater fan and a three-speed heater fan, or who treasure the prospect of having a temperature gauge.

Anyway, do I need to change the wiring loom for that one?

Actually, scratch that, I know that I will have to, because the lights/indicators/wipers are obviously all different. So, the next question has to be, how much of the loom has to be changed? Is it really possible to change the wires only as far back as the fusebox?

I might stick with the Mk1 dashboard. Although it looks older, it is pretty cool, particularly with the optional uncracked dashroll (very few Mk1s have that!) and of course the LEDs that you can put in the switchgear, so that the legends for the lights/wiper switch etc. light up. Just don't be tempted to use high-intensity LEDs... it's a blinding experience.

Also, the odometer only has 123,000km which is not a lot for a Mk1! Though, I'm expecting that an electric drill could make the Mk2 cluster read the correct distance (it's at 104,000km).

Anyway. It's now a weekend project, as I have lost my days off during the week (I now work at the Hamilton museum, as an 'electronics technician'... a loose term, meaning a variety of things. Today I put up a 19" LCD with a slideshow of Irish history in photos!)

As for the upgrade of electric windows... have fun with the switches! I find that usually the dead windows in my Turbo or 70SL were caused entirely by the switches. Generally, if one car's windows worked, the others immediately ceased to function, a sort of yin-yang effect. Let's hope that not all Uno electric windows are tied into some global karma-thing. Or perhaps there are now a number in scrapyards not working, and thus balanced by yours...

Cheers,
-Alex
 
Right, I've taken some pics and got some info with regards to mk 1 dashboard removal. I'll post these up in seperate posts so they might help others who want to do the same.

Regarding some of your queries Alex:

Windscreen removal/ refitting:

This CAN be done with the dashboard in place, though can be a little awkward. I've done this myself, so know it is possible. Removing the screen is easy, it's refitting it that can be a problem as the dashboard gets in the way of the lower windscreen flange.

Best thing to do is to use the nylon cord trick, but to try and get the screen and seal completely seated on the lower flange first. Then use the cord to pull the rubber into the side and top flange. The cord will pull from the bottom flange, but you have to come out at a bit of an angle. Make sure the rubber is well greased up (silicone grease is best and won't harm the rubber) and you should have no problem.

Mk1 to mk2 dashboard:

As to swapping over a mk1 to mk2 dashboard, I'm not sure but I think it is possible. I think as well Fiat did away with those two awkward clips at the back, and use screws instead behind the speaker grills in the top left and right corners.

However, to get the two speed interior fan and also the two speed wipers you will need the motors for both as they have extra connections that the base models don't have. I remember upgrading my old base 45 to S spec and found that it was easier to swap the whole heater box over than to dismantel the old one to fit the two speed motor. The same will apply to the windscreen wiper motor.

I'm not sure if the mk2 used the same fuse box as the mk1, but all the connectors fit whether it is a base or S model loom.

You are unlucky in getting an even more base model than we did, because even our base 45/ 60's had temperature gauges!

Personally I like the mk1 dashboard better as it is so distinctive. Perhaps your best bet is to find a 45S/60S mk1 being scrapped and get the dashboard and loom from that?

Odometer reading (mileometer):

The mileage reading is really, really easy to change. You don't need an electric drill, and besides, it would take weeks to lower the mileage by much.

Dismantel the instrument pod, then remove the speedo unit. At the back you will see that the odometer tumbler is simply pushed into place on two plastic 'v' shaped clips via its spindle. Simply prize the spindle out of the clips, and you will have the odometer tumbler in your hand. Now rotate the tumblers until you get the correct mileage and re-install back into the clips. Job done!

Electric Window Switches:

I tested the whole electric window loom, motors and switches while it was off the car. All was working fine with no problems. I now have the loom installed in the car and correctly wired up, so all I have to do is fit the motors in place of the old manual winders and fit the turbo door cards with electric window switches. Then I'll have the delight of electric windows, and for an old Fiat yet another possible electrical thing to go wrong!

You also mentioned about the 'four place fuse box' for the dim/ dip light system. It's a seperate loom from the fuse box, and is clipped to the side of the fuse box with a relay almost as an after thought.

The attached picture shows what it looks like, plus also what the fog light relay and fuse looks like tacked onto the fusebox. The dim/ dip four place fuse box with relay is attached the same way, but has now been removed from my car.

Good luck with your 45 project!

Chas
 

Attachments

  • Dscf0007-4 point fuse box.jpg
    Dscf0007-4 point fuse box.jpg
    404.8 KB · Views: 355
  • Dscf0009 - Fuse Box with Extra Relays.jpg
    Dscf0009 - Fuse Box with Extra Relays.jpg
    205.6 KB · Views: 381
Last edited:
Round two of my dashboard removal was fairly painless as I knew what to do having only done it a week or so previously.

This time I pulled out the SX underdash loom and refitted my original 45S loom. Using the Haynes wiring diagram I then removed the fog light loom and relay, and transplanted this into the 45S loom. This was rather painstaking as I had to unravel the wiring loom and pull out all the wires that were needed, and in some cases cut them when they joined a shared connector.

What took most of the time was fitting some of these wires into the original 45 S connectors. I didn't want to use Scotchlocks, crimp on connectors or anything like that, so I carefully opened out the pin clamps that were crimped onto the original 45 S wires. This then enabled me to fit two wires into one pin (like in the SX loom), then crimp the connector back together. Installed into the plastic connecting blocks it now looks factory standard. Took bloody ages though!

Then I taped up the loom and refitted it to the back of the black SX dashboard. Put it back into the car, screwed it back into place, connected it up to the fuse box and.... Phew! It all works this time, parking lights and fog lights included. I even got the fog lights warning light to work on the dash panel too. I'm glad that I've got all that done and out of the way.

I've attached a few pics so everyone can see what is involved. Note in one pic where the wiring loom comes over the beam on the left to the fusebox. It was like that from new, and I wasn't too happy at the way the wires were rubbing on a bit of metal! So I cut up an old motorcycle inner tube and wrapped it round the loom where it came over the beam and was now protected. You can see this taped up in yellow masking tape.

Anyone else contemplating doing this, it is quite easy but takes time. Just make sure you set aside at least a day to do a job as comprehensive as this.

Lastly, in the pic with the dashboard all back in place you can see wiring coming out of the side of the dashboard going into the door tidy pockets. This is the electric window wiring that I've yet to feed through the door post and into the door itself. I'll get round to doing that sooner or later!
 

Attachments

  • Dscf0017 - Fog Light Loom.jpg
    Dscf0017 - Fog Light Loom.jpg
    412.3 KB · Views: 164
  • Dscf0020 - Inner tube sheath .jpg
    Dscf0020 - Inner tube sheath .jpg
    424.7 KB · Views: 189
  • Dscf0024 - rewired.jpg
    Dscf0024 - rewired.jpg
    413 KB · Views: 224
  • Dscf0033 - dashboard back in.jpg
    Dscf0033 - dashboard back in.jpg
    408.7 KB · Views: 693
Hi,
I have Fiat Uno 45s Fire (1989.) and I also need to know how to remove dashboard to find an alarm console to connect it with central locking motors?
Any step-by-step diagrams or photos?

Thank you all very much in advance
 
Back
Top