Panda 2012+ 2013 Panda iPhone and AUX input

Currently reading:
Panda 2012+ 2013 Panda iPhone and AUX input

SimonWH

New member
Joined
Oct 21, 2013
Messages
7
Points
5
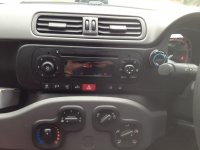
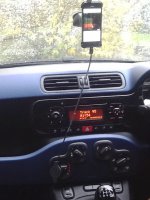
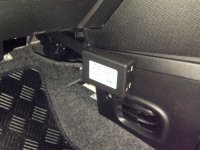
Hi all, Newbie here. I've only had this Panda for two weeks but the main issue I had was not being able to plug my iPhone into the radio (standard CD player).
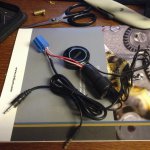
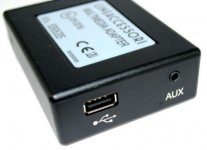
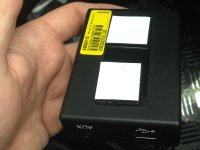
So I bought this:

attachment.php


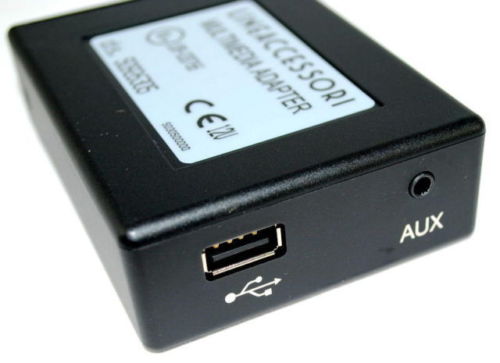
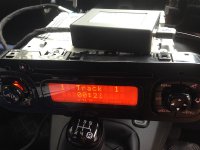
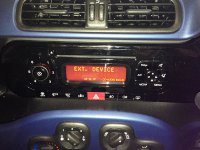
And can now plug my iPhone in and it'll be recharged at the same time via the USB port

attachment.php


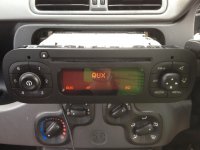
Just press the 'MEDIA' button to sellect 'External Source' You can skip and select tracks via the radio buttons but it does not display the detail on the radio screen. There is an additional phono socket for basic 'audio in'.

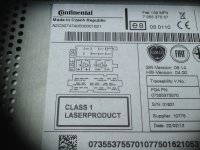
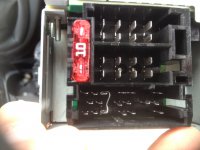
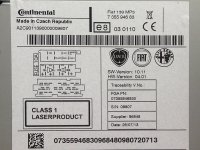
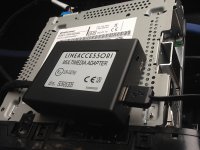
It is a genuine FIAT accessory:
Multimedia Adapter part number 50926305.
I bought it from PERTHPARTS on eBay for £85. (Other retailers list it for £110)

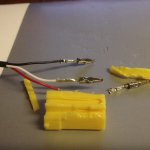
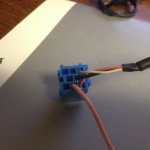
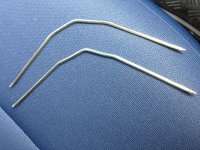
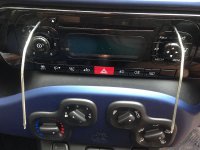
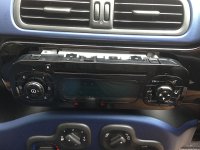
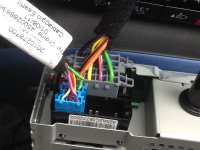
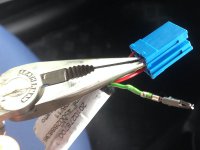
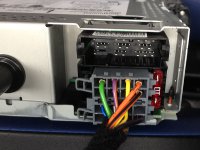
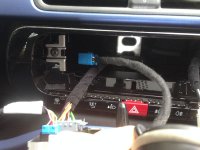
I'll post the step-by-step photos too but it's really very easy to fit, can be done in 10 minutes.


.
 

Attachments

  • adapter.JPG
    adapter.JPG
    19.3 KB · Views: 20,109
  • IMG_0198.JPG
    IMG_0198.JPG
    105.6 KB · Views: 21,528
Fitting the Media Adapter is very straight forward, getting the radio out is the hardest part, but you also need to swap over a couple of leads in one of the connectors to make it compatible with the 2012 model Panda.


As the new Panda Radio only has two holes for the release keys (instead of the usual 4) you'll need to bend the keys straight-ish.

attachment.php


The keys only need to be inserted about an inch to release the lugs but you don't have much purchase on anything to pull the radio out so it is a bit fiddly

attachment.php


After a bit of wiggling and no small amount of cursing the radio comes out of the slot

attachment.php


It will come out just far enough to rest on the gear stick

attachment.php


For those that are interested in these things, this is the label on the 2013 model Panda CD player

attachment.php


The adapter connector fits in the top right slot of this socket on the back of the radio

attachment.php


It comes out of the box with the VIOLET and GREEN wires in this position. These need to be swapped over to be compatible with the Panda radio. ON ONE END ONLY, do not swap them over on both ends of the wiring

attachment.php


With a pair of pliers just pull them out and swap them over. They are in VERY tightly. Do not yank them out but grip firmly and pull with steady force, they'll come out eventually. When you swap them over make sure they go back the correct way around, they must align with the pins on the back of the radio. Look at the other connectors to see which way round they go

attachment.php


It just clicks into place

attachment.php


I chose to test it before fitting it all back in place. It worked straight away. Just press the MEDIA button to see 'External Source'

attachment.php


The iPhone plugs into the USB socket using any compatible lead. It also charges the phone at the same time (not tested it with an iPad yet). Or you can plug it into the AUX socket with a standard phono lead.

attachment.php


Next job is to thread the wire down the back of the dashboard. There is plenty of room to get your hands in and fish it out from underneath the dashboard and route it to wherever you're going to place the adapter

attachment.php


the adapter comes with sticky velcro tabs so allowing you to place it anywhere convenient. The instruction manual details a method for placing is INSIDE the glovebox but I figured that would be inconvenient and the glovebox lid wouldn't fit very snuggly once closed

attachment.php


I chose to stick mine on the side of the centre console under the dash (see below) it is not as neat and hidden as I'd like but it makes it easier to plug things in and means I wont be trapping the USB cable in the glovebox lid.

attachment.php


The all important end result! You now have an EXTERNAL SOURCE for music on the move. Rock On!!

attachment.php


In the attachments below is a PDF of the fitting manual if you need it.


.
 

Attachments

  • IMG_3114.JPG
    IMG_3114.JPG
    220.8 KB · Views: 21,158
  • IMG_3115.JPG
    IMG_3115.JPG
    122.1 KB · Views: 21,275
  • IMG_3116.JPG
    IMG_3116.JPG
    123 KB · Views: 20,863
  • IMG_3117.JPG
    IMG_3117.JPG
    94.3 KB · Views: 20,715
  • IMG_3118.JPG
    IMG_3118.JPG
    155.2 KB · Views: 20,703
  • IMG_3126.JPG
    IMG_3126.JPG
    97.9 KB · Views: 20,149
  • IMG_3123.JPG
    IMG_3123.JPG
    108.7 KB · Views: 20,432
  • IMG_3122.JPG
    IMG_3122.JPG
    91.7 KB · Views: 20,343
  • IMG_3120.JPG
    IMG_3120.JPG
    68.9 KB · Views: 20,323
  • IMG_3119.JPG
    IMG_3119.JPG
    111.9 KB · Views: 20,616
  • IMG_3136.JPG
    IMG_3136.JPG
    144.4 KB · Views: 19,833
  • IMG_3135.JPG
    IMG_3135.JPG
    125.9 KB · Views: 20,074
  • IMG_3131.JPG
    IMG_3131.JPG
    85 KB · Views: 19,932
  • IMG_3129.JPG
    IMG_3129.JPG
    109.1 KB · Views: 20,050
  • IMG_3127.JPG
    IMG_3127.JPG
    108.1 KB · Views: 20,066
  • media_adapter.pdf
    875.6 KB · Views: 674
Good work Simon.

I think I should put a warning here however.

Removing the pins is a really tricky task. I managed to break the pin for the green wire and couldn't get it out of the ISO housing. As a result I had to order a new ISO housing and a whole load of new pins.

Several days later when I received the new ISO housing and pins - I spent all night trying to remove the wires from the old ISO housing in to the new one. Again, some pins jammed in and as a result I had to rewire half the wires with new pins for the new housing.

This morning I went to fit it - and DISASTER.

I spent about an hour trying to find away of feeding the ISO cable from behind the dashboard to down below. How can anyone claim this easy?! Anyway, whilst doing this, the radio (that was resting on the gearknob) fell off - grazing the surrounding coloured plastic and snapped off the ariel lead connection. As well as this, whilst I was trying to feed the lead, some of the pins and disconnected from the wires in the ISO housing.

So after spending £90 on the USB device, £5 for a new USO housing and pins, several hours of trying to re-wire and install it in the car I have now got a non-functioning radio, damaged plastic work around the radio and cut fingers.

My advice to anyone doing this - just get a new head unit.

Or if you follow this route - make sure to do the following

Be really, REALLY careful when changing the two pins around. Spend an evening on it if you have to, applying as little pressure as possible over a very long time.

Do NOT rest the headunit on the gearknob. Take out all the cables and put it somewhere stable.
 
Will it work if there is no media button and there is no way of getting aux up. Can the system be updated?
 
Hi,
I'm looking at buying one of these for my own Panda (2012), but I'm trying to find out if it is compatable with the iPhone 5. I've asked the guy who is selling them on eBay but he doesn't know and the instruction manual for the Multimedia adaptor available online only mentions the iphones upto the 4s.
But has anyone tried the system with the 5?
By looking at the photos above it looks like SimonWH has used an iPhone 5, but can anyone confirm before I go and spend my money on one.
Cheers.
 
Could you plug a USB Bluetooth dongle into this and then connect via Bluetooth instead of wired?
 
So I've gone ahead and ordered this a bluetooth to 3.5mm adapter (I can't post the link to it yet).
I'm hoping it'll connect to the radio via the aux cable, I'll leave it in the glovebox, and connect via bluetooth. I'll report back on how it works.
 
Thought I'd post up how I added bluetooth to my standard Panda Easy stereo for ~£30.

I bought a aux cable from ebay and connected it to the rear of the stereo, I then routed this into the glovebox. You could stop at this step if you didn't have a bluetooth device. But I then connected it to a Bluetooth NFC receiver. This device connects via NFC or standard bluetooth pairing to your phone and allows you to play any sounds from your phone through your stereo.

The device was £15 http://www.amazon.co.uk/dp/B00D6JE96S. It has a battery and needs recharging but will supposedly run for 12hours and will work whilst being charged.

This was super simple and I'm glad I didn't fork out for blue&me.
 
Last edited:
This post contains affiliate links which may earn a commission at no additional cost to you.
Hi everyone,

I'm a posting newbie although I've been lurking for some years as part of a 3 Panda family (wife's 60 plate Multijet; No. 3 daughters 56 plate Multijet and the latest edition, No. 2 daughters 14 plate 1.2 Lounge). Thanks for a very informative and helpful site.

After picking up her Lounge No. 2 daughter wanted the capability to play music from a USB stick so she purchased the Multimedia Adapter kit (for me to fit!). I have just completed the fitting, using the supplied instructions as well as the excellent photo guide supplied by SimonWH at the beginning of this thread and thought I'd pass on some tips to use in conjunction with the guides.

Removing the Head Unit. I removed the Head Unit using 2 modified removal tools as shown in the pictorial guide. However, I also found that the Head Unit is a very tight fit even when unlocked by the removal tools. I discovered that it was easier to remove the Head Unit by fitting the removal tools with the right angle pieces pointing upward (rather than pointing down as shown in Simon's photos), this seems to give a better purchase and the Head Unit came out much easier this way. I also placed some folded towels between the gear stick and console to rest the head Unit on.

Swapping the Violet and Green Wires. In Simon's guide he suggests pulling on the rear of the wires to remove the pins from the mini iso connector. As well as doing this you need to unlock the small spring fingers which lock each pin into place (you can see these in Simon's pictures on the top and bottom of the pins). I did this by pushing a doubled over wire office staple into the connector at the top and bottom of each pin and leaving them there whilst I pulled on the rear of the wire; the wire then pulled out relatively easily.

Removing the Glove-box. The glove box is held in place by T25 Torx headed screws and an Allen headed bolt. There are 3 Torx screws on the front top edge of the glove-box; 2 of them are easy to see but the 3rd one is cunningly hidden on the rear edge of the door latch mechanism. There are also 3 or 4 T25 torx screws just behind the lower front edge of the glove-box. The Allen headed bolt is on the rear face of the glove-box just to the right of the fuse panel cover; it's fairly obvious when you look inside. Once all of the screws and the bolt are undone the only thing holding the box in place is a spring clip on the left hand edge; a gentle tug will release this and the box will pull forward.

Locating the Adapter Box in the Glove-box. The instructions supplied with the kit are for a left hand drive Panda so I assumed that the glove-box in UK spec Pandas would be a straight mirror image and that I could just drill the hole for the wire loom on the opposite side to that shown. However the glove-box is actually a different shape. I actually found that the best place to drill the hole was on the lower right rear face (as you look at the glove-box from the front); this means that the loom runs straight into the adapter box and doesn't contort itself through 90 degrees. The adapter box itself can then be fitted on the inner right hand side using the sticky backed velcro pads supplied.

Routing the Wiring Loom. If you look into the space where the Head Unit sits you will see a gap. in the far left corner; feed the loom through this space and it will drop down into the space behind the glove-box.

Testing the Adapter Box. My final tip is to check that the adapter box is working before you refit the glove-box and head unit.

Finally I should say that adapter box works really well. I'm sorry that I haven't been able to post any pictures but I hope that my addition to the original guide will be of help to someone.
 
Hi there . superb tutorial by the way. Simon could I ask a cupla questions.....
can I ask why the two wires had to be changed over?
is it possible to plug in a usb stick loaded only with mp3s and play/navigate through them using the main stereo controls? cheers
 
Last edited:
Ok, so I've fully figured out how to get aux in working on my Fiat Panda 2012 62 plate with bog standard Fiat 139 radio. I've even managed to go one step further, and get bluetooth integrated. I don't have blue & me.

I did it by searching around, bravely shorting pins together, and pretty much following electronics logic.

Firstly - aux in.
You can get a aux in cable on ebay that will connect to the pins
CDC-R
CDC-GND
CDC-L
And give you a 3.5mm stereo connector.

But if there are only 3 terminals populated on the CD player side this will not work on it's own.

On the sticker on top of the radio, not all of the pins are labelled.
attachment.php

This post:(url removed) post2928666
attachment.php

1 Pre Out Rear Left
2 Pre Out Rear Right
3 Pre Out Ground
4 Pre Out Front Left
5 Pre Out Front Right
6 Amp Switch +12v
7 Telephone In +
8 Telephone In -
9 Radio Mute
10 Switch Supply +12v
11 Remote Control
12 RC Ground
13 Cd Changer Data In
14 Cd Changer Data Out
15 Permanent 12v
16 Switched 12v
17 Bus Ground
18 Aux In Ground
19 Aux In Left
20 Aux In Right

defines a whole load more pins. If you short pins 13 and 14 together (Data IN and Data OUT), then when you press the media button on the radio, you will get 'AUX' displayed, and the input from pins 18,19,20 is played. All the frustrating posts saying you've just got to power off the engine, then plug it in, start it up etc are a waste of time. I tested this theory with a piece of wire:
attachment.php


You need to short some pins otherwise you will not get the aux displayed.
attachment.php


Secondly - power:
Pin 17 is ground
Pin 16 is switched 12V (or switched 14V if you go by the label)
These can be used to power a 12V adaptor which switches on when the radio turns on. I used this to power my bluetooth adaptor.


Shopping list:
  • Aux in connector for fiat. Make sure it is the blue connector with 8 pins, not the yellow one. e.g.
    (url removed)
  • Another connector for fiat, you'll chop this up just to use the pins, could buy two of the same one if you want. In total you'll need 4 spare pins (or just 2 if you don't need 12V power).
  • Himbox HB01 or equivalent bluetooth adaptor and a 12V adaptor, e.g.
    (url removed)
  • female-female 3.5mm stereo jack

Instructions:
  1. Take your spare plug, cut it down or use whatever method you are comfortable with to get the pins out.
    attachment.php
  2. Solder a short wire to join two of the spare pins together. Not too short, at least 50mm.
    attachment.php
  3. Insert the short wire to join the two pins as shown.
    attachment.php
  4. Solder new short wires onto pins 17 and 16 (use fairly thick wire)
  5. Insert into the plug as shown.
    attachment.php
  6. You now have a short loop, a 3.5mm plug cable, and two flying leads.
    Disassemble the 12V adaptor that came with the HB01.
  7. Solder the +12V (red in my case) to the tip connection point, and the 0V wire (pink) to the side connection point.
    attachment.php
  8. Clip the sides back on and tape it up.
  9. Plug in the USB connector.
    The full assembly should look like this:
    attachment.php

  10. Use the 3.5mm female-female connector to connect the two 3.5mm plugs together. (hadn't arrived when I took the photo).
  11. Next remove your radio and plug the new assembly in. You might need to play around with the free cable lengths as there isn't much space behind the radio.
  12. Route the bluetooth controller round to wherever you want it, e.g. round to the steering column like this:
    attachment.php

  13. Turn on the radio. You should see the HB01 light up.
  14. Press the media button on the radio. You should see 'AUX' on the display.
  15. Follow the pairing instructions, and listen for the messages from the HB01.
You now have bluetooth in your fiat panda. You have your 12V socket still free and the only thing extra showing is the bluetooth control module.


You can:
  • press the HB01 main button for ~1 second to activate siri on iphone.
  • Press the HB01 main button briefly for start/stop audio playback
  • Make and receive phone calls using the HB01's built in microphone and the car speakers.

Nothing to charge up, no FM tuning nonsense, minimal wiring/clutter on display.

Have fun!
 

Attachments

  • IMG_2786.JPG
    IMG_2786.JPG
    2.6 MB · Views: 3,986
  • IMG_2784.JPG
    IMG_2784.JPG
    1.9 MB · Views: 4,163
  • IMG_2791.JPG
    IMG_2791.JPG
    1.9 MB · Views: 3,702
  • IMG_2792.JPG
    IMG_2792.JPG
    2 MB · Views: 96
  • IMG_2794.JPG
    IMG_2794.JPG
    2 MB · Views: 3,684
  • IMG_2805.JPG
    IMG_2805.JPG
    2.1 MB · Views: 3,942
  • IMG_2799.JPG
    IMG_2799.JPG
    2 MB · Views: 3,577
  • IMG_2795.JPG
    IMG_2795.JPG
    1.9 MB · Views: 3,679
  • IMG_2782.JPG
    IMG_2782.JPG
    1.7 MB · Views: 3,749
  • IMG_2797.JPG
    IMG_2797.JPG
    1.8 MB · Views: 3,600
  • IMG_2798.JPG
    IMG_2798.JPG
    1.7 MB · Views: 3,604
Newbie here.

Just bought a new panda without the USB blue & me thingy.

As a person who is very much an amateur in these things, i think i would struggle to mess around with the cables at the back. Would it be possible to somehow fit a 3.5mm jack (with a cable to a usb port) to the back of the stereo and then plug in a Bluetooth receiver to the USB? That way the phone could connect to the device without an extra cable.
 
Does anyone know if this will be compatible with a 2012 Fiat Punto? I believe I have the Delphi radio (all black gloss) but it has no USB, AUX or Bluetooth.
 
Thanks to this thread (I should, we'll find out this weekend) be in the position to upgrade our soon to be purchased Panda's headunit to support bluetooth for the grand total of £20 thanks to eBay (£25 if you include the Airframe+ to clip the phone to the vent). I may be back with further questions (or if I find a neat way to do anything I'll add some photos).

Cheers,

Andy.
 
Just to update (and provide links for anyone in the market to do this) it was a doddle to do (aside from the snug fit of the stereo even with keys it was a bit of an effort to remove from its enclosure). Radio poped out, cable installed and routed down behind the gearbox/glovebox side and then routed round the groove in the gear box column to come out at the front of the gearbox. Then connected the bluetooth reciver to the aux cable and pressed Media and hey presto AUX and bluetooth sucessfully paried and playing.

I got both items from ebay, AUX (item ID 201638690370) and Bluetooth (item ID 262107076613).
 
Back
Top