Technical Replacing front suspension strut

Currently reading:
Technical Replacing front suspension strut

DaveMcT

Distinguished member
Joined
Sep 14, 2009
Messages
19,492
Points
3,294
Mrs Dave's suspension feels ok to drive, but nearside strut leaking oil. A pair of Sachs units ordered and job done.

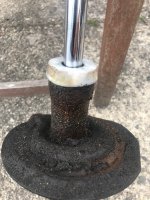
The oil leak was not the seal. Both tops were badly rusted. Perhaps I should have painted the new struts.

I used cargo tie-down straps to compress the springs. Much easier than spring compressors.
Car already supported on axle stands. Jacked up the suspension with jack under bottom ball joint. Put two tie down straps around the now compressed spring coils and pulled up tight. Lowering the jack left the spring compressed.

Both top bearings were dry. I opened the new bearings and packed with waterproof grease. They only move slowly over less than 1/2 a turn so packed solid with grease is good. The rubber top mounts are in fine condition so annoying that you have to buy the whole lot just to get the bearings.

Spring paint was badly flaking. Cleaned off flaking paint and coated with copper grease. S4P has them at about £50 the pair, so will have to get some new springs from S4P. Top bump stops are in good condition.

Bottom bolts to hub were in good condition but tight to remove. Cleaned threads with a wire brush and they came off ok. Copper grease all the way up will help for next time.

The dirt trap behind the struts were cleaned out and vacumed out. No signs of corrosion but painted the area with copper grease (that stuff is getting seriously used).
 

Attachments

  • IMG_2944.jpeg
    IMG_2944.jpeg
    2.3 MB · Views: 161
  • IMG_2943.jpeg
    IMG_2943.jpeg
    2.8 MB · Views: 39
Last edited:
You can get the bearings separately, but they aren't much cheaper than buying the whole mount!

The 100hp doesn't even need spring compressors to whip the spring off, which is pretty handy :)

That copper grease will last about 5 seconds and be washed away the first time you clean under the arches. Tbh, I wouldn't want to stick any of that in the dirt trap behind the front struts as that is just asking for more **** to stick there and block the drain holes!
 
That copper grease will last about 5 seconds and be washed away the first time you clean under the arches. Tbh, I wouldn't want to stick any of that in the dirt trap behind the front struts as that is just asking for more **** to stick there and block the drain holes!

This was the Dynamic 1200.

The struts came off fine but needed the straps to pull the springs down a little. 100HP at the back has shorter versions of normal Panda springs (same wire and same coil pitch). I expect it's been done a similar way at the front.

The dirt trap did not seem to have any drain holes (checked with mirror) but it was dry so must have something to let the water out. The Goo I just painted on so wont block the drain holes. The dirt trap was filled to the brim with grit so anything to protect it is good.
 
Last edited:
Any protection in the area behind the strut is better than none on mine I used Dinitrol RC900, covered that with white stonechip then a liberal coat of Dinitrol carroheat 4110 hopefully that'll keep the rot at bay.:)
 
The dirt trap did not seem to have any drain holes
My 2004 1.2 definitely does have drain holes, one quite large hole at the front end of each dirt trap. Mine were blocked solid with a stone or two and 14 years' worth of muck, took some digging out.

The drain holes were the same each side, quite neat edges and no rust, so I assume they are supposed to be there:D
 
Last edited:
The cack in mine was bone dry and well packed so the water was clearly getting out. A brush over with copper grease adds another layer of goodness. Closed cell foam packing would be a good idea but I did not have anything suitable.

I did notice one brake pipe grommet had popped out of its hole. There was no sign of chafing but also no way of getting it back. I slit a piece of reinforced fuel hose and slipped that over the pipe to make sure it can't chafe.

I use the copper grease on exhaust pipe welds. The manufacturers (almost) never remove the welding millscale before finish coating so they always rust. A coat after new rust has pushed off the millscale seems to keep it from getting too bad too quickly. The same stuff does a great job where metal brake pipes had blown the plastic coating under flare nuts.
 
thats a lot of oil for a shock ??? Its quite thin oil ???

Everyone I have done front or rear has always leaked down one side not evenly around.


its almost like it was sprayed it with engine oil to stop corrosion by a previous owner
 
I did notice one brake pipe grommet had popped out of its hole. There was no sign of chafing but also no way of getting it back. I slit a piece of reinforced fuel hose and slipped that over the pipe to make sure it can't chafe.


How hard can it be to pop them back in properly


Just looked at mine. Grommets are installed correctly and I have changed the struts.


I don't even remember doing them.
 
The cack in mine was bone dry and well packed so the water was clearly getting out. A brush over with copper grease adds another layer of goodness. Closed cell foam packing would be a good idea but I did not have anything suitable.

I did notice one brake pipe grommet had popped out of its hole. There was no sign of chafing but also no way of getting it back. I slit a piece of reinforced fuel hose and slipped that over the pipe to make sure it can't chafe.

I use the copper grease on exhaust pipe welds. The manufacturers (almost) never remove the welding millscale before finish coating so they always rust. A coat after new rust has pushed off the millscale seems to keep it from getting too bad too quickly. The same stuff does a great job where metal brake pipes had blown the plastic coating under flare nuts.

Good to see copper grease being used ?? if only it was used more by previous owners the next person doing repairs won't struggle getting bottom ball joint bolts out or exhaust clamp/studs off. I use a dab on wheel studs too and on the braking system especially caliper bolts. In fact anywhere that needs it. Now whenever I work on the car I don't spend hours freeing bolts off before I do the original work.
 
On threads I tend to use Action Can CS90. £10 for 500ml. It's a heavy on solids so minimal mess but very effective. For corrosion protection the cheaper stuff is better. My Carlube copper grease is like thick paint ideal for - erm - painting. ;)
 
thats a lot of oil for a shock ??? Its quite thin oil ???

Everyone I have done front or rear has always leaked down one side not evenly around.

its almost like it was sprayed it with engine oil to stop corrosion by a previous owner

The other side was dry but almost as badly corroded. I have not seen that before. It leaked due to corrosion around the top of the shock the seal is actually ok. Amazingly the shock damping was hardly any worse that the other side.

Copper grease is anti seize stuff, it's a waste painting with it.

The CS-90 I use on threads is a stiff paste. The Comma brand stuff I paint on rusty (or potentially rusty areas) is has a consistency like thick paint. I brush it on from a tin that's lasted years. Being oil, it can't flake away like paint.

How hard can it be to pop them back in properly

Just looked at mine. Grommets are installed correctly and I have changed the struts.

I don't even remember doing them.

Nothing to do with the strut replacement job. But I don't ignore other stuff that shows up while working on the car.

I have no idea why the metal brake pipe was not correctly seated. The gearbox side may be easier, but not having three elbows (to reach past the alternator) protecting it with a split hose does the job.

Mentioned, because our car won't be the only one with the issue.
 
Last edited:
Replaced the Pandas front shocks yesterday as the passenger side was shot and had no oil in or dampening and had been clonking for a short while following a pot hole incident !

It took nearly 2 hours, which included a couple of breaks as it was over 100 degrees on the drive. Oh, and the adaptation of a socket, so it fitted within a spanner, on the top mounts under the bonnet - allowing the Allen key to still fit in the top.

Replaced with a set of Bilstein B4 gas dampers and new dust cover kit, which worked out a very reasonable price.

The springs only needed a clean, with no sign of rust/flaky paint and fortunately none of the other bolts had seized.

Dipped the threads in the copper stuff so if they need to come off again they will be easy. I say copper stuff as the labels worn and it’s been in my shed many years - and I can’t recall it’s exact name.

The improvement is immense and the Panda glides along and takes any bumps with ease, rather than crashing over them as it did previously.

Once the rain stops I’ll be taking the Panda for a proper drive to my local beach to let the hound have a run. For the past couple of weeks the Panda has just sat on the drive, so a good run will do it the world of good too.
 
Last edited:
I strongly recommend replacing the bottom end pinch bolts. Mine were structurally fine, but the exposed bare threads had corroded causing the threads to jam. I got them off but it took an age of back and forth with penetrating oil. They are metric fine so your yobbo brand thread dies wont be any help.
The piston rod tops work best with a crank ended ring spanner. That way, you can hold the spindle with an Allen key and loosen the bolt. For removing the old shock you can just clamp the piston rod with a Mole Grip - it's scrap anyway.
The old top bearings on mine were bone dry. I recommend popping the new bearings out of the rubber mounts, separate them and pack with grease. They are not rolling bearings so wont be damaged by over-greasing. Use a sticky waterproof grease.
Mine had rotted around the top below - the seals were fine. I can only assume it was the rather stiff cover bellows rubbing the paint off the shock top. Clipped on rubber bellows seals would be better if anyone can find something suitable.
 
Back
Top