Technical DIY Servicing Panda

Currently reading:
Technical DIY Servicing Panda

Theleman

Member
Joined
Sep 15, 2015
Messages
332
Points
68
I am planning to do more DIY servicing my Panda.

But as a newbie DIYer, it will be limited to basic service in the beginning, and gradually learning more about it and doing it.

What servicing could be done from home garage with basic tools?
What works must be done by professional garages?

My tools in the shed are,
172 piece socket set
Pliers and screw drivers
Prying bars
Hammers
Hack saw
Work light
Locking pliers
Angle grinder
Power Drill set
Wire cutters

I just ordered,
3 tonne Trolley Jack
6 tonne Axle stands
Folding Mechanics Car Creeper.
 
This post contains affiliate links which may earn a commission at no additional cost to you.
Great info. Much appreciated.

I replaced battery a few days ago, and it was just simple job with 10mm and 13mm sockets. But it saved me 40£ from getting it replaced from garage, and got a lot better battery = Bosch rather than some no name cheaper battery garage was going to fit.

Will be doing next oil and filter change DIY.

And I might have to look into replacing shock absorber and exhaust in the future.
 
A tip with the rear shocks/dampers or in fact most of the chassis bolts.

The rear shock top mounting bolts are easy to get cross threaded. They have self cleaning threads which is handy, but get them crossed and they will dig in and seize. The hardened tip having done damage before you realise it's wrong.

So fit the top bolts first, turning backwards until you feel the screw thread settle. You can now carefully turn them in and tighten. Some anti seize is always a good idea but it wont stop the threads self cutting so take care.

The bottom bolts are aligned by brackets so can't get cross-threaded. They are very long so I use a socket attachment on an 18V cordless drill. Set the screw-driving torque to 15 and run the bolt in. When it bottoms out, the sudden stop wont break your wrist (or in the case of smaller bolts potentially shear the threads).

At the front, you will need new bottom clamp bolts which might not be supplied with new shocks. It's also worth having new steering top bearings while you are in there.
 
Last edited:
Just did an oil and filter change yesterday.
You'll need a 12mm allen key or better still a socket hex set with 12mm included (£9 at screwfix for a small set)
and an oil filter wrench, I used something like this successfully
https://www.ebay.co.uk/itm/Car-Van-...=item5416461389:g:Y1cAAOSw2XFUjEmG:rk:50:pf:0
can be used for other things as well, like loosening tight screw lids etc!
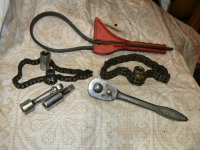
Canister type oil filters, which should always be installed with the seal lightly oiled and by using hand pressure only, can be a pure sod to remove. Many years ago I bought a webbing strap type which is used with the ratchet/"T" bar from my socket set. It worked fine for a year or so then the webbing strap, which had been fraying, broke. This is all that's left of it now.

P1080219.JPG

By now I was working for a living and regularly doing my own and family cars in my spare time and I had a Mini Cooper "S" 1275 which I uprated with a fast road cam (731) Downton head etc. It had a duplex timing chain as standard which I renewed as a matter of course and used the old one to make a tourniquet type wrench by brazing it to an old socket (the one on the right in the next picture) Trouble was/is that it has too much surface area so it doesn't bite into the canister very well and is prone to slipping. Within a very short while I got fed up with it and made another one using a standard simplex "A" series chain welded to an old bolt - takes a 3/4 AF socket. This works much better and is my current "go to" favorite. (the one on the left).

P1080216.JPG

I also have a set of 3 "BOA" wrenches (The red thing) but I find that, in many applications, you can't get enough angular movement before the handle bumps into the block, radiator, hoses, etc, etc. So useful for a great many other things but often thwarted by clearance issues on cars.

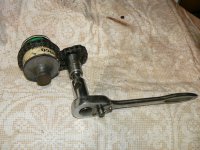
Just to clarify how they are used here's a picture with an old touchup paint can standing in for the filter can.

P1080217.JPG
 
This post contains affiliate links which may earn a commission at no additional cost to you.
Biggest pain with oil filters..
Being given the wrong one .. :(


So I invested in steel band type wrenches. That barely mark the original filter.

So.. when the inevitable happens.. you can drain and re.use the old filter.

They are S.P.
Sykes Pickavant.

Top quality.. but been around for years.. so should be cheap options around.

Charlie
 
Biggest pain with oil filters..
Being given the wrong one

Massive pain being given the wrong anything, Pads, track rod ends, plugs, air filter, etc, etc. However I must say I find it much less of the problem it used to be now that they all seem to use the car's Reg No as identity?
 
which is why I mentioned the oil filter band wrench as the filter I had was a Halfrauds ...ie the wrong one so had to reinstall the original, the band wrench allows this as it doesn't cause any damage like a chain wrench or screwdriver through the body! (oil filter not mine:rolleyes:)
 
had to reinstall the original, the band wrench allows this as it doesn't cause any damage like a chain wrench or screwdriver through the body! (oil filter not mine:rolleyes:)

I've had success with the screwdriver method in the past but the first time I tried it was on a real wreck I was given years ago - it didn't end well. Me with oil up my arm almost to my armpit and a jagged half filter still attached to the car with the other half on the ground! I was young and inexperienced but eventually got it off by driving it round with a big screwdriver hammered against the swaged rim where the seal sits.

I'm lucky/spoiled for choice living in the city with a couple of factors almost on the doorstep. We also have two cars so usually at least one is running - if not there's always my bike! I know sometimes "needs must" but I would be quite reluctant to refit a used filter to an engine with a nice full sump of clean oil.
 
I always fit filter 1st.. as turbo engines favour a pre.filled filter.

And my last cash exchange at Halfords highlighted some very poor practices on their part.

So ..compare the diameter of the rubber seals of the old and new filters..
They should be identical.. or pressurised oil could leak out.. MESSY..!!

spin on the new flter..

Make sure it is a good fit on the threads..

Or it will fall off (fiat main dealer)

Then.. if it runs up to the sealing ring ok.

Spin back off ... clean faces.. fill with the correct engine oil. Lightly covering the face of the seal.

Spin on.. then as tight by one hand..as you can.

Run motor for 10 seconds.. as soon as oil light goes out.. switch off engine.

Back under.. and look for leaks.

Wipe everything clean.. any new drips need investigating.
 
Last edited:
I'm very much a fan of filling the new filter with as much oil as possible before fitting. Cuts down on the delay before the pressure comes up on restarting. I absolutely hate the paper element type fitted to my boy's Astra and the Fabia we just traded in for the KIA. Both were the type where you remove the screw off top, renew the element - which is held in the lid - and refit. any oil poured into the filter body just disappears immediately into the sump! It makes me cringe waiting for the oil light to go out on start up. I suppose I could take the plugs out and crank the petrol Astra on the starter - like priming a rebuilt engine - But the diesel? Anyway it's (the diesel) no longer ours.
 
There's never any need to tighten a disposable filter as hard as you can. They are enough of a struggle to remove with just 1/2 turn after the seal compresses.

I've had the strap wrench slip on the filter case due to over-tightening (it wasn't greasy) and the large pressed steel socket type just spun on the filter body flats. One filter had to be destroyed and chiseled off.

Tight enough is all you need.
 
Last edited:
A tip with the rear shocks/dampers or in fact most of the chassis bolts.

The rear shock top mounting bolts are easy to get cross threaded. They have self cleaning threads which is handy, but get them crossed and they will dig in and seize. The hardened tip having done damage before you realise it's wrong.

So fit the top bolts first, turning backwards until you feel the screw thread settle. You can now carefully turn them in and tighten. Some anti seize is always a good idea but it wont stop the threads self cutting so take care.

The bottom bolts are aligned by brackets so can't get cross-threaded. They are very long so I use a socket attachment on an 18V cordless drill. Set the screw-driving torque to 15 and run the bolt in. When it bottoms out, the sudden stop wont break your wrist (or in the case of smaller bolts potentially shear the threads).

At the front, you will need new bottom clamp bolts which might not be supplied with new shocks. It's also worth having new steering top bearings while you are in there.

Great advice. Thanks.

Came across excellent video for Panda front suspension replacement in youtube.
 
Last edited:
Hi Theleman, I just did my first service on my '54 plate 1.2 this afternoon, and happily I didn't even have to jack the car up!
I renewed engine oil & filter, transmission oil, and spark plugs.
I wouldn't do transmission oil & plugs every year, but I've only had the car 4 months & didn't know how old they were. Pretty old, despite FSH...
In addition to those mentioned above, I needed:
8mm allen key for gearbox drain plug as well as 12mm allen key for filler plug (remove first!), good video here
My local motor factors sells 75W-90 transmission oil in 1litre bottles, so I needed 2.
16mm plug wrench for spark plugs (but I understand there are 2 different sizes?). A deep socket & extension bar would also work.
To get to the plugs, remove the air filter housing with 2 bolts, 10mm socket. The plugs are a bit fiddly to get to, low down between the cam cover and throttle body. It took me some time making sure they were threaded properly by hand before getting the wrench on them. Some might find it easier to remove the throttle body first, mine is held in place with 3 torx screws.
My engine oil filter and sump plug were stupidly tight (I put a jack handle on the 12mm allen key for more leverage) but it wasn't too challenging as long as you have everything you need in place before you start. Hope this helps!
 
Hi rmjbn

Great info. Thank you for your post and video link.
A lot to learn here for me. Great stuff. cheers.
 
Your tool kit doesn't have any ring/open ended spanners.
A good set is essential, so it's worth adding.

A socket works from above the nut or bolt, whereas a ring works at the same level as the bolt head. One will often do what the other can't.
 
My local motor factors sells 75W-90 transmission oil in 1litre bottles, so I needed 2.

API GL4 or GL5? Fiat's spec for my 2010 Panda 1.2 is 75w/80 to API GL 4(plus).

Historically using GL5 in a box for which GL4 was specified was asking for trouble because GL5 spec oils contained anti friction additives which slowly leeched material away from "yellow" metals (like brass, phosphor bronze, etc. So gear selector forks, synchro rings, etc). There seems now to be uncertainty about this with the newest GL5 products as I've seen statements to the effect that manufacturers have addressed this so you can now use the GL5. I would ask though - which manufacturers? also how can you be sure that you're not buying older stock?

So I now only buy the manufacturer recommended product for any vehicle I'm working on. So for the Fiats (Panda and Punto) I go to Shop4parts and buy Petronas Tutela 75w/80 GL4plus although we did top up my boy's 2012 Punto with Granville MTF M 75w/80 API GL4 about 3 years ago when he bought it and it's been fine (I will probably change it to the Tutela this summer when it's getting a "big" service though) For my VAG stuff (Skoda/SEAT) I go to TPS and follow their genuine part recommendation. - I find it quite difficult to find out what the VAG product actually is as they don't, or haven't in the past, listed the oil spec on the tin. So buying the genuine stuff just makes me feel "comfortable" and TPS prices are very affordable. Still deciding what to do about the Honda which I will be doing this summer as I've not yet found the Honda equivalent to Shop4parts or TPS.

By the way API GL4(plus) seems to be a spec that doesn't exist when you look at the API spec sheets? I have read speculation that it is possibly an oil that complies with the new "friendly" GL5 spec but is labeled GL4(plus) so as not to "scare" the older guys, like me, who remember the dire results of using a GL5 oil in a box where GL4 was specified.
 
Back
Top