Technical New Steel Coolant Pipe

Currently reading:
Technical New Steel Coolant Pipe

Joined
Jul 1, 2014
Messages
3,581
Points
978
Location
United Kingdom
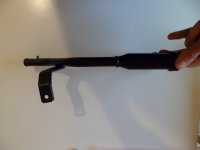
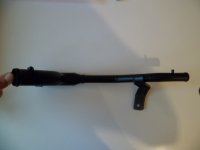
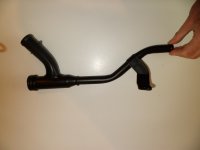
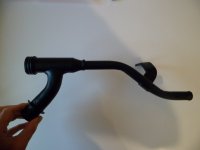
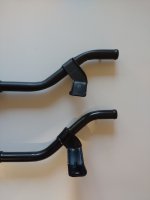
To all Panda owners reading this, take a look at your 'Coolant Outflow Pipe'.

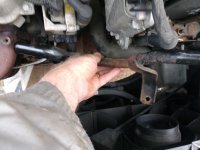
It runs from the left side of your engine where the water pump is, under the exhaust manifold and out to the right onto a rubber flexible hose.

You may discover that the black paint finish of this steel pipe has rotted and if you do, you should replace it to avoid further problems at a bad time.

The part photographed is £40 from FIAT, and interestingly, the one you buy today is a 'revised' part from the original hinting at a recognised weakness perhaps in the original.

We fitted this in 20 minutes and you DO NOT need to remove the exhaust manifold, just the heat cover over it. Do not let a mechanic tell you this will take hours and needs removed or that you're better to leave it..

Mines developed a huge GASH and eventually squirted Coolant out in your face!!! Not good for you, or the car! If you run the car with no Coolant then it won't take long to utterly destroy the engine due to overheating and leave you stranded with an 850kg paperweight on wheels.

Two clips on each end (20.5mm and 23mm respectively) and the third part pushes into the engine and comes with a seal.

I am using information the forum gave me in order to do this, and reminding you to check for this problem in advance as not so long ago it was an issue for me, and had it burst whilst driving I may not have my car in good shape or working condition. Thanks to everyone who has helped me on this one a few weeks ago.

Hope this helps someone and if you need any help I am now able to help :)

Part number can be seen in photos as well as the part itself.

IMG_1473865668.276474.jpg

IMG_1473865685.935995.jpg

IMG_1473865697.236961.jpg
 
Good information. The larger engines used in Alfas and Fiats have a similar design but they really are not removable with exhaust manifold in place.

If you really cannot get an OEM new pipe, you could repair the old pipe with silicone hoses. Don't worry about reflected heat from the exhaust because silicone is fine up to 250 degs C.
 
Last edited:
Hi all, Has anyone fitted a new steel coolant pipe very recently? If so, when you took it out of the packet, did you think the orientation of the little bracket looked a bit odd, before you'd had a chance to compare it with the old leaky pipe still on the car?

I'm not at all convinced that the bracket on my pipe will align correctly and sit perfectly flush against the mounting point on the engine block where the small M6 bolt fits. The final 'flat' on the very end of the bracket just doesn't seem to be all 'parallel and perpendicular' to the centre axis of the 'main tube' in the pipe, if you see what I mean. I think I would have expected it to
be.

The new pipe (Original Birth, not genuine Fiat) definitely isn't damaged at all, it's just how it is. I've loaded a couple of pictures. I've seen a few other pictures of these pipes on the forum (Jock and Theleman), but it's difficult to compare.

Anyone have views on this, especially if you thought the same thing at first? If this pipe has a manufacturing flaw, I'd prefer to find out now if at all possible before the old pipe is removed.

Thanks for your help. Stuart
 

Attachments

  • SAM_2736.JPG
    SAM_2736.JPG
    2 MB · Views: 60
  • SAM_2735.JPG
    SAM_2735.JPG
    2.1 MB · Views: 67
  • SAM_2734.JPG
    SAM_2734.JPG
    2 MB · Views: 66
  • SAM_2733.JPG
    SAM_2733.JPG
    2.1 MB · Views: 72
The Original birth pipe I bought from S4p was a perfect fit (some 18 months ago now) so must have been identical to the old one. I could have taken pictures of the old one for you to compare but unfortunately, after having been kicked around the garage floor for all that time, I finally took it to the recycling centre last week! Sorry.
Jock
 
Thanks for the views. I still wasn't convinced that the bracket on the Original Birth coolant pipe shown above wasn't flawed, so I raised it with the supplier. They agreed and replaced it superquickly. The picture of the flawed pipe and it's replacement illustrates the problem.

So, the new pipe is now fitted and I'll keep a lookout to check the joints are OK. Couple of things I'd add to what's been said already. Though straightforward this job can actually take a DIYer quite a bit of time if you've never done it before and things don't loosen easily (eg heatshield securing nuts or bolts). I'd say the oil filter should always come off so you can get your hands in there. The rubber seal on my old pipe was left in the block when the old pipe was removed, so I had to get a large screwdriver in there to lever it out. I also spent quite a bit of time trying to get the old pipe out from behind the cat. It comes out from above, on the right as you look at it from the front, with the pipe oriented in the position shown. Finally as Jock said, it does take a lot of effort and a big heave to get the new pipe with the new greased seal to fit in the block. There must be a knack to it. For me, a few gentle taps with a heavy hammer helped get it lined up.

Stuart
 

Attachments

  • 2019-10-17 13.07.00.jpg
    2019-10-17 13.07.00.jpg
    2.8 MB · Views: 140
  • 2019-10-23 11.16.09.jpg
    2019-10-23 11.16.09.jpg
    2.8 MB · Views: 155
Just overhauled the top end of my 100hp.

The pipe was still perfect on the outside but having a look on the inside showed tonnes of corrosion especially at the water pump end, affecting the seal. It would have only been a matter of time before it completely corroded through.

Good information, I agree. Definitely check out the steel pipe on your engine!
 
If the car has a solid service history, the pipe should be fine internally. BUT if you are working in the area, it would be wise to change the pipe as they are cheap to buy. I'm a geek so would always paint the new pipe even though its not really necessary (standard lifetime = >10 years).

If the seal is rubber (even silicone rubber) it will not be happy with ordinary petroleum grease. I always use red rubber grease on seals so there's no risk of messing up.

https://www.ebay.co.uk/sch/i.html?_from=R40&_trksid=m570.l1313&_nkw=red+rubber+grease&_sacat=0
 
Last edited:
This post contains affiliate links which may earn a commission at no additional cost to you.
If the seal is rubber (even silicone rubber) it will not be happy with ordinary petroleum grease. I always use red rubber grease on seals so there's no risk of messing up.

https://www.ebay.co.uk/sch/i.html?_from=R40&_trksid=m570.l1313&_nkw=red+rubber+grease&_sacat=0

I ran out of red rubber grease over a year ago and have been using silicone grease - which I bought when I was fitting a seal kit to a caliper on one of the family fleet - on fitments like this. So far so good.
 
This post contains affiliate links which may earn a commission at no additional cost to you.
I had a bad experience with silicone grease on alloy brake calipers. It's wonderfully slippery but brake pistons need to stick/slip and will bind if the grease is too "good". I found out the hard way on a Japanese bike. The brakes came on fine and promptly jammed solid. There was no spring back from the square section seals. The silicone grease proved virtually impossible to clean off and despite another set of new seals, I ended up buying new calipers.

Red rubber grease has never caused such problems and I still have the 500ml tub I bought back then.
 
Last edited:
Back
Top