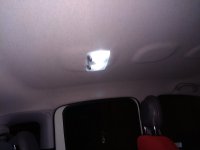
General interior lights dissapointing (fixed)

Currently reading:
General interior lights dissapointing (fixed)

LegionsX

Member
Joined
Mar 5, 2020
Messages
26
Points
56
Hello,

since i have had my Panda i have noticed how poor the interior lights are,

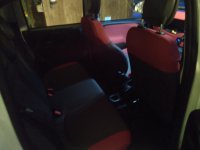
I have addresed this in several of my previous cars so after a few weeks and the kids saying 'i can't get my seatbelt on' in the back and the candles in the front being decorative rather than functional i set about improving things.

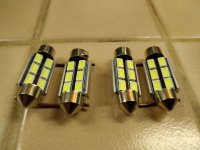
i started by ordering some LED festoon replacements from Amazon.

these were an improvement but i thought it could be better.

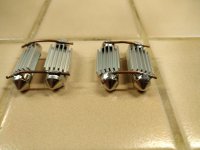
The main problem is the 'optics' are smoked grey plastic and a 'reflector' which is simply painted silver.

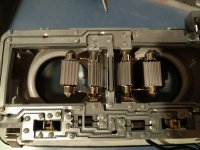
to counter this i connected two of the bulbs together with some earth wire from houshold 'twin and earth' cable..

these were angled to provide the original light direction plus added down facing.
 

Attachments

  • IMG_20200315_214741.jpg
    IMG_20200315_214741.jpg
    5 MB · Views: 78
  • IMG_20200315_214752.jpg
    IMG_20200315_214752.jpg
    4.8 MB · Views: 33
This fixed the front lighting nicely..
 

Attachments

  • IMG_20200319_184043.jpg
    IMG_20200319_184043.jpg
    2.3 MB · Views: 53
Last edited:
the rear of the car however was thrown into further contrasting darkness..
 

Attachments

  • IMG_20200319_184100.jpg
    IMG_20200319_184100.jpg
    1.5 MB · Views: 30
Last edited:
I looked on Ebay and found a fitting similar to the one in the front,
from a grand punto.

when it arrived i noticed it was slightly different, mainly the lenses are clear rather than smoked.

i used the fitting to create a cutout template, this was then used to cut out a support plate from sone 3mm plastic, this was about 30mm larger than the fitting, and the light fits it fine.

the same template was then used to cut a hole in the roof lining at the front of the Squircle above the rear seats.

i reused some of the polystyrene packing that the light was packed in.
this was cut into two lengths about 30mm square and about as long as the light is wide.

the support plastic was inserted into the hole in the roof and a little hot glue along the front and the back keeps it in place.

the polystyrene spacers were then put along the front and back edge to hold the roof lining down just enogh to suit the depth of the light.

A three way cable was soldered onto the pins of the fitting and the bulbs replaced with the custom ones from earlier in the post.

the cable was threaded forwards to the existing light and connected to the same pins there.

the fitting was then pressed up into the new mounting front edge first.

All done!

the results speak for themselves..

I thought i would share the process in case anyone else had considered this route but not got around to it!
 

Attachments

  • IMG_20200319_184223.jpg
    IMG_20200319_184223.jpg
    4.7 MB · Views: 75
  • IMG_20200319_184151.jpg
    IMG_20200319_184151.jpg
    2.4 MB · Views: 52
  • IMG_20200319_184117.jpg
    IMG_20200319_184117.jpg
    2.3 MB · Views: 51
Last edited:
Great, with LED sure that would be fine. To add a little moderation it would not be generally recommended to use polystyrene near any sort of wiring, a conventional bulb would run hot, and chafed or poor connections, partial shorts, etc, are common enough reasons for fires. A block of wood would be better, or some other dense materials. To affirm, your job here will be fine, just be aware if doing a campervan for example... But I have to deal with UL test requirements for electrical safety where the bar is set very high almost towards paranoid.
 
Just to add, wiring the two units in parallel preserves all the functions of both,

The switches perform identically and do not interfere with the other lamp. :slayer:
 
Nicely done.
It seem that Fiat have stopped fitting the front light with two separate lenses? Both my 2017 Panda 4x4, and its 2018 replacement (after a write-off) 'only' have the more basic single large lamp (whereas my 2013 4x4 had the twin bulb/reading light version). This does allow some light into the back, but looses the rather useful passenger-only reading light.
I put a genuine Fiat accessory LED panel in mine (which cannot be used in the light with two separate bulbs) and this helped further. But have still been wondering abot a separate light in the back.
Will have to wait for now though...
 
Last edited:
Nicely done.
It seem that Fiat have stopped fitting the front light with two separate lenses? Both my 2017 Panda 4x4, and its 2018 replacement (after a write-off) 'only' have the more basic single large lamp (whereas my 2013 4x4 had the twin bulb/reading light version). This does allow some light into the back, but looses the rather useful passenger-only reading light.
I put a genuine Fiat accessory LED panel in mine (which cannot be used in the light with two separate bulbs) and this helped further. But have still been wondering abot a separate light in the back.
Will have to wait for now though...
Just found a photo I took whilst upgrading the interior clusters...

You may be able to use a similar technique with the single bulb variant.
 

Attachments

  • IMG_20200217_192633.jpg
    IMG_20200217_192633.jpg
    3.4 MB · Views: 49
Last edited:
Back
Top