Technical How to dismantle this connector

Currently reading:
Technical How to dismantle this connector

Joined
Nov 24, 2014
Messages
34
Points
26
I finally got around to fitting my towbar this weekend.

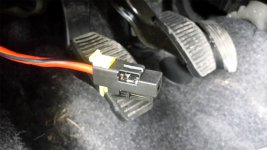
Towbar was easy, the electrics are a pain. Most of it is now done, the only thing left to do is to connect a power line into a positive wire coming off the battery. There's a nice chunky one going into the fuse box under the steering wheel that I'd like to join onto, but first I need to remove the plastic cover from the connector.

Does anyone know how to slide the metal part out of the plastic holder. There's a yellow plastic tab that slides out, which I figured would unlock things, but no joy. I'm guessing something inside the hole it uncovers needs lifting/pushing down, but I can't work it out.

I've attached a picture (I've rested the yellow locking tab on the back of the plug so you can see it).

Any clues as to how to dismantle this connector would be very much appreciated. Thanks.
 

Attachments

  • plug1.jpg
    plug1.jpg
    132.4 KB · Views: 100
Cant help you with your question (sorry i know its anoying lol)

Good luck, when youve finnished could you post a picture of the towbar on the 4x4 please
 
Does anyone know how to slide the metal part out of the plastic holder. There's a yellow plastic tab that slides out, which I figured would unlock things, but no joy. I'm guessing something inside the hole it uncovers needs lifting/pushing down, but I can't work it out.

Hi,
I don't know the exact details of that connector, but typically there is a tab, either a plastic one part of the moulding, or a metal one part of the contact. You need special tool thet slides in and depresses the tab, allowing the contact to be pulled out. The tool can go in from the front or the rear. Mostly the tool slides in alongside the contact, but sometimes there is a separate hole. A close examination with a magnifying glass and torch may give a clue.
But more importantly, why do you want to take it apart? You can't easily add a second wire to it. You would be better off tapping in further down the wire.
I'd remove a small amount of insulation without cutting the wire, wrap the tap-in wire around it and solder it. Insulate with self amalgamating tape.
I don't recommend the "scotch-lok" type of tap-in connector.

Robert G8RPI.
 
Thanks. I did end up dusting off the soldering iron in the end.

My plan was to prise open the clamp holding the wire to the connector, add the second wire and crimp it back up, but after lots of head scratching and gentle poking I figured I'd end up destroying more than I fixed, so it's twisted, soldered and wrapped.

And I must say I'm very happy with the installation overall. I went for the Westfalia detachable tow bar. More expensive than others, but easy to fit, and simple to put the bar on off. It also feels really solid and has an air of quality about it. There's also no sign that the car has a towbar fitted when the bar itself is detached (see pictures).

The electrics are a pain, but you just need to be patient and plod your way through the process (the last tow bar I fitted was to my Defender and the electrics just plugged into a socket behind a door in the wheel arch - no such luck with the Panda).

Anyway, I now know the interior of the Panda 4x4 like the back of my hand.
 

Attachments

  • bar_on1.jpg
    bar_on1.jpg
    406.4 KB · Views: 60
  • tow_on_side1.jpg
    tow_on_side1.jpg
    323.8 KB · Views: 58
  • tow_on_side2.jpg
    tow_on_side2.jpg
    789.5 KB · Views: 55
  • tow_off1.jpg
    tow_off1.jpg
    461.2 KB · Views: 49
Last edited:
First tow and the Panda performed well. I could feel that there will be a tendency for the trailer to wag the car once it's loaded, but I'm sure it'll be manageable as long as I don't go mad with the loads.

And unbelievably all of the lights on the trailer worked as they should, so I think I deserve a beer.
 

Attachments

  • FirstTow.jpg
    FirstTow.jpg
    504.8 KB · Views: 53
First tow and the Panda performed well. I could feel that there will be a tendency for the trailer to wag the car once it's loaded, but I'm sure it'll be manageable as long as I don't go mad with the loads.

And unbelievably all of the lights on the trailer worked as they should, so I think I deserve a beer.

Looks good, ordered my twinair cross today, have opted for a towbar, just hope it will pull my 750kg trailer tent.
 
In defence of 'Scotchlock' - There's nothing wrong with an IDC (Insulation Displacement Connector) provided of course you get it for the correct wire gauge! Same with pre insulated connectors of the 'fast on type' - Most wiring bodge jobs involve incorrect crimp tool or incorrect gauge.
 
Hi,
I agree. I did not say there was anything wrong with Scotch-Loks, just did not recommend them for this job. It would need a tap-in type Scotch-Lok designed for two different wire gauges. These are hard to find in small quantities. Also what is the wire gauge? Note that the biggest users of this style of IDC connector (telecos) use the "gel" filled style to keep moisture out.
 
Sorry to be a bit late to this party (which has wandered off-topic a bit!), but with regard to dismantling a connector to bring more wires into it, you might well find even if you succeed that there is no room to add another wire - especially a heavy gauge one (which is the point here I gather). As someone else pointed out, it is better to break into and tap off the wire further up.

I don't like Scotchlocks as they can cut through strands ot the parent wire, reducing the current capacity - unless they are an exact size for the wire, which is unlikely as car wires come in all sizes. Also, the "cutters" in a Scotchlok are steel which is not such a good conductor as brass or copper, and introduces a corrosion problem, added to which the side connection is only through a narrow area (is has to be, to cut the insulation). I regard Scotchlocks as only OK for low current signal cables, not power cables. A further problem is that you cannot dismantle and re-assemble Scotchlocks, eg for access during later work, without compromising the wires like probably severing even more strands.

If you can solder I prefer brass bullet connectors into a twinned socket. Otherwise I'd use a unit of standard screwed terminal connection block (say 30A in this application) inside a small plastic box to keep the assembly from kinking.
 
Back
Top