Technical Just started and could do with some 4x4 help.

Currently reading:
Technical Just started and could do with some 4x4 help.

Re: Spray Booth Time

Well Max and now Harry are well into the best bits.

Setback was the drivers door that is about to get re-skinned.

Anyway a large amount of preparation was underway.

I am getting seriously worried I did enough marking, labeling and photographing to get this all back into a moving vehicle.


Touch of perfection in these guys. Even the film is almost crease free.


Paint Teaser....flake poppin!


Primer applied.


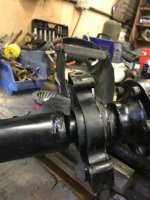
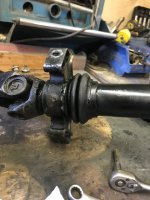
So shaft rebuild underway and Freddy hopefully coming up with the needful.

Thanks for looking.


No worries give anyone a face time and help will be at hand
 
Ricambio Visit

Well took a trip through Surrey on the way to a meeting.
Had a Tipo hire car so allowed to park outside!

Lots to drool over...


Think my life may need something like this from a Panda?


You know that 'I only wanted one thing and came back with...' that!:devil:

Was collecting a door skin when the boss offered this rot free all the way from the South of Italy.


Bargain!

Then proceeded to pick up a few other parts...


Really nice people discussed the Panda build, Italy and life. Then an expresso. Little Italy!(y)

Stripping it down tonight for prep tomorrow:slayer:
 
Getting Mucky

Having pulled the front shocks with the hubs shafts and arms I needed to remove the hub nuts.


Well a 500mm breaker bar and they still weren't compliant so 20 minutes with air tools and they are off. The front arm (camber) nut also didn't want to play.


After that the assembly fell apart with brute force and an angle grinder.


The spacer plate needs a clean up.


The drivers side hub was free wheeling.


The other side was shot and only rotating I guess as the bearings had been ground down. Noted the outer alloy seal retainer was gone and the seal probably wasn't.


Have new hub carriers so just need some new hubs now!

The nearside front arm needed a bit of muscle to separate the washers as the inner bush/tube was corroded.


The internal faces were mucky but the plastic bush was still in place on both mounts.


The control arm bolt was also corroded into the front arm. It resisted not the grinder! And a light tap out!

Have new control arms so just need some new bolts (common need).


The brake caliper mount is hinged on one pivot bolt hidden behind the hose bracket. Bit of a weird arrangement but fell apart. More wire brushing to follow.


Found the remains of the drivers side brake cover plate.


More to come.
 
Duplicate picture above should be this. Nut wasn't keen on moving.


Couple of shock bolts needed cutting out as most of the nut had gone and unable to hold a socket.


Nearside brake cover plate intact but mostly rust held by paint.


Understand these are no longer available?(n)
Wonder about a bit of fabrication...:)

Inner plates just need a wire brush again.


Time to clean up the gearbox.
Before's....


ID still visible.


Looking better.


Started a proper clean up with the Dremel like thing.


Then the back axle.

Good scrape.


Then jet washed.


Ready for the wire brush treatment.


Same for the tank.


Leaving everything in this pile for a proper clean up, prep and paint!


Well no more now for a week or so but opportunity to order yet more parts!(y)
 
Fuel tank. It may be an idea to reline the inside with fuel proof paint as pin holes appear without warning.

Also I could be worth your time doing Box rebuild. Circa £100 for the bearing seals ect. Pretty straight forward too .
 
Shaft Strip

Excellent work Derek, this is going to be one exceptional Panda when you done! Your gaiters will be in the post tomorrow morning (y)

So thanks to Panda1408 have a nice new set of rubber things and a loan tool!

So priority now is shaft strip and rebuild.

First the front ones.


Some corrosion on the shaft and similar on the hub.


Circlip pliers in use.


Tri-bearing removed with a light tap.
Groves go outboard.


CV clip falls off with a screwdriver twist. All look original..whats left of them anyway.


Exposes the inner oilseal and bearing.


Cut off the old gaiter.


Looks like original. Doing pretty well for 30 years?


Cut off the other gaiter and lifted some of the gunk. Should ebable to fit bothe gaiters without removing this hub.


Light tap and the oil seal/bearing is removed.


Leaving the bearing surface in OK condition.


Some cleaning up required wire brush and abrasives.


Cleaned up and then rust treatment.


Mask Up and spray.
Rattle Can base primer and burgandy red metallic.


Ready to build.


Larger Shaft


Again tri-bearing clip removed. Even lighter tap to remove.


Prise of the flange clamp.


Cut off the gaiter and expose the oilseal/bearing.


Need to pull the hub on this shaft so clamps flipped off.


Screwdriver is just pointing out the inner circlip tang location.


Bit fidly but hold circlip pliers open then tap off the hub.


Wirebrush, abrasives and rust remover time.


Primer and paint again.


Then a bit of Tricolore.:eek:


Three coats of lacquer.


New wheel hubs arrived.


Next plan propshaft!

Thanks for the advice on the fuel tank was wondering how to improve that!.....(y)
 
Ok here’s a tip for the prop use one of the redundant gaiters and slip it over the prop fill with grease this will prevent debris getting into the bearing
View attachment 18815
 

Attachments

  • Image1517771890.859734.jpg
    Image1517771890.859734.jpg
    325.5 KB · Views: 21
  • Image1517771966.958814.jpg
    Image1517771966.958814.jpg
    334.9 KB · Views: 21
Last edited:
Ok here’s a tip for the prop use one of the redundant gaiters and slip it over the prop fill with grease this will prevent debris getting into the bearing

Thanks! Saw something on that somewhere else.
Have a look tomorrow night.
 
Small Jobs...

For various reasons time has passed with little happening so just a closure on the shafts and a few small tasks.

Trial fit of the oil seal/bearings and check the lengths in Haynes. Weird thing is the bearings were right against the stop when removed? Anyway travel hopefully.:eek:


Then check the measurements again.


Then fit the gaiters essential.


Then using Freedy's tool (which I admit I didn't look after when I used the press... set off with too much enthusiasm ...sorry)


Its not difficult to see which measurements fit which shaft.

All pressed in.


Bit of grease to fit the gaiter over the oil seal/bearing and then fit the clamps.


Just waiting to fit the flanges now.

Then on to the front camber/control arm/radius arm bracket.

Grinder and abrasives.


Bit of acid dipping.


Then lots of wire brush work.


Coat of inhibitor and then a coat or two of 5 year protection (we will see).


Did the hub holders and spacers as well.

One casualty was the camber bush. One was brittle. Thing this may be a pain to source?


While all was drying cut and glued the new headlining cover. Hope it going to blend with the interior colours.


Explorer theme continues.


Before and after on the camber/radius rods and parts.


30 year old bushes v new Ricambio Surrey ones.


Metallic Paint added.


Trial assembly.


Next job...


Seats in for rework, paint being applied, far too much spent on parts, box and engine about to go on a frame..... if the weather improves we could make some progress.

:slayer:
 
Last edited:
Great stuff. No progress for me being too slow getting out! There
 
Derek, on the front driveshafts, the collars you have left on the shafts are part of the old bearings and need to be removed before fitting the new ones. I presume you have already worked that out but just in case you haven't.

Yup part of the way through.
Mr Dremel is my friend.:)
 
More Small Stuff

Just an update on a few smaller bits underway.

First the cleaning and sanding of the gearbox continued. I dropped the drain plugs and the magnet had only attracted a few shards which encouraged me not to strip the box. If it needs doing I now know its a simple job to drop the box again.

So painted the box in VHT Silver and the other bits in black. The anodized (I guess) parts got a lick of gold.


Still have the inside of the clutch housing to decorate.

Next I had a play with the K&N filter. So this is a K&N 56-9152 and the orifice fits the 32 Weber but the 3 supplied locating pins don't work.


So ordered some brass studs. Think they will pick up where the current mount bracket is for two of the holes and dummy the third.

Also ordered some aluminum sheet to see if I can make some sort of replacement for this.


So their later jobs.

Soaked all the brake parts in rust remover/neutraliser. Hardly touched the rot. First the hand brake actuators go under the wire brush.


Now found this symbol under the rot. A bit Dan Brown? So are Fiats protected by the Pope or Satan? :devil:


Brake Caliper brackets next a bit of a before and some time after.


Not forgetting the brake hose bracket.


Laid into the gear shifter and the mounting bracket.


So ended up with a box of nice shiny painted and lacquered little parts.


Had one good mount left so did that as well.


Lastly started on the steering gear.


Well surprised that a gentle tap and the ball joint almost fell off!

The gaiters were well passed saving but have a nice new set from Freddy.


Brackets tapped off.


Now to lots of cleaning up.


More prep to do here.

Found some nice red steel hex sockets for the drive shaft flanges.


Now have a cupboard full of new and refinished parts.


Lots more to do. (y):devil:
 
Last edited:
Re: More Small Stuff

Just an update on a few smaller bits underway.

First the cleaning and sanding of the gearbox continued. I dropped the drain plugs and the magnet had only attracted a few shards which encouraged me not to strip the box. If it needs doing I now know its a simple job to drop the box again.

So painted the box in VHT Silver and the other bits in black. The anodized (I guess) parts got a lick of gold.


Still have the inside of the clutch housing to decorate.

Next I had a play with the K&N filter. So this is a K&N 56-9152 and the orifice fits the 32 Weber but the 3 supplied locating pins don't work.


So ordered some brass studs. Think they will pick up where the current mount bracket is for two of the holes and dummy the third.

Also ordered some aluminum sheet to see if I can make some sort of replacement for this.


So their later jobs.

Soaked all the brake parts in rust remover/neutraliser. Hardly touched the rot. First the hand brake actuators go under the wire brush.


Now found this symbol under the rot. A bit Dan Brown? So are Fiats protected by the Pope or Satan? :devil:


Brake Caliper brackets next a bit of a before and some time after.


Not forgetting the brake hose bracket.


Laid into the gear shifter and the mounting bracket.


So ended up with a box of nice shiny painted and lacquered little parts.


Had one good mount left so did that as well.


Lastly started on the steering gear.


Well surprised that a gentle tap and the ball joint almost fell off!

The gaiters were well passed saving but have a nice new set from Freddy.


Brackets tapped off.


Now to lots of cleaning up.


More prep to do here.

Found some nice red steel hex sockets for the drive shaft flanges.


Now have a cupboard full of new and refinished parts.


Lots more to do. (y):devil:


Steering rack. You may get a M O T fail on the rack. Due to excessive play if the worm gear is striped downthe plate with 2 m6 bolts. Behind are packers that engage the gear, also giving friction resistance altering this will help.
The ball sockets connected to the rack also may have a little slack , give them a gentle squeeze with the vice. Good fix too
 
Re: More Small Stuff

Steering rack. You may get a M O T fail on the rack. Due to excessive play if the worm gear is striped downthe plate with 2 m6 bolts. Behind are packers that engage the gear, also giving friction resistance altering this will help.
The ball sockets connected to the rack also may have a little slack , give them a gentle squeeze with the vice. Good fix too

Well good move!
Things a bit green/brown in here.
More attention needed.
Thanks!

 
More Small Stuff and Engine Gets Mounted

Having stripped the steering rack concluded with a paint job.


Did a lube and grease job to clean out all the moisture ingress then fitted the new gaiters. The nearside one was a cow to get on.


Now before someone notices yes new locking nuts were not in the pack!
More shopping.

Having got the box off the support frame cleaned up the inside of the bell housing as well.


Now the frame is free moved the engine out. Looking neglected.


Clutch off and not looking too bad. Was Sachs OEM? or is this a newer one?


Flywheel came off with out a fight. Still some oil in the sump.


Made sure not to loose this.


Fitted and ready for its time under the wire brush!


Quick degreaser soak.


At least one oil leak explained! Bent dipsticks don't seal too well.


Plan is to move the gunk then pull it apart.

While its soaking lifted the back axel rear cover.

No significant wear.


But rot on the mating faces explains some of the gunk on the axle.


Quick refacing on both sides.


Seems to be sealed with bathroom silicone?


So having finished the de-rust and a few coats of primer it came up well.


Cover got a slightly different finish.


So engine the main focus now. Going for grey block and polishing the rocker cover.

Have to think about the alternator upgrade and new pully.
 
Last edited:
Well a 1/2 day to spend on the engine.

Started with this.


Drained the oil which was let us say 'grim'.


Few befores


Started on the Cambelt.

Two short bolts and one long. This will all be useful hints if I ever have to do one on the car.


Two nuts hold the distributor and I added a mark to help set up.


Fuel pump came off easily.


Not forgetting the pump drive shaft.


Next off with the engine mount and the cover behind it.


Found the timing marks pretty easily. Again useful hints.


Single nut for the tensioner belt was in pretty good order.


Water Pump held on with 'kitchen' mastic. Did wonder why the new one had no gasket.


So down to this and a lot of degreaser applied .


Now I have a set of gaskets and the stretch bolts. Did think I might just do the valve seals and not the head gasket.

Then thought again and the heads coming off next!

Few images from the body shop.

Tailgate needed more work than I expected but they are perfectionists.


Doors also needed a bit more work.


The salvage door also received some attention.


Now a few tasters for the paint job.

Door internals get the first paint.


So go ahead given for the rest...lets see what it comes out like.

(y)
 
Last edited:
Back
Top