Technical Magentas story 4x4 rebuild

Currently reading:
Technical Magentas story 4x4 rebuild

Sjvarley

Established member
Joined
Oct 18, 2016
Messages
827
Points
212
Those who have seen our previous posts will know how we purchased 3 4x4 pandas for £600 well one has now died one has become the big Green panda
So on to the third Magenta
Which is looking pretty good
Started and ran the engine for 1st time since 2003 .[
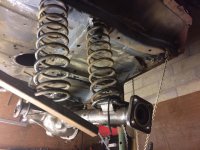
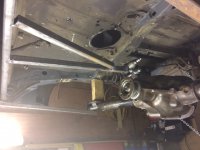
Started to strip her IMG_1501494344.629736.jpg
Panda Brian off to Italy leaving Magenta behind IMG_1501494413.638963.jpg
IMG_1501494460.363243.jpgIMG_1501494477.801354.jpgIMG_1501494488.166514.jpgIMG_1501494501.398824.jpg
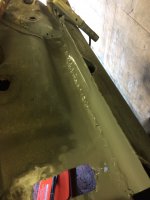
Alll in all not so bad a bit of floor pan rust and rear panel
As for the sill tops and window edges I am very happy
Full Strip this weekend then get welding
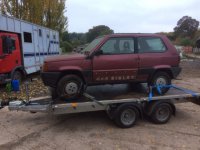
Magenta being collected October 31 2016
 

Attachments

  • IMG_1501495658.793987.jpg
    IMG_1501495658.793987.jpg
    331.6 KB · Views: 71
Last edited:
Moving on to what is planned for Magenta
I am thinking about 2 directions to go either using all the knowledge from Brian to make another big panda but with the addition of a live rear axel utilising swing arms. coilovers and panrod linkage
Or to go for a full connection isolation from the suspension to make her far smother to
Drive and quieter in the cabin i.e. Home made sub frame isolators
Or even a mix of both ?
 
Last edited:
Had today off work so set into stripping out Magenta from the back to front planning to set her up on a home made spit making it easy to weldIMG_1501912089.094587.jpg
 
Last edited:
Was the TV fitted to it aswell?!


Well that was free with loads of other stuff too soft tops for a triumph jack leather jacket solicitor case file full set of mats t
Jack for a stag 8 ski racks for Sisley spare dash speakers mice snails pens pencils keys sweets lighter Triumph parts list triumph workshop manual house key for an address in France to keys for an aero vac whatever !!!
 
Magenta now stripped down and on the spit. Chopped out some rot
Assessed the repairs
Absolutely no body rot all floor pan work brilliant [emoji1360][emoji1360][emoji1009][emoji209][emoji375]
 
IMG_1502038606.261255.jpgIMG_1502038650.736833.jpg IMG_1502038673.845668.jpgIMG_1502038696.230500.jpgIMG_1502038745.300362.jpgIMG_1502038761.830009.jpg spot that snail
IMG_1502038811.515882.jpgIMG_1502038887.468678.jpgIMG_1502038911.709689.jpg can't believe these sills the other Sisley had rotten sills and intact inners rotten body panels roof line door tops door bottoms sill tops but perfect leaf supports and inner arches !!!
 
Last edited:
Full strip then rebuild that way we will find all the pitfalls first
 
Decided on trailing arms for this one just got make a decision on the axel connection type
 
Chopping out the rotIMG_1502456599.027105.jpg
IMG_1502456169.392242.jpg
The inner sill and floor pan had rotted away on the near side
Soulution cut back then grip together weld the 2 edges into one IMG_1502456384.606472.jpg
Inside view IMG_1502456428.617079.jpg
Create a new floor pan and then weld to the jointIMG_1502462552.162903.jpg
Gas just ran out
 
Last edited:
IMG_1502556503.160890.jpg
The first 45 cm of sill complete
Hammer test. All good next tackle this hole IMG_1502556343.643665.jpg
Running total hrs now spent since putting her in the workshop
23 hrs.
 

Attachments

  • IMG_1502556250.368031.jpg
    IMG_1502556250.368031.jpg
    289.7 KB · Views: 88
Last edited:
Well few more hours have passed both sill now complete rear hanger boxes rebuilt now closing Down the floor pan under the rear seat . Photos to follow. 28 hrs. Now !!
 
Last edited:
Update on progress welding now 95% complete just a couple of inside patches to complete 1 hour or so. IMG_1505243850.252476.jpg
Suspension strengthen plate
IMG_1505243892.483501.jpg
Cross member now without jacking point
IMG_1505243928.786047.jpg

Now trying to set up albeit temporary the swinging arms
Either 3 link or 4 link with a panard rod positions of springs either directly over the bump stops or slightly forward this would give more travel
Proposing to use the front springs. As a bench mark (keeping it fiat ) collapsed length of 150 extending to 355
This may not be sufficient
Longer tie rods going to the centre cross member would allow fuller articulation problems noted are the true will come in contact sooner against the triple seam in the wheel arch to over come this it may be best to have a panhard rod resulting in the axle moving sideways like a pendulum IMG_1505244536.423832.jpg IMG_1505244570.365101.jpgIMG_1505244685.420967.jpg
31 hours now
 

Attachments

  • IMG_1505244552.641499.jpg
    IMG_1505244552.641499.jpg
    351.3 KB · Views: 74
  • IMG_1505244583.860952.jpg
    IMG_1505244583.860952.jpg
    294.5 KB · Views: 56
Last edited:
Been off. Work for a few days so no physical stuff done more of a decision time ordered steel sections polybushes and rose joints investigated coil over shocks looking at the weights of the vehicle vw beetle front coilovers are good for the load and stroke. At the front an engine drop of 60 mm would give loads more travel if working from the bottomed out point free rotating drive shafts utilising all the acquired data from Brian no problems will occur so here it is
Items planned but no fixed
Front wheel centre forward by 55 mm
Engine drop of 60mm
Front wheel centre track 80mm wider
Suspension travel up from 140mm to 185
Longer front drive shafts ns + 25
Off side +15mm
Rear trailing arms wheel centre moved nav by 35 mm
Giving a longer wheel base
Increase the attack angle to 56 degrees
Increece of rear flex due to trailing arms of 120 mm
Rear coil overs
rear track +60mm
Engine up grade to 100hp
Rear stilo discs
Upgraded front brakes
Lexus 200 mm dual diaphragm servo dual circuit front diagonal rear
Utilise the Alfa pepper pot rims
With 195 r14 80 mallestra jones or or 185 r14 recip tyres
Rolling diameter of circa 28"
Rear mounted spare
 
Last edited:
Manufacturing this weekend
Here is how it went
IMG_1506881216.640731.jpg
First move the arc position further back using previous 50 mm lift hangers to match up with the prop u j May have to fitt doulble Carden yoke
IMG_1506881320.462169.jpg
Bolts though the floor picking up also leaf spring fixation
IMG_1506881382.763329.jpg
Trailing arm in placeIMG_1506881419.400128.jpgrubber buffers
IMG_1506881443.893371.jpg
Axel fixations IMG_1506881469.826093.jpgIMG_1506881487.396803.jpg
Arm in place
IMG_1506881509.378973.jpg
Poly bush fixing IMG_1506881539.448669.jpg
Axel connection
IMG_1506881565.802991.jpg
IMG_1506881589.113873.jpg
IMG_1506881603.153662.jpg
Next operation to fix the upper fulcrum point
A big 10 hours today
41 hrs running total
Deliberation about spring and operation with coilovers or standalone shocks. 2wd rear spring. Could be ok or if the same spec but longer .

Punto sporting engine has arrived 1.4 16v = power !! Or disaster !
 
Last edited:
Mammoth effort.
I remembered a post yesterday that may be of interest for this build

What would be the benefits of LSD in rear axle of Panda 4x4?
LSD for front diff are out there and it does have some justification in 2wd car with approx. 100hp.
Rear axle diff lock kits are available from Italy with manual on/off, same as Y10 4x4 rear axles will do the trick.

fiat 5933627, and
BLOCCAGGIO DIFFERENZIALE PANDA 4 X 4​
 
Back
Top