General Welding sills - hints & tips

Currently reading:
General Welding sills - hints & tips

CaptainTuba

West Wilts Panda Reserve
Joined
Nov 27, 2006
Messages
121
Points
111
Location
Wilts
Folks
The welding gas will be arriving this week so I'll soon be starting on repairing the bodywork.

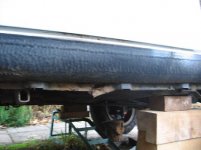
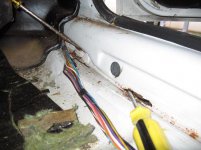
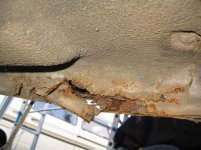
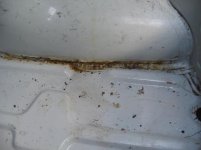
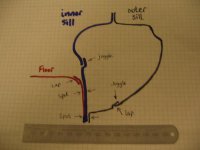
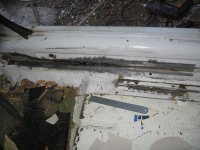
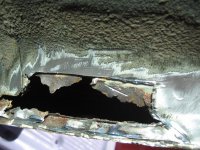
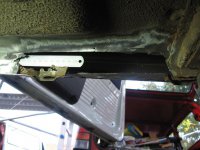
You can see from pictures that:
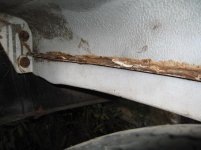
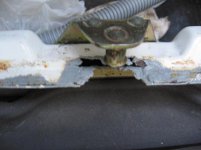
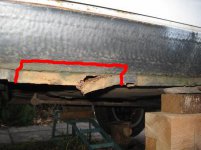
- the RHS sill needs work from the jacking point forwards inside & out
- the wheel arch seams need fixing (both sides)
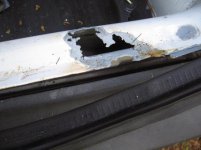
- the boot sill needs work

I've done 12 wks of night classes of MIG/ARC work on a workbench with flat plate. So doing it in awkward positions with complicated shapes is a new challenge that I'm looking forward to. ;)
Kit: Clark 135te, gas universal mix argon 88%, 0.6 wire, auto-helmet, grips & magentic clamps, anti-splatter stuff.

What hints & tips do you have? :confused:

Does anyone have a picture or diagram of how the sills and wheel arch seams are contructed?
Should I buy or fabricate the parts? (Beever's do sill skins for £32+vat)
Raw materials to hand are:
Sheet: 1mm boiler casing, .7mm office furniture, PC cases - Box: salvage from school furniture
What other tools might I need ?
How far can you tilt a Panda over? Someone suggested getting a mattress and putting it on it's side.

Cheers
C.T.
------
 

Attachments

  • Sill rhs 03.JPG
    Sill rhs 03.JPG
    26.8 KB · Views: 262
  • Inside Sill rhs 01.JPG
    Inside Sill rhs 01.JPG
    34.9 KB · Views: 143
  • Sill rhs 01.JPG
    Sill rhs 01.JPG
    39.8 KB · Views: 129
  • inside rear arch rhs 1.JPG
    inside rear arch rhs 1.JPG
    20.9 KB · Views: 103
  • rear arch rhs.JPG
    rear arch rhs.JPG
    30.5 KB · Views: 104
  • boot lock.JPG
    boot lock.JPG
    24.6 KB · Views: 104
  • boot sill.JPG
    boot sill.JPG
    27 KB · Views: 110
From what I can see you got your work cut out for yourself ..my tip would be to [if possible] buy any manufactured body parts possible to do the job ..if you haven't done any metal fab work you might have problems making the parts to the correct contours of the body ..make sure you cut all the rot out and clean back all under seal with a grinder before you do any welding.. if you do any positional work with the mig you come vertically down with the mig and not up as you would with manual arc [stick] and I would just do a series of tack welds about three eighths of an inch long all around each plate and space the stitches about the same distance apart ..you can then go back around and fill in the spaces to get the continues weld you need and will save you blowing holes in the job and having to fill the hole in..remember just take your time and dont rush it the mot guy will inspect all welding done [at least he should do ] and in many cases they dont like an area to be repainted with under seal until the work has been inspected ..
 
Last edited:
I'll be watching this closely!
I had a poke around today and found sill probs and alot of rust/holes around the offside rear suspension mount which I think I'll have to attack from the inner wall of the outer sill once i've removed it!
Carpets will come up tomorrow!
 
Your also going to need a good grinder with both cutting discs and flatenning discs for it.

Make sure you cut the back metal back until you only have clean metal left a good half inch past the bad metal is usually the rule of thumb. And buy a small hammer, one for putting in small nails would do. They are very handy for hammering the metal into place as you work along. Plus make sure it has a wooden handle because you will end up using thehandle to hld the metal to the job at some point.

Car can be jacked up quite far but NEVER get under the car onless you have axle stands in place. You'd be amazed how many people don't do this.

Buy 8th guage sheet metal from your local motor factors as its the same thickness as the metal on the car so will match in much better and can easily be cut to size and shape with snips.

The sills are straight forward, so's the boot floor. You will find it a little tricky round the boot lock and that's were the small hammer will come in. Cut a piece of metal to the general shape (you might need 2 bits shaped) and once you have it ancored at one corner use the hammer to get the shape as you work along. Just take your time.

Don't forget once you have the welds all done to grind the weld smooth and buy brush on seam sealer to paint over the welds to protect them.

If you have a look here http://www.maranellohouse.com/juppy.html this is Juppy who went in pretty much the same places (apart from the the boot lock). It might be helpfull and if you trawl through the Panda section you should find a thread about Splutter were you can see were the welding was dne on him.

"Oh and make sure you move the carpet and sound deadening well out of the way" :D Hope this is of use.
 
Thanks Stu
Buy 8th guage sheet metal from your local motor factors as its the same thickness as the metal on the car so will match in much better and can easily be cut to size and shape with snips.

Stu do you mean 18 gauge i.e. 1.2mm ?
Should I go to 1.5mm for extra strength?

I've been cleaning the sill up and I'm not sure how to approach welding it.:confused:
Most of the rot is in the lower part of the floor and inner sill.
There are patches of rot on each side of the jacking point.
The original floor & inner sill look as though they were spot welded together, then the outer sill welded to them.

Floor & Inside Sill
Since this is covered by carpet - this doesn't have to be beatiful.
I figure that I need to fabricate the inner sill and floor parts and jiggle them into place. I can get a weld onto both sides of floor lap joint, but can only do one side of the inner sill. I'm worried that this will be a moisture trap.
Where the outer sill needs reaplacing I should be able to get some under seal on it.

Outside Sill
How do I reproduce the drain holes in the outer sill?
Are they really nescessary?
Should I try and save them and cut & weld them into a new fabricated patch?
It it easier to use a sill skin and cut out the bits I need?

Finishing
Flap disc it flat - fill if nescessary.
Prime with high zinc undercoat, Seam seal, Paint
Waxoyl inside

Is this approach OK :confused:

Cheers C.T. :)

I've found more rust elsewhere - but I post another thread to cover it.:mad:
 

Attachments

  • Sill rhs 04.JPG
    Sill rhs 04.JPG
    33.6 KB · Views: 91
  • sill diagram 2.JPG
    sill diagram 2.JPG
    27.5 KB · Views: 150
  • Inside Sill rhs 05.JPG
    Inside Sill rhs 05.JPG
    91.5 KB · Views: 113
  • inner sill 1.JPG
    inner sill 1.JPG
    80.8 KB · Views: 105
  • inner sill 2.JPG
    inner sill 2.JPG
    61.1 KB · Views: 148
Back
Top