Technical anti roll bar bush

Currently reading:
Technical anti roll bar bush

Hi,

I'm thinking of replacing the ARB bushes on my Multipla.

Question: When removing/replacing the old/new bush can you:

a) prize the old/new plastic bush apart with a screwdriver say and slip the bush over the rollbar ie. sideways at a right angle to the rollbar, or

b) do you have to undo the droplink at the end of the bar and slide the bush along the bar and off the end?

Reason being: I usually have to saw the droplinks off as the nuts are so tight, so I'd like to avoid doing this if possible. If the job's too much hassle I'll let the garage do it.

Thanks in advance.

Mark
 
The bushes are split, but not completely in two. You can spread them enough to clip them over the ARB.

You'll have to split the riveted part of the roll bar clamps to get the old bushes out and the new ones in. The bolts hold everything in place when you put it all back together. It's just a bit more fiddly because each clamp is in two bits now, instead of one, but it's not difficult.

I did mine with the roll bar off the car so can't comment on the last query.
 
The bushes are split, but not completely in two. You can spread them enough to clip them over the ARB.

You'll have to split the riveted part of the roll bar clamps to get the old bushes out and the new ones in.

Thanks widemouthfrog.

Wondering if bushes done before, clamp might already be split? - 16 year old car. Otherwise have read to slacken clamp bolts and drive screwdriver between to split. Might try see how I get on.

Quoted £100 (parts and 1.5 hours labour) to do (2 garages). £30-ish for parts from local motor factor.
 
Last edited:
You can have a pair of roll bar bushes off ebay for about £15, delivered. Nothing else needed to do the job, though I'd check the condition of the four mounting bolts - a couple of mine had stretched so I replaced them.
 
Did a dry run today to see if I could get at/remove the ARB bush clamp on one side. The 2 bolts unscrewed OK, but the upper and lower part of the clamp remained solidly stuck together even after some hefty welts with a cold chisel on the join front and back of the clamp.

Realise I will have to remove the whole ARB bar to open the clamps. Don't want to destroy the droplinks, yes I know they're cheap, might just saw off the bottom droplink nut on each side.

How easy is it to wiggle the rollbar out? Easy or not? Does the car have to be jacked up high enough, as I'm working on the deck?

Do you think it will be easy to split the clamps once I have 'em off the car?
I am working away from my house, so I need to know I can do it, don't want to have a car - and me - stranded away from home.
 
Yes, it is easy to do but there's a fair bit of waggling involved to get the bar out. Jack the car up to an equal height on both sides. Getting the drop links off is a pig if you don't do this. Remove both wheels. Use a small wire brush to clean the exposed threads on the drop links & spray them with plenty of penetrating oil or WD40 & leave it to do its work for a few minutes. Release the drop links from the end of the ARB. Some types have a socket in the end of the thread to take an allen key, others have thin flats between the ARB and the ball joint rubber gaiter. Neither type is ideal; the allen key socket usually splits open as soon as you put any load on it and the type with flats needs a REALLY thin spanner to get on them (try a bicycle repair spanner if you can find one with the right AF).

Once those bits are cracked off, remove the four bolts that hold the ARB clamps in place, then you can start wiggling. It comes out more easily from one side than the other, but I can't remember which side is best! It's the power steering pipes that get in the way, but it does come out without disturbing anything else.

Splitting the clamps is easy with it all off the car.
 
Good instructions ta.

Usually find the droplink nuts are a b**tard to get off, but I'll try what you suggest, and buy a spare droplink so I have a couple of spare nuts/link to use in case. I have some 30 year old - no kidding - Spear and Jackson junior hacksaw blades which go through steel like butter.

Potential savings: £100 - £15 (bushes) - £12 (droplink) = £73.
And satisfaction of doing the job myself.

See if my confidence is up to the job when the new bushes arrive.
 
If you get the ARB off and run out of time to put it back on, just remove the drop links from the struts as well. Bikedoc on here used to advocate driving his Multi without the rollbar fitted and said he felt little difference. A quick road test without the whole setup will also confirm whether or not the ARB is the culprit for the knocking.

If you end up buying new drop links (assuming that you decide to refit the ARB!), treat yourself to a pair of Meyle HD ones. There's a seller from N. Ireland on ebay doing a pair for around £20-25 inc. delivery IIRC. They are way better than any others I've used.
 
Last edited:
Update: ARB bushes arrived today. They are a rubber material and can be easily spread apart with bare hands, so if I could've split the clamps on the car or they were already split, it would be a quick job to swap the old bushes w/o removing the ARB or droplinks.

Bought a nut splitter (£12 motor factor) for the droplink nuts, tested it on an identical nut - it works. There are a few Youtube videos showing their use for anyone interested eg. They are a lot cheaper on Ebay but I don't want to hang around. Intend to just split the bottom droplink nut (to detach the droplink from the ARB) and replace, saving the existing droplinks as they're not old. I normally have to hacksaw through both droplink bolts which is a pain (and destroys the droplink), so I'm hoping the nut splitter will be a lot easier.

Waiting for a fine day next week to do the job.

Question: The ARB must rotate in the bushes as the ARB arms are moved up and down by the strut/droplinks, so do I lubricate/grease the inside of the bushes? If so, I have heard that you have to be careful what grease you use on rubber? Is lithium grease OK?
 
Last edited:
Bought a nut splitter for the droplink nuts... Intend to just split the bottom droplink nut (to detach the droplink from the ARB)...

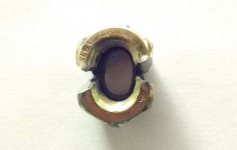
Tried this today on the driver's side droplink. Cut through one flat of the droplink bottom nut with the nut splitter, turned the nut though 180 degrees and did the opposite flat. Neither cut went all the way through to the bolt, but this isn't necessary as the effect of the nut splitter is that it distorts/ovals the nut loosening it from the bolt, I could then unscrew the nut by hand. Easy.

Wanted to undo/remove the top nut too, but this came undone easily after some PlusGas with a 17mm socket. Strange, as it's normally much more difficult, then realised that the local garage replaced the strut spring earlier in the year, so had obviously detached the top of the droplink and used the old nut to reattach.

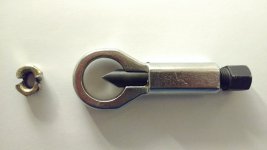
For anyone considering a nut splitter to detach a droplink, both droplink nuts are easily accessible with the tool I used (very similar to the one in the Youtube picture above): plenty of space for the tool plus a wrench and a 19mm socket to operate the tool. I think it's an invaluable tool (and inexpensive), should have had one in my toolbox years ago.

Note: I've replaced both nuts until I do the ARB maybe next week. Will probably replace the droplinks anyway as they're only a tenner each.
 
Last edited:
Tried this today on the driver's side droplink. Cut through one flat of the droplink bottom nut with the nut splitter, turned the nut though 180 degrees and did the opposite flat. Neither cut went all the way through to the bolt, but this isn't necessary as the effect of the nut splitter is that it distorts/ovals the nut loosening it from the bolt, I could then unscrew the nut by hand. Easy.

Wanted to undo/remove the top nut too, but this came undone easily after some PlusGas with a 17mm socket. Strange, as it's normally much more difficult, then realised that the local garage replaced the strut spring earlier in the year, so had obviously detached the top of the droplink and used the old nut to reattach.

For anyone considering a nut splitter to detach a droplink, both droplink nuts are easily accessible with the tool I used (very similar to the one in the Youtube picture above): plenty of space for the tool plus a wrench and a 19mm socket to operate the tool. I think it's an invaluable tool (and inexpensive), should have had one in my toolbox years ago.

Note: I've replaced both nuts until I do the ARB maybe next week. Will probably replace the droplinks anyway as they're only a tenner each.
Don't use grease on the arb bushes unless it's specifically safe for use on rubber, for instance red rubber grease.
 
ARB bushes replacement continued...

Today I undid the nuts securing the nearside droplink to the ARB and strut (easier said then done), and unscrewed the nearside ARB clamp bolts and cleaned them.

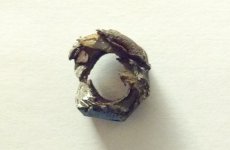
The droplink to ARB nut split OK with the nutsplitter, but the top nut connecting the droplink to the strut, which I thought would be easier as it's visible and accessible, was a mother. After singing the praises of the nutsplitter, today the chisel end (business end) of the nutsplitter rotated through 45 degrees, and later through 90 degrees, as it cut into the nut because the tiny grub screw which keeps the chisel in place broke. Made a right mess of the nut. Eventually I managed to remove it by more cutting and using a couple of cold chisels. Still felt better then sawing the nut off.

The ARB clamp bolts (M8, 13mm hex socket) came out easily and are in good condition ie. not stretched or corroded. No wire brush, so I cleaned the threads by spraying with PlusGas and running a clean nut up and down the threads.

Other stuff: When refitting the droplink, after attaching the top balljoint to the strut, I discovered that you can position the lower balljoint bolt at the right height to go into the hole on the end of the ARB by jacking up the hub (under the wishbone balljoint) and hence pushing up the strut and with it the droplink. Easy. Also realised that when I next replace/refit the wishbones, I can do the same thing - jack up the hub - to take the downward force off the wishbone brackets which should make installation of the 4 wishbone bolts a lot easier (last time I did the wishbones I couldn't get the bolts in, because the brackets had to be levered down to vertically line up the holes in the brackets to be parallel to the bolts, and nearly had to abandon the car jacked up and in bits 5 miles from home after struggling for 4 hours! Humorously, I had allowed 2 hours to the job, which mean't that by the time I got home, my £200 football bet which I had intended to go home and nurse, had turned into a measily 15 quid, which made me think why the **** didn't I just stay at home and get the garage to do the job in the first place! ;-) ).

Now I know I can disconnect the ARB completely, the remaining unknowns are: Can I wrestle the ARB off the car, and can I split the brackets? If yes to both, I should complete the job at the next attempt.

(In case anyone wonders why it takes me so long, it's because now I can't work on the car in front of my house, so I have to find a flat, discrete place several miles from home, so I have to get the car back together so I can drive it back home when I've finished. If I get stuck and can't get it back together, I'd have to abandon the car, and who knows what I'd come back to the next day! That's why I carry out the repair in stages on different days, to try to eliminate any potential showshoppers. I envy those of you who have a flat, private drive or space outside your house to do your repairs).

Photos of nutsplitter, and good and bad nut splits attached. Notice the oval shape of the good nut split.
 

Attachments

  • IMG_20171018_205447805.jpg
    IMG_20171018_205447805.jpg
    1.9 MB · Views: 47
  • IMG_20171018_205734650.jpg
    IMG_20171018_205734650.jpg
    387 KB · Views: 25
  • IMG_20171018_205751291.jpg
    IMG_20171018_205751291.jpg
    464.8 KB · Views: 50
Last edited:
No you can't get the arb out without dropping subframe slightly.
Try splitting the arb bush clamps in situ . I didn't find it too difficult, can't remember if left clamp bolts in but very loose while splitting or something else.
 
Have to disagree there Jackwhoo. I definitely got my ARB out without removing any sub frame bolts. Yes, I had to take the wheels off and there was a lot of twiddling around (mainly to get it past the steering pipes)but I got the old one out & new one in with minimal disruption
 
Have to disagree there Jackwhoo. I definitely got my ARB out without removing any sub frame bolts. Yes, I had to take the wheels off and there was a lot of twiddling around (mainly to get it past the steering pipes)but I got the old one out & new one in with minimal disruption
I stand happily corrected , that's good news . Thank you Widemouth ?
 
Success! I managed to replace the ARB bushes today without having to jack up the whole of the car front and without having to remove the ARB from the car. I few gremlins but otherwise OK to do. I'll post a fuller description of what I did and how it went later. :)
 
Firstly, here's the summary of the procedure I followed:

Tools used:

Car jack x 2
Block of wood
Axle stand
Socket wrench
Torque wrench
17mm socket - for droplink balljoint nut
13mm socket and 6in extension - for ARB bracket bolts
2-4 temporary bracket bolts M8, 13mm head, about 37mm long, plus a few washers, maybe a few 13mm nuts (£1 the lot from local parts store)
10in long Wilco chisel plus 10in 1/2in drive socket extension to increase length of chisel
Standard hammer

Procedure (summary)

Step 1: Jack up car on one side, support on axle stand, remove road wheel.
Step 2: Detach droplink lower balljoint from ARB.
Step 3: Remove and replace ARB bracket bolts with temporary bolts.
Step 4: Loosen temporary bolts to leave a gap slightly wider than the thickness of the chisel head to be used to split the brackets.
Step 5: Separate the upper and lower ARB brackets with the chisel and hammer.
Step 6: Remove the temporary bolts.
Step 7: Lift off the ARB upper bracket.
Step 8: Replace the ARB bush with new bush.
Step 9: Reinstall the ARB upper bracket.
Step 10: Reinstall the temporary bolts and tighten to press the upper and lower brackets back together.
Step 11: Replace the temporary bolts with the real ARB bracket bolts, tighten to correct torque setting.
Step 12: Reattach the droplink balljoint to the ARB.
Step 13: Refit road wheel. Lower car to ground.
Step 14: Repeat Steps 1 to 13 on the other side of the car.

Sounds straightforward right? Here's how it went...

Procedure (in detail)

Step 1: Jack up car on one side, support on axle stand, remove road wheel.

Step 2: Detach droplink lower balljoint from ARB:

Jack up the wheelhub to take the tension off the droplink - I used a block of wood and second jack under the suspension arm balljoint. Remove the droplink lower balljoint nut (I had previously removed the old nut and replaced with a new nut in preparation for today), and detach the droplink from the ARB.

Step 3: Remove and replace ARB bracket bolts with temporary bolts:

The reason for replacing the bolts with temporary ones is that when chiselling the brackets I didn't want to damage the real bolts.

Tip: to aid/keep the temporary bolt vertical in the wrench socket, screw a nut all the way up to, and lined up with, the temporary bolt head, increasing the size of the bolt head. This helps when trying to locate the bolt into the subframe bolt hole/bracket captive nut.

Step 4: Loosen temporary bolts to leave a gap slightly wider than the thickness of the chisel head to be used to split the brackets:

The gap to be left between the bracket and subframe. My chisel head is a couple of mm's thick so I left a gap of 3-4mm.

Step 5: Separate the upper and lower ARB brackets with the chisel and hammer:

I tried to do this the other day with a small 5in chisel - no chance. Needed something meatier and longer ie. a 10in Wilco chisel (£5 money well spent). Note the tip is about 15mm wide. Position the chisel in the join between the ARB upper and lower brackets (car front or car back of ARB bracket). I then extended the chisel handle by placing my 10in 1/2 drive socket extension at the back of the chisel, this allowed me to swing the hammer unobstructed outside the wheel arch. Whack with hammer to split bracket. Another poster above has attempted to describe the force needed to split the bracket, I would say that I found it's about 3-5 times the force needed to hammer a nail into wood. It's not a tap. I increased the force gradually so as not to overdo it. Repeat on the other side (front or back) of the bracket.

I'm not sure what "swaging" is, but after removal when I checked the upper and lower brackets what I found is that there is a ring of metal round the bolt hole on the underside of the upper bracket, and this metal ring locates into the hole in the lower bracket and appears to be the only thing holding the upper and lower brackets together. Didn't see any obvious signs of spot welding etc. But it is obviously a tight fit. Was the bottom of the ring "swaged" under the bottom bracket? Don't know. Note: the reason not to overdo the whacking force is that if you overdo it you might damage the aforesaid metal ring. Of course I didn't know that at the time.

Step 6: Remove the temporary bolts:

Take em' out allowing separation of the upper and lower brackets.

Step 7: Lift off the ARB upper bracket.

Step 8: Replace the ARB bush with new bush:

I found that both the old and new bushes could be split open easily with bare fingers to work them off/on the ARB.

Step 9: Reinstall the ARB upper bracket.

Step 10: Reinstall the temporary bolts and tighten to press the upper and lower brackets back together:

In the same way I didn't want to damage the real ARB bolts when splitting the brackets, I didn't want to strain/damage the real ARB bolts when pressing the upper and lower brackets back together (I assume that when the manufacturer builds the ARB they use a press or something to press the bracket halves together - not what the ARB bolts are designed to do!). If the first temporary bolts were damaged on bracket splitting (the screw threads on mine were damaged by the chisel), use new ones. I tightened front and back bolts gradually going back and forth between the two, to make sure the brackets and holes were aligned.

Here's where it got interesting. For some reason I can't remember I wasn't happy after installing the temporary bolts, so I took the front one out and started to reinstall it, but it got harder and harder to get the bolt in, and was impossible to screw all the home. I took out the bolt and top bracket and found I'd driven the bolt in at the wrong angle and crossthreaded. I couldn't get a bolt into the captive nut even with the bracket off the car! Sh*t! After some mucking about I tried screwing in a bolt from the other side of the captive nut and that seemed to sort it out. Phew. Almost a showstopper.

Step 11: Replace the temporary bolts with the real ARB bracket bolts, tighten to correct torque setting:

OK, temporary bolts out, real bolts in. Not so fast. The next near disaster - what I thought could happen, happened: the front ARB bolt dropped inside the hollow subframe, rolled off somewhere into subframe oblivion, and I couldn't get it out! F***! Who designed this f***ing stupid car?!

This is where your temporary bolts come to the rescue. I had to use one of them (cut down shorter) instead of the real thing.

So a tip: In case the same should happen to you, have a couple of spare 13mm M8 bolts and washers handy for this job (and a hacksaw).
But think I'll order some new ARB bolts anyway. Anyone know where I can get some, cheap?

The remaining steps are straightforward...

Step 12: Reattach the droplink balljoint to the ARB:

...and lower the wheel hub back down.

Step 13: Refit the road wheel. Lower car to ground.

Step 14: Repeat Steps 1 to 13 on the other side of the car.

=== THE END ===

The knocking and banging from the front of the car when I run over potholes etc. has now diminished to just quiet thumps and bumps. I wouldn't have believed replacing two bushes could make such a difference.

I spent about £25 for tools and sundries, the tools are now permanent additions to my toolbox, the bushes cost £15. 2 garages quoted me £100 to do the job, inc. parts, labour and VAT, so I saved about £60 doing the job myself.
 
Last edited:
Back
Top