Multipla Front Strut Top Bearing and Mounting Block Replacement 110 Elx Jtd 2001 with 128 k miles
My nearside front suspension has been gradually getting a bit clunky. The knocking seems to come from the top end of the strut, and I’d already changed the roll bar bushes and the drop links and the shock absorber seemed to be leak free and working ok, so I could only think it could be something at the strut top.
I searched this site, but again couldn’t find much info. Am I not doing it properly somehow ?
A quick look on ebay brought up the top bearing, so I decided this must be the solution.
My local motor factors stocked the bearings but asked if I needed the mounting block too. That sounded distinctly likely, so I bought both. My factors are very good and happy to refund and take parts back if not needed so I wasn’t being too rash. £ 25 for the bearing, £ 40 for the mounting block.
I didn’t time myself, but it’s pretty easy to do this job if you have some coil spring compressors, probably about 1 ½ hours to do one side, the worst bit being compressing and then ‘uncompressing’ the coil spring.
I managed to remember to take photos this time, but it took me a long time to sucessfully up-load them. Most of the time the computer just said please wait - uploading images, but nothing happened. It seemed to work eventually when I just up-loaded one image at once.
You will need the following :-
Wooden blocks to position on the chassis box sections to spread the load from the axle stands.
Trolley jack and axle stands.
Joiners type hammer.
18 mm, 17mm, 15mm, 13mm sockets and ring-keys, a ½” ratchet drive, 6mm and 5mm allen keys
A small tub of copper slip grease and a tin of WD40.
1 No. Strut top bearing and 1 No. mounting block.
Coil spring compressors.
Cleaning rags and a wire brush.
1. Loosen the front wheel bolts ½ a turn or so of the noisy side – in my case the near side.
2. Jack up the front (offending) side of the car and position the axle stand and wooden spreader block on the chassis box sections to take the load. You’ll need the jack to support the hub assembly, so keep access to that area clear. Lower the body onto the stand and check all is safe, well supported and no ‘wobbles or leans’. Remove the jack and undo the wheel bolts. Remove the wheel and use it as an emergency ‘prop’ under the body, just in case the axle stand fails.

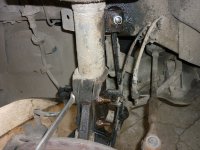
Nearside strut with bolts to remove soaking in WD40.
3. Liberally spray the two bolts which fix the strut to the hub, and the top fixing of the drop link with WD40. Allow the oil to soak in for a while (have a coffee), then using the wire brush remove as much mud and rust as you are able from the exposed threads. Spray on more WD40.
4. Spray WD around the brackets and gromits which support the flexi brake hose, the ABS cables and the brake pad warning wires. (The wear cables on my car had been severed prior to my buying the car, but the service history was complete and by Fiat main dealer, I hope it wasn’t deliberate, but it’s not a problem if you check the brake pad thickness regularly).
5. Note that the lower strut bolts ‘point’ to the rear of the car, and with a 15mm ring key on the bolt head, and a 17mm socket on the nut, loosen both bolts a couple of turns.
6. My drop links bolts had a 5mm allen socket in the end of the thread, but the previous ones had flats adjacent to the ball joint, so stop the joint rotating with either the allen key or a spanner, undo the top end of the drop link a couple of turns.
7. Position the trolley jack under the wish bone ball joint and take the weight of the strut. Remove all three nuts and then with a little juggling you’ll be able to tap the main bolts out fairly easily, and then for me, jacking the wishbone a little higher removed the load from the drop link and this could be disconnected easily too.
8. Gradually lowering the jack then allows the hub assembly to drop clear of the strut. Take care, don’t let the strut bottom sit on the drive shaft outer CV rubber boot, it is delicate and could tear. Maybe use a thick rag in the gap to prevent contact.
9. The strut is now just hanging free from the top fixings.

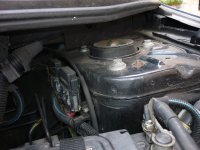
Inner wing with three 13mm bolt heads to undo to remove strut.
10. From the engine compartment, with a 13mm ring key, gradually loosen all three top fixing bolts two or three turns. Remove the middle bolt completely, then from the wheel arch push and pull on the strut, and on mine with a ‘crack’ the arm dropped slightly, clear of the wheel arch, and I supported the strut with one arm, whilst removing the remaining bolts with the other – it’s easier with an assistant if you are lucky enough to have one !
11. The strut can then be removed from the car by moving the bottom end towards the front of the car, easing the brake flexi hose under it, then pulling it free.
12. Then comes the boring bit. Fit the coil spring compressors on (exactly) opposite sides of the spring and tighten them, alternating every few turns until the strut top nut has no load on it and the steel cup washer is loose.

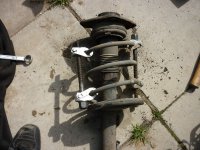
Strut with coil spring compressors in position ready to start tightening.
13. On mine the top nut (18mm) was very tight, and I had to improvise with a ring key to give me extra leverage on the 6mm Allen key to stop the shock absorber shaft from turning, eventually the nut cracked loose and could be removed.
14. The top strut assembly could then be tapped free from the top of the coil spring.
15. I’d already decided I may as well replace the bearing, but on inspection the rubber in the top mounting block had almost completely sheared away from the steel housing, so I was confident this was the cause of my noisy suspension.
16. Split the old top mounting, you’ll need the rubber support ring.
17. Refit the support ring, the new bearing and the new mounting block (the right way round), standing the assembly on the floor and pushing down from the top until the 18mm nut with the steel cup washer can be re-fitted to the end of the shock absorber shaft. Fully tighten the nut whilst stopping the shaft turning with the Allen key.

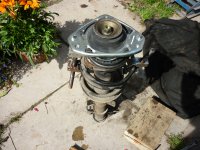
Spring still compressed, rubber support ring, bearing, new mounting block and cup washer in position, top nut ready to tighten.
18. Check that the coil spring is seated in the correct groove and stops at both bottom and top ends, and that you have got the top mounting on the right way round, then slowly release the compressors a few turns each until they can be removed.
19. At this stage I was a bit baffled as to how the dust cover should be fitted, but on checking the off-side assembly it just seems to ‘hang free’. How does it stay at the top then ? Presumably just friction from the thickening bush on the shock absorber.
20. I coated all the fixing bolts with copper grease, then was ready to refit the strut.
21. Offer the top of the strut back into position, guiding the rubber top bush to the centre of the hole in the wing housing from above, then moving the bottom end of the strut from the front side of the hub towards the rear of the car, carefully ease the brake flexi hose beneath the bottom of the strut and then push the top end home.
22. Hold it steady while you get the top three fixing bolts started and working in rotation tighten them with your 13 mm ring key until fully nipped up.
23. Waggle the hub assembly into position, allowing it to slide back onto the strut bottom end and by raising the jack carefully.
24. With a little pulling and wiggling and finally a screwdriver through the bolt hole, align the hub with the strut hole as accurately as you can, with luck the bolt will then slide home (the right way round) from a hand push or a gently hammer tap.
25. Repeat the push/pull on the hub to align the second bolt holes and fit the second bolt. Fit the nuts and tighten them up.
26. Jack the hub higher until the drop link can be re-fitted to the strut bracket and tighten that nut too.
27. Clip the brake flexi hose, the ABS cable and the pad warning light cables back into the strut clips.
28. Refit the road wheel, tighten the bolts just hand tight and move all your tools from under the car.
29. Reposition the jack, lift the body far enough to remove the axle stand, then gradually lower to the floor.
30. Tighten the wheel bolts to the recommended torque.
Hope this is helpful.
Best regards,
Simon
My nearside front suspension has been gradually getting a bit clunky. The knocking seems to come from the top end of the strut, and I’d already changed the roll bar bushes and the drop links and the shock absorber seemed to be leak free and working ok, so I could only think it could be something at the strut top.
I searched this site, but again couldn’t find much info. Am I not doing it properly somehow ?
A quick look on ebay brought up the top bearing, so I decided this must be the solution.
My local motor factors stocked the bearings but asked if I needed the mounting block too. That sounded distinctly likely, so I bought both. My factors are very good and happy to refund and take parts back if not needed so I wasn’t being too rash. £ 25 for the bearing, £ 40 for the mounting block.
I didn’t time myself, but it’s pretty easy to do this job if you have some coil spring compressors, probably about 1 ½ hours to do one side, the worst bit being compressing and then ‘uncompressing’ the coil spring.
I managed to remember to take photos this time, but it took me a long time to sucessfully up-load them. Most of the time the computer just said please wait - uploading images, but nothing happened. It seemed to work eventually when I just up-loaded one image at once.
You will need the following :-
Wooden blocks to position on the chassis box sections to spread the load from the axle stands.
Trolley jack and axle stands.
Joiners type hammer.
18 mm, 17mm, 15mm, 13mm sockets and ring-keys, a ½” ratchet drive, 6mm and 5mm allen keys
A small tub of copper slip grease and a tin of WD40.
1 No. Strut top bearing and 1 No. mounting block.
Coil spring compressors.
Cleaning rags and a wire brush.
1. Loosen the front wheel bolts ½ a turn or so of the noisy side – in my case the near side.
2. Jack up the front (offending) side of the car and position the axle stand and wooden spreader block on the chassis box sections to take the load. You’ll need the jack to support the hub assembly, so keep access to that area clear. Lower the body onto the stand and check all is safe, well supported and no ‘wobbles or leans’. Remove the jack and undo the wheel bolts. Remove the wheel and use it as an emergency ‘prop’ under the body, just in case the axle stand fails.

Nearside strut with bolts to remove soaking in WD40.
3. Liberally spray the two bolts which fix the strut to the hub, and the top fixing of the drop link with WD40. Allow the oil to soak in for a while (have a coffee), then using the wire brush remove as much mud and rust as you are able from the exposed threads. Spray on more WD40.
4. Spray WD around the brackets and gromits which support the flexi brake hose, the ABS cables and the brake pad warning wires. (The wear cables on my car had been severed prior to my buying the car, but the service history was complete and by Fiat main dealer, I hope it wasn’t deliberate, but it’s not a problem if you check the brake pad thickness regularly).
5. Note that the lower strut bolts ‘point’ to the rear of the car, and with a 15mm ring key on the bolt head, and a 17mm socket on the nut, loosen both bolts a couple of turns.
6. My drop links bolts had a 5mm allen socket in the end of the thread, but the previous ones had flats adjacent to the ball joint, so stop the joint rotating with either the allen key or a spanner, undo the top end of the drop link a couple of turns.
7. Position the trolley jack under the wish bone ball joint and take the weight of the strut. Remove all three nuts and then with a little juggling you’ll be able to tap the main bolts out fairly easily, and then for me, jacking the wishbone a little higher removed the load from the drop link and this could be disconnected easily too.
8. Gradually lowering the jack then allows the hub assembly to drop clear of the strut. Take care, don’t let the strut bottom sit on the drive shaft outer CV rubber boot, it is delicate and could tear. Maybe use a thick rag in the gap to prevent contact.
9. The strut is now just hanging free from the top fixings.

Inner wing with three 13mm bolt heads to undo to remove strut.
10. From the engine compartment, with a 13mm ring key, gradually loosen all three top fixing bolts two or three turns. Remove the middle bolt completely, then from the wheel arch push and pull on the strut, and on mine with a ‘crack’ the arm dropped slightly, clear of the wheel arch, and I supported the strut with one arm, whilst removing the remaining bolts with the other – it’s easier with an assistant if you are lucky enough to have one !
11. The strut can then be removed from the car by moving the bottom end towards the front of the car, easing the brake flexi hose under it, then pulling it free.
12. Then comes the boring bit. Fit the coil spring compressors on (exactly) opposite sides of the spring and tighten them, alternating every few turns until the strut top nut has no load on it and the steel cup washer is loose.

Strut with coil spring compressors in position ready to start tightening.
13. On mine the top nut (18mm) was very tight, and I had to improvise with a ring key to give me extra leverage on the 6mm Allen key to stop the shock absorber shaft from turning, eventually the nut cracked loose and could be removed.
14. The top strut assembly could then be tapped free from the top of the coil spring.
15. I’d already decided I may as well replace the bearing, but on inspection the rubber in the top mounting block had almost completely sheared away from the steel housing, so I was confident this was the cause of my noisy suspension.
16. Split the old top mounting, you’ll need the rubber support ring.
17. Refit the support ring, the new bearing and the new mounting block (the right way round), standing the assembly on the floor and pushing down from the top until the 18mm nut with the steel cup washer can be re-fitted to the end of the shock absorber shaft. Fully tighten the nut whilst stopping the shaft turning with the Allen key.

Spring still compressed, rubber support ring, bearing, new mounting block and cup washer in position, top nut ready to tighten.
18. Check that the coil spring is seated in the correct groove and stops at both bottom and top ends, and that you have got the top mounting on the right way round, then slowly release the compressors a few turns each until they can be removed.
19. At this stage I was a bit baffled as to how the dust cover should be fitted, but on checking the off-side assembly it just seems to ‘hang free’. How does it stay at the top then ? Presumably just friction from the thickening bush on the shock absorber.
20. I coated all the fixing bolts with copper grease, then was ready to refit the strut.
21. Offer the top of the strut back into position, guiding the rubber top bush to the centre of the hole in the wing housing from above, then moving the bottom end of the strut from the front side of the hub towards the rear of the car, carefully ease the brake flexi hose beneath the bottom of the strut and then push the top end home.
22. Hold it steady while you get the top three fixing bolts started and working in rotation tighten them with your 13 mm ring key until fully nipped up.
23. Waggle the hub assembly into position, allowing it to slide back onto the strut bottom end and by raising the jack carefully.
24. With a little pulling and wiggling and finally a screwdriver through the bolt hole, align the hub with the strut hole as accurately as you can, with luck the bolt will then slide home (the right way round) from a hand push or a gently hammer tap.
25. Repeat the push/pull on the hub to align the second bolt holes and fit the second bolt. Fit the nuts and tighten them up.
26. Jack the hub higher until the drop link can be re-fitted to the strut bracket and tighten that nut too.
27. Clip the brake flexi hose, the ABS cable and the pad warning light cables back into the strut clips.
28. Refit the road wheel, tighten the bolts just hand tight and move all your tools from under the car.
29. Reposition the jack, lift the body far enough to remove the axle stand, then gradually lower to the floor.
30. Tighten the wheel bolts to the recommended torque.
Hope this is helpful.
Best regards,
Simon

