s-l1600.jpg

Panda My New 2009 100HP

Introduction

A bit of background:

I was looking to replace my VW Golf 1.8T after 13 years of ownership. It has been recently hit up the backside and consequently written off. I was offered a paltry amount of £800 for it which gave me a bit of a reality check - why was I paying £450 a year insurance for a heavily modified car to only be offered that?

Also I have been in the modified car scene for quite a while now in various cars ranging from an Escort RS Turbo, a Fiesta XR2 (both of which I bitterly regret selling considering market prices nowadays) to my current Mk4 Golf GTI and have realised I'm spending more and more over the years and not really getting anything back. Plus I'm getting old now (40) :p

So the decision was made to buy the Golf back and it is now waiting to be broken for parts which when sold should be more than enough to cover a new car. Which brings me to the Panda...

I know what the Panda is like as a car as my wife owns a 1.2 Dynamic ECO which has been absolutely good as gold over the past few years. So the hunt was on.

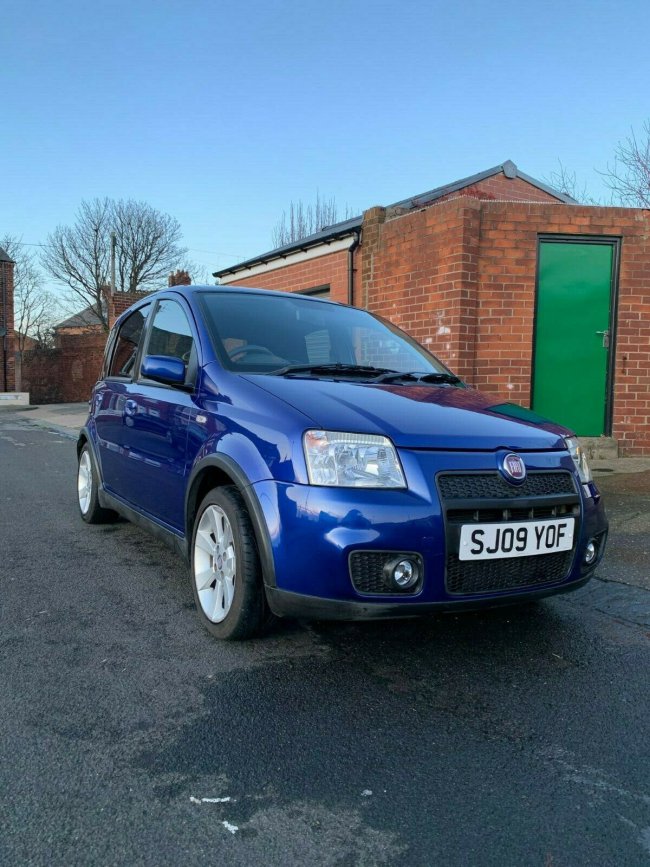
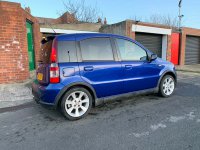
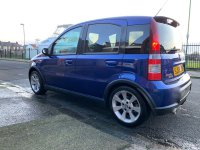
EBay turned up what I think is a lovely example of a Panda 100HP from Newcastle. It was a bit of a trek bearing in mind I live 350 miles and a stretch of water away from the sellers address so I was really hoping it lived up to expectations when I went to view the car yesterday.

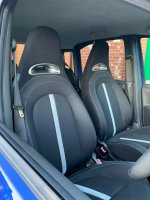
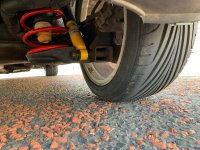
The seller was very honest and pointed out the very few faults it had and what he has fixed over the last year as the owner. He'd spent a fair bit sorting out the main niggles that come with the 100HP; a Bilstien B12 kit had been fitted along with a Coupe bumpstops, new top mounts, ARB bushes, track rod ends, drop links and an Ulter backbox as the old one had rotted out. He also fitted a set of Abarth 500 seats as the standard ones didn't agree with him.

This and the 4 fairly new Goodyear tyres, FSH and only 56k on the clocks swayed it for me and made the 350 mile catamaran, bus, train, plane, car and ferry journey (in that order, all in 12 hours) worth it.

The car is currently parked on my brothers driveway as I am waiting for everything to be sorted out with my Golf and while it's there he is going to give it a good machine polish and a nice wax as he's into all that where I am not :D

I do have a few plans for it but nothing too serious; I have already bought a Fiat 500 Abarth steering wheel and airbag to replace the worn standard wheel, I will get some 3D gel number plates made up when I transfer my private plate over with some surrounds, a new interior mirror as the one in there is a bit scabby, a Euro drivers rear light, paint the calipers red and some silver bulbs all round for the indicators. My Kenwood headunit will also make an appearance at some point.

Anyways enough of my waffling, attached are some pics from the eBay listing.
Right I've been tinkering this week and with the help of some pictures provided by Carpy I think I know what I need to do to make the back seats fit correctly.

It seems the previous owner didn't have the 500 centre hinge bracket for the back parts of the seats so used the Pandas along with the side hinges. This meant they clipped in and were secure but left a huge gap between the backs and the bench.

So while going through the bits I got with the Panda I found I had the 500 side hinges. I swapped these over and now the backs fit a lot lower and meet up with the bench. I've also found a 500 centre hinge bracket to keep it all bolted in.

This then throws up the problem of holding the seats back as they don't clip into the original striker plates any more. So I've made a template for a plate which I will make out of steel to bolt to the original position and mark out some positions to have a suitable striker welded to them.

In other news one Vibe door speaker has been fitted, very happy with the sound so far. Managed to fit the tweeters in the standard position and I think they look quite presentable without being in your face. Once they're all in I'll fit the amp and start the task of tuning it all up.

I've also discovered my passenger side window regulator clip isn't the best and starts to slow down once the window is close to the full extent of opening. Correct new clip ordered and will be fitted as soon as it arrives.

I've also decided to sound proof the doors while fitting the speakers as the "insulation" on the inside is woeful at best. If anyone has any suggestions for brands etc or even just an ebay listing I would be most grateful.

I'm hopefully fitting the rear brakes and wheel bearing this weekend but we might all be lock down by then so playing it by ear.

More to follow...


IMG-20200125-WA0004.jpeg20200315_135630.jpeg20200314_104106.jpegIMG_20200314_202615_235.jpegIMG_20200314_202615_234.jpeg20200318_191431.jpeg
 
Last edited:
Looking all good mate, i have the Pioneer upgrades, sound is very good indeed :)
 
Well with all the uncertainty out there I cheered myself up by fitting the rear centre seat bracket last night.

I tracked one of these down knowing the floor on the Mk3 was the same as the Mk4 Panda so all bolt holes would be in the right position but they were all around the £50 mark. A little bit of research later and I found that the Mk4 Panda and the Mk2 KA share the same chassis (I'm new to this so please excuse the fact I didn't know). A quick search and ebay turned a bracket up for £20 delivered.

All now fitted and the seats are finally looking like they should.

The spare striker plates also turned up so I'll be cutting the steel I have then mocking up positions for them before having them welded20200320_163819.jpeg20200320_222910.jpeg20200320_222917.jpeg
 
Pulled the standard passenger speaker out and proceeded to destroy it so I can use it for an adapter as per one of the guides in here. While I was doing this I noticed the foam insulator had come off the inside of the door and was catching on the window when it was down so reattached that too.

The window regulator clips I ordered the other day had turned up so I gave the passenger side a go, surprisingly easy to change and very satisfying now it works properly. A bargain for genuine Fiat items at £6 a side [emoji106]

I missed the delivery of the soundproofing material I ordered so I can't get the passenger door back together, hopefully there won't be a nationwide lockdown before that arrives tomorrow!

Took the glove box out and added a USB port which is then hooked up to my headunit allowing me to use android auto through the screen.

My vibe micro amp is in too, just need to work out where it is going to live; I have noticed there is a decent bit of room next to the glove box and near the centre of the dash so I'm sure I can fashion some sort of platform for it to sit on permanently.

Lastly the rear seats are all clipped in and are secure, really love these and are by far the best mod on the car [emoji7]IMG_20200321_124022_655.jpegIMG_20200321_124022_652.jpegIMG_20200322_125041_164.jpeg20200322_124441.jpeg20200322_165126.jpeg20200322_165254.jpeg
 
Last edited:
As I'm still pulling in a little money here and there from the breaking of the Golf I scraped together enough to get myself a set of 500 Abarth aluminium pedals and a Novitec GP1 throttle box.

The throttle box is a little expensive but is actually a brilliant mod and really livens up the throttle response.

I'm still waiting for the speaker adapters for the rear doors to finish the speakers off and still on the hunt for rear threshold plastics which are proving to be really hard to find.

The pedals were surprisingly easy to fit, just a bit awkward getting the pedals to sit back and allow me to drill them but I got there in the end.

Once this lockdown is over I need to get the rear discs and pads changed over as well as the wheel bearing. IMG_20200404_152354_254.jpeg
 
Hi mate, i have crossed drilled and grooved disks all round with green stuff pads, really good and they look really good too, glad you got the throttle box, really like mine :)
 
Well with all the uncertainty out there I cheered myself up by fitting the rear centre seat bracket last night.

I tracked one of these down knowing the floor on the Mk3 was the same as the Mk4 Panda so all bolt holes would be in the right position but they were all around the £50 mark. A little bit of research later and I found that the Mk4 Panda and the Mk2 KA share the same chassis (I'm new to this so please excuse the fact I didn't know). A quick search and ebay turned a bracket up for £20 delivered.

All now fitted and the seats are finally looking like they should.

The spare striker plates also turned up so I'll be cutting the steel I have then mocking up positions for them before having them weldedView attachment 207188View attachment 207189View attachment 207190


Can you please provide more pictures of rear hinges and the plates you welded.
I fitted 500 seats in panda, there is huge gap in rear bench and back, the i used the centre support from the original panda seats which i took out by cutting from rear bench, i also used side hinges from panda as well, the 500 ones were keeping the seats too low, and were not locking locking up in the catchers.
 
Hi, you were right to use the 500 side hinges and centre bracket. This then makes the 500 seats sit lower than the panda seats so like you say they don't clip into the catches like the photo below.

What I did in the end was to buy some 500 catches and redrill them. I was going to weld up some new catches but didn't have the time at work with everything going on so this will do for now. They take a bit of slamming to get the seats to stay held in but they are secure now and sit nicely.

I'll be heading out to the car in a bit so I will get a pic of them for you

20200411_122114.jpeg
 
Had a bit of fun the other day replacing the passenger side headlight as it was smashed when I bought the car. The seller gave me a replacement and just hadn't got round to fitting it himself. I now know why.

After finding all the necessary bolts to remove the bumper I realised it wasn't going to be as easy as I thought as the bumper has never been off. I was fighting against 11 years of corrosion and dirt build up but I eventually got there and made it look like it has been in a huge smash.

Passenger headlight out and promptly put in the bin. The bolt holding it to the inside wing snapped on the way out so it was off to the random bolt drawer in the shed and a replacement found.

The drivers had an LED bulb inside that was just rattling about so that was removed too.

While I had the bumper off I replaced the pink Fiat badge with a new one also provided by the previous owner. The fog lights were tinted yellow and the covers restored with some Turtle Wax gel that I bought from Halfords a few weeks ago.

I one of the fogs was attached with a zip tie so I've ordered a replacement chimney nut along with new stainless fixings instead of the old rusty screws I removed. Just waiting for them to turn up now and I can get everything put back together and start restoring the plastic trim on the whole car.

20200411_152918.jpeg20200411_153154.jpegIMG_20200414_093131_238.jpeg20200412_124343.jpegIMG-20200413-WA0002.jpegIMG-20200413-WA0004.jpeg20200411_172328.jpeg
 
I hit a deer at 60mph. It shattered the bumper and the radiator/headlights frame, bent both radiators and cracked the air filter box and one headlight. Amazingly the bonnet and wing were ok.
Calling the 100HP front panel a bumper is frankly a lie. It offers zero protection to important parts of the car. They are also very expensive to replace while ordinary Panda bumpers are cheap as chips and a fair bit tougher.

Paint the middle section black and few will notice the difference. You will then have your original bumper safe and sound for when you sell the car.

I fitted a standard Panda bumper. I chose to remove the front rubbing strips and fill the holes but that is a much bigger job than it looks. The bottom splitter/spolier wont easily fit a standard bumper but the wheel spats fit fine. Measure the three fixing holes from the 100HP bumper.
 
Last edited:
The basic models have a two piece bumper with grill that makes the whole thing a bit stronger but makes additional bumper hoops harder to fit.
The 100HP radiators would benefit (a lot) from some steel tubes welded to the front cross beam. They could be done quite easily and would be completely hidden under the plastic. That would stop anything that does fly through the plastic from destroying everything behind.
 
I hit a deer at 60mph. It shattered the bumper and the radiator/headlights frame, bent both radiators and cracked the air filter box and one headlight. Amazingly the bonnet and wing were ok.
Calling the 100HP front panel a bumper is frankly a lie. It offers zero protection to important parts of the car. They are also very expensive to replace while ordinary Panda bumpers are cheap as chips and a fair bit tougher.

Paint the middle section black and few will notice the difference. You will then have your original bumper safe and sound for when you sell the car.

I fitted a standard Panda bumper. I chose to remove the front rubbing strips and fill the holes but that is a much bigger job than it looks. The bottom splitter/spolier wont easily fit a standard bumper but the wheel spats fit fine. Measure the three fixing holes from the 100HP bumper.
I don't think bumpers are allowed to offer any protection thesedays with the cushioning needed to pass passenger collision tests
 
I am not suggesting anything on the outside.


A huge steel crash beam, mandated by crash protection rules, runs across the car under the bumper (inside if you like). It transfers crash loads across the car, but fails to protect the radiators or the engine air box. There is space above the beam but UNDER the plastic to add a metal tube under the bumper which would protect the radiators.

The standard bumper partly does this with thicker, tougher plastic and a top (beneath the grille) that provides some protection where the 100HP has none.
 
Great thread this, some really worthwhile things you're doing to the 100. I was bemused when you said only 2 of them on the island as I thought you meant Britain but I've read the whole thread now

Seeing your regulator assembly reminds me I must get out and fix the grinding noise on mine. I don't have any lithium e2 grease can I use copper ease?
 
Back
Top