General DIY two tone alloy wheel painting

Currently reading:
General DIY two tone alloy wheel painting

Brad Cogan

New member
Joined
Nov 26, 2015
Messages
27
Points
8
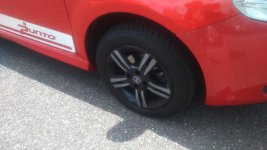
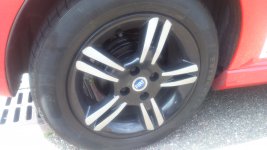
The wheels on my GP were looking pretty battered and the paint started flaking off so I decided to get them repainted. However I'm very tight fisted and couldn't allow myself to get them painted by a professional and I thought 'No, I'll DIY!'
yummy.gif


While I was at it I thought I might as well paint them some awesome colours to make the car look better (and also give it more HP because that's how it works).
slayer.gif


Here are the battered wheels before.
thumb_down.gif


More images to follow...
 

Attachments

  • Wheels_-_Before.jpg
    Wheels_-_Before.jpg
    77.2 KB · Views: 74
Last edited:
Sanding

First thing I did was jack up one side of the car and put it on axle stands. I then removed the wheels and cleaned them with some water and washing up liquid (Obviously I'm only going to go through this for one wheel so I repeated this whole process for the other wheels).


I then began sanding away all of the curb rash and scrapes on the wheel with 240 grit paper. I then went over the entire top surface of the wheel with fine 1500 grit paper so the primer will stick better. I then cleaned it again and dried it with a microfibre cloth.


At this stage you should put on some PPE including goggles, dust mask and gloves, especially if you're using power tools for sanding. I also wore it for the priming, painting and lacquering.


Time to cook meth *Ahem* I mean paint some wheels (looking very miserable here).
frown.gif


Here it is after sanding.
thumb.gif

 
Last edited:
Priming

I then applied the grey primer. I tried masking the tyres with masking tape but it didn't work so I used some SeaWorld playing cards that I found instead which worked pretty well (until it got windy).


P.S I bought all of the stuff I used from Halfords except a few things that I already had lying around but all of the paint I bought from Halfords. The primer is normal grey primer.


Painting the silver areas

I'm going for a two tone black/silver look like a lot of modern alloy wheels around nowadays. With most of the wheel being black with silver highlights on the spokes.
cool.gif


So on the picture below you'll see I only applied the silver paint on the areas that would need it. The rest is still grey primer.


Masking up for the black paint

Before applying the black paint I had to mask up the silver areas that I wanted to stay silver. To do this I used vehicle masking tape (proper painters tape would probably be better) and stuck it on the wheel. I then traced around the spokes with a pencil and then cut this shape out and carefully stuck them back onto the wheel which took a very long time
banghead.gif


Painting the wheel black

After careful masking with the masking tape and playing cards, I painted the entire surface of the wheel black and then removed the masking tape once the paint had dried. So satisfying
biggrin.gif


Unfortunately I didn't get any pictures of it at this stage but I'm sure you can imagine how it would look.


I kinda messed up a little at this stage by using masking tape instead of stickier, plasticier tape so if you look very closely you can see slightly jagged edges and a little bit of fading from black to silver where the tape didn't stick enough and separated from the wheel slightly. Not really noticeable from any more than a meter away though so I'm not too bothered.
 
Applying the lacquer

Now all of the paint is on and looking good, I put some heavy duty PU lacquer on the wheels to protect the new paint (note - don't put this on light coloured wheels as it has a slight straw colour and will discolour your wheels)


I applied about 4 coats of this instead of the 2-3 coats I applied for the paint.


Unfortunately I had a few runs and laid it on quite thick so I got an orange peel effect. If I did it again I would take more time at this stage.
banghead.gif


Here's the finished product.
smile.gif

 
Wheels are on but the brakes look naff

After waiting for a couple of hours for the lacquer to properly dry, I put the wheels back on the car. At this point I realised how rusty and horrible the wheel bolts and the drum brakes looked.

I decided that this was wrong so I spent ages taking the wheels off again and painting these parts. For the wheel bolts I just masked up the threads with masking tape, sprayed with black, waited 5 minutes, turned them over and sprayed again.


For the drum brake I masked up the surface where it meets the wheel(not very well) with masking tape and masked the rest of my car and the wheel arch by putting a hole in a bin bag and putting this hole over the drum and taping the outside of the bag to the car (again no pictures..
thumb_down.gif
). I then cleaned, sanded off the rust and dried (in the same way as the wheels) and then painted 2 coats of black.


That's better.
thumb.gif
 
Done! For now

Before I put the wheels back on, I applied some copper grease on to the meeting surfaces because two of the wheels were rather seized when I took them off the first time. I then torqued them up to 105nm using a torque wrench I borrowed.


I want to point out that I have never done anything like this before and kinda just wanted to see how it turned out and fix my manky wheels without spending a fortune and overall I'm very happy with the results. It's not perfect but much better than before plus I've saved a lot of money and I can happily say I've done it myself.
yummy.gif


Next project is to paint those rusty calipers. Red of course for that extra power
slayer.gif


Any questions, comments or suggestions on how I could've done it better would be much appreciated.
smile.gif
 
I'm kinda new to this forum and still don't quite get how to add pictures and stuff. I'll see if I can fix it. Cheers!
 
Here's one. They're a bit dirty because I've been driving around a lot.
 

Attachments

  • DSC_0796.JPG
    DSC_0796.JPG
    1.8 MB · Views: 70
Hey new update. The lacquer I put on the wheels is starting to peel off. I've followed all of the instructions on the can but it's just flaking off. Upon a bit of research I've found out that this is really bad lacquer. The lacquer was Halfords PU lacquer. Don't buy!

Gonna give it a quick sanding with 2000 grit wet and dry and hit it with some better quality lacquer.
 
That's a good idea mate. It wasn't as hard as I thought it would be. The hardest part was the masking up. If you decide to do it yourself I suggest you keep your paint cans warm (I put them in a bucket of hot water) and I also suggest you buy a good quality lacquer because although Halfords paint was good, the Halfords lacquer was rubbish and just peels off in a film.
 
Back
Top