

In this method you will be raising and lowering the engine with a jack whilst the driver’s side front engine mount is removed. When raising or lowering, keep a sharp eye out firstly for stability, but also for anything catching. If you’re lifting and the engine stops going up, you’ve caught something and mustn’t raise it any further. Same applies when lowering, if it stops going down, raise the jack slightly so the weight of the engine is taken again by the jack. Never work underneath a car which isn’t properly supported.
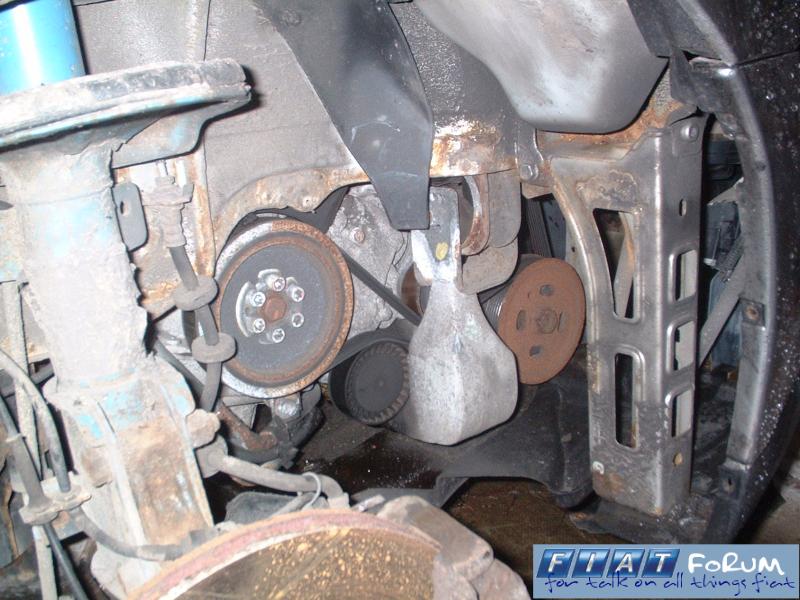
Lets start off with the obvious ones. Apply the handbrake tightly, chock a rear wheel, jack up the car and remove the driver’s side roadwheel. Support the car securely on axle stands. Under the wheel arch, remove the two parts of splash shield under the wing – one with the grille on behind the fog lamp and another covering the drive belts. You should be faced with a view a little like this:
Those 6 little bolts surrounding the big one on the crank pulley are Torx ones, you’ll need a TX45 bit to loosen them. Undo them one at a time, don’t remove yet, and put them back in finger tight. Then, turn the crank using a 19mm spanner or socket on the big bolt in the middle until the nick in the pulley and the notch on the timing belt cover line up – you can’t miss it, it’s just off the vertical position. Now you may remove them along with the pulley – it won’t turn the crank this way if they’re already loose.
Now, put the jack under the sump and support the weight of the engine. You may need to lift it ½” or so, as you need to remove the bolts from the engine mount in the middle of that picture. Three go up into the wing, and one goes through from front to rear.
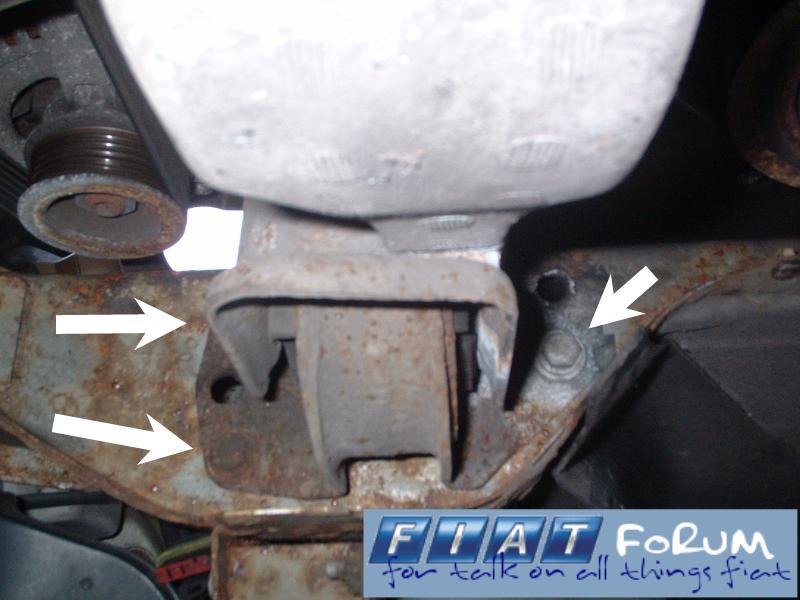
View of mount from below. Remove the three bolts arrowed, making sure the engine isn’t going to drop on your head, ideally. Remove the through bolt too as this will allow for more engine movement later. Manipulate the mount, if you can remove it completely then all the better – if not then just jiggle it as you go depending on whether you’re raising or lowering.
I modified a Torx TX40 bit for the next step (i.e. cut it down to ½” length with an angle grinder); it had to be done as clearance is tight getting onto the timing belt cover bolts. Raise the engine and then remove the three top bolts. In the pic you can see the shortened torx bit taped into a ¼” combination spanner. I won’t pretend it’s dead simple getting these bolts out, it’s quite fiddly getting to the front and rear ones. Once they are out, lower the engine and remove the bottom torx screw – this is the last one holding the belt cover on.
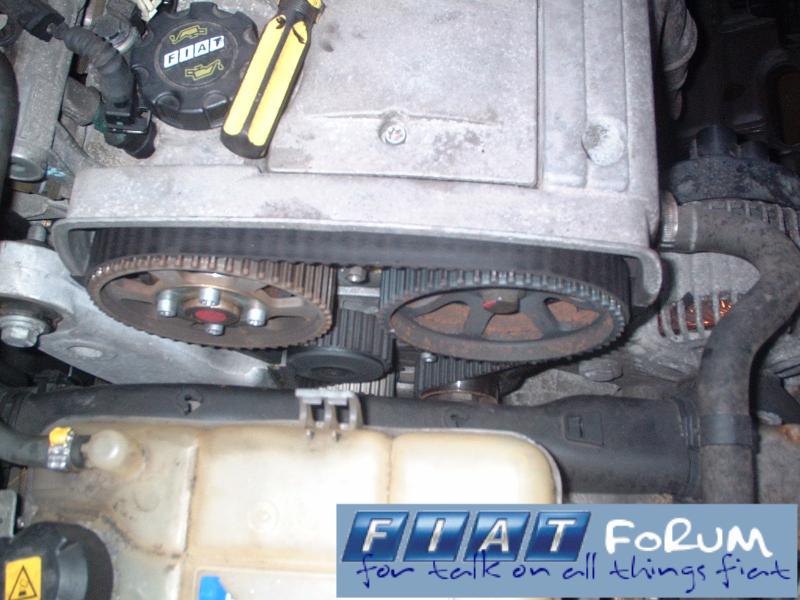
I then had to chop off the timing belt marker from the cover using a hacksaw in order to lift it out – it protrudes about ½” and makes clearance just that bit too tight otherwise. Before you do this, score the position of the timing point on the marker above the little lip, so you can check it on refitting. Once the cover is off, you should see something like this:
The inlet cam has no markings on, the exhaust has one but it didn’t easily line up with anything of note. I took a felt pen and after cleaning the pulleys and casing above, made marks on the pulleys and cam cover so I could see if anything moved. Also mark the crank pulley to make sure that stays put, too.
You can just about see the white tensioner pulley in the above picture, this is held with one 13mm nut which is best accessed from below. Once loosened, the pulley will swing and you can do a Haynes - ‘simply remove the old belt’. Do remember which way around the pulleys it goes, as the new one has to be just the same!
Right, now the new belt is on you need to tension it. I did this from below with two spanners – a 24mm combo for leverage, and the 13mm for tightening up.
In this pic, looking up you’re pulling the big spanner to the right to take up the tension, levering against the metal roller on the left of the pic. The smaller one is the 13mm one to tighten the tensioner bolt. Once you have this done, check that all the timing marks still line up – 2 top and one bottom. If not, belt off, realign and try again. If it’s just one notch off, you’re still stuffed so make sure it’s right.
Now it’s time to turn the engine over with a spanner / socket. Use a 19mm on the big centre bolt on the crank pulley. See that everything moves when it should, if the belt wasn’t seated right it’ll slip and become loose – if it slips, realign all the pulleys and start again.
Assuming it didn’t slip, turn the crank pulley two full turns clockwise and realign the marks. See that everything still lines up, if it does all well and good. If not, you know the score. Check the tension by just turning the crank pulley until it takes up the slack from the right hand side (front of the car) then feel how slack the section of belt on the left hand side of the bottom crank pulley is. There should be a little movement available on the belt from left to right, if not it’s too tight. You ideally want around ¼” max movement on this short stretch, pull quite hard to make sure all the slack is where you’re trying to feel the movement - the play should easily be felt. If the belt is too tight or too slack, loosen the pulley bolt and retension – make sure the marks are lined up first though, in case anything goes wrong.
Bung the belt covers back on ands reattach the crank pulley – making sure the notch in the pulley on the engine lines up with the hole in the pulley in your hand.
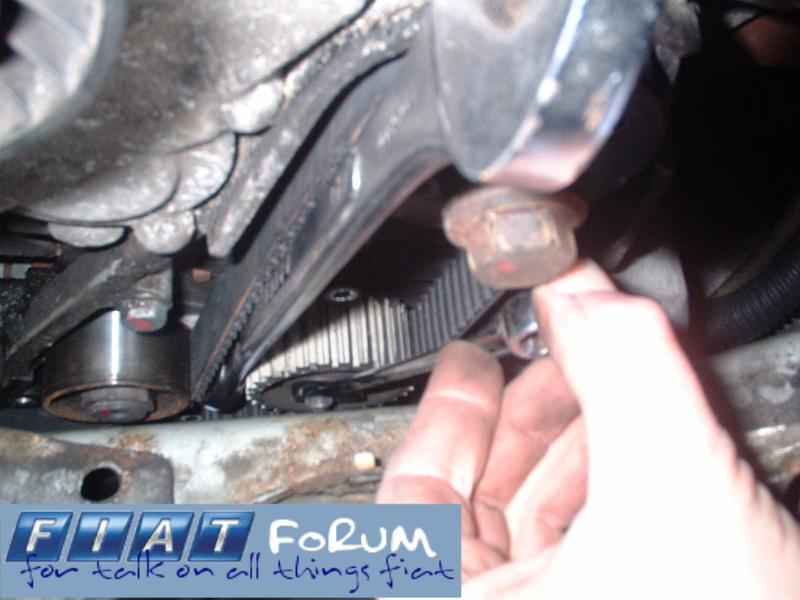
Next job is to replace the alternator and power steering belts. You can’t do the alternator belt while the power steering one is fitted as it’s driven from the same pulley and won’t go past it. So, at this stage the PAS belt is already off – easy enough. Loosen the alternator mounting bolt closest to the engine:
then the one nearest the front of the car. Just one turn each will do.
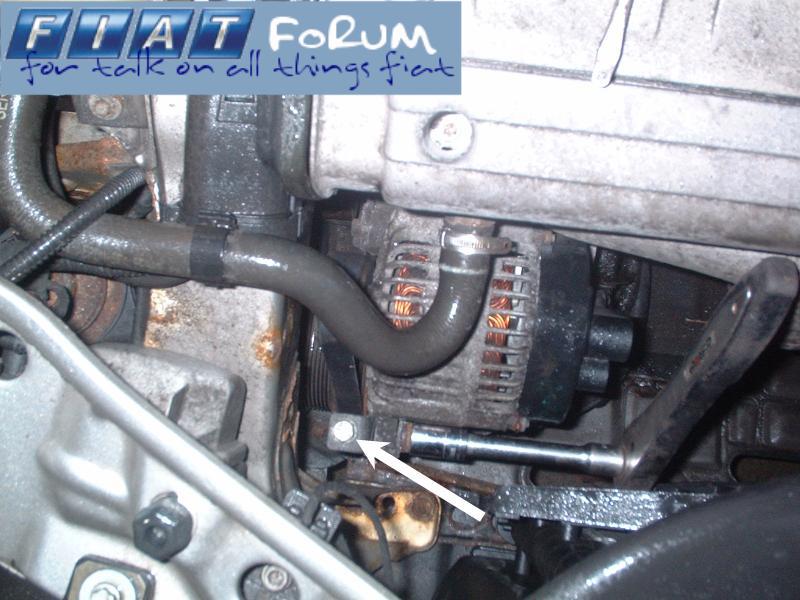
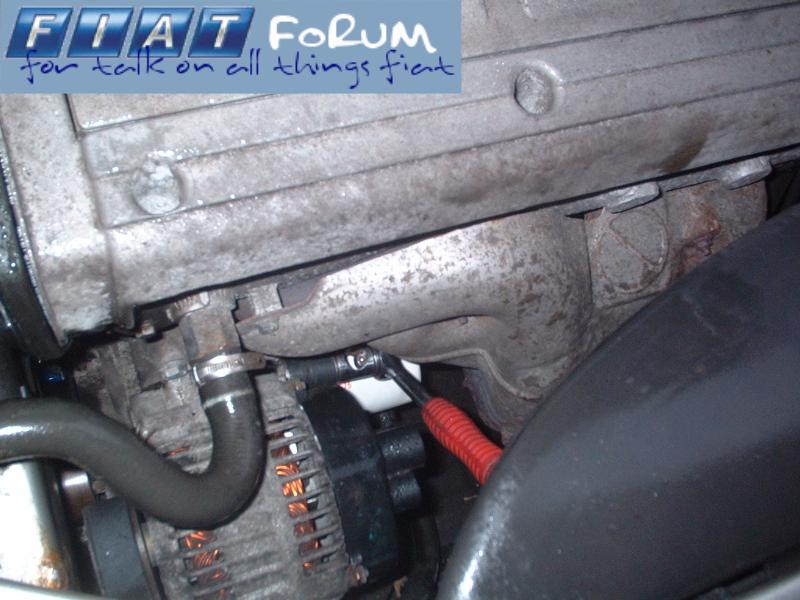
Now undo the tension adjusting bolt, arrowed in the above picture to release the belt.
Fit new belt and tension appropriately, then tighten the front and rear mounting bolts back up.
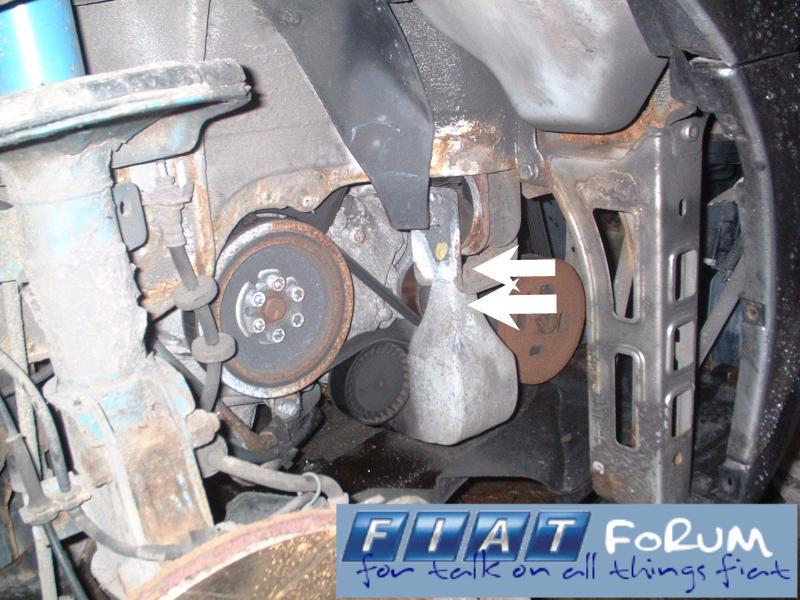
PAS belt next – the tensioner for this is held on by 2x 13mm bolts which are hidden behind the engine mount. Easy enough to get at though, they are roughly where the arrows point (but behind the mount, obviously………)
The PAS belt is tensioned by turning it with a 17mm spanner, it has a bolt in the centre to allow you to do this. Fit the new belt and tension appropriately.
Refit the splash shields, refit the wheel and take it off the jacks. Start the engine and listen for any strange noises, if all has been done correctly it should run as sweet as a nut. Investigate any odd noises quickly, as they could become expensive quite rapidly.
Well, that’s it – job done. Give yourself a hot bath, a beer and a takeaway to celebrate.
You’ve just managed what Fiat say can’t be done")
Lets start off with the obvious ones. Apply the handbrake tightly, chock a rear wheel, jack up the car and remove the driver’s side roadwheel. Support the car securely on axle stands. Under the wheel arch, remove the two parts of splash shield under the wing – one with the grille on behind the fog lamp and another covering the drive belts. You should be faced with a view a little like this:
Those 6 little bolts surrounding the big one on the crank pulley are Torx ones, you’ll need a TX45 bit to loosen them. Undo them one at a time, don’t remove yet, and put them back in finger tight. Then, turn the crank using a 19mm spanner or socket on the big bolt in the middle until the nick in the pulley and the notch on the timing belt cover line up – you can’t miss it, it’s just off the vertical position. Now you may remove them along with the pulley – it won’t turn the crank this way if they’re already loose.
Now, put the jack under the sump and support the weight of the engine. You may need to lift it ½” or so, as you need to remove the bolts from the engine mount in the middle of that picture. Three go up into the wing, and one goes through from front to rear.
View of mount from below. Remove the three bolts arrowed, making sure the engine isn’t going to drop on your head, ideally. Remove the through bolt too as this will allow for more engine movement later. Manipulate the mount, if you can remove it completely then all the better – if not then just jiggle it as you go depending on whether you’re raising or lowering.
I modified a Torx TX40 bit for the next step (i.e. cut it down to ½” length with an angle grinder); it had to be done as clearance is tight getting onto the timing belt cover bolts. Raise the engine and then remove the three top bolts. In the pic you can see the shortened torx bit taped into a ¼” combination spanner. I won’t pretend it’s dead simple getting these bolts out, it’s quite fiddly getting to the front and rear ones. Once they are out, lower the engine and remove the bottom torx screw – this is the last one holding the belt cover on.
I then had to chop off the timing belt marker from the cover using a hacksaw in order to lift it out – it protrudes about ½” and makes clearance just that bit too tight otherwise. Before you do this, score the position of the timing point on the marker above the little lip, so you can check it on refitting. Once the cover is off, you should see something like this:
The inlet cam has no markings on, the exhaust has one but it didn’t easily line up with anything of note. I took a felt pen and after cleaning the pulleys and casing above, made marks on the pulleys and cam cover so I could see if anything moved. Also mark the crank pulley to make sure that stays put, too.
You can just about see the white tensioner pulley in the above picture, this is held with one 13mm nut which is best accessed from below. Once loosened, the pulley will swing and you can do a Haynes - ‘simply remove the old belt’. Do remember which way around the pulleys it goes, as the new one has to be just the same!
Right, now the new belt is on you need to tension it. I did this from below with two spanners – a 24mm combo for leverage, and the 13mm for tightening up.
In this pic, looking up you’re pulling the big spanner to the right to take up the tension, levering against the metal roller on the left of the pic. The smaller one is the 13mm one to tighten the tensioner bolt. Once you have this done, check that all the timing marks still line up – 2 top and one bottom. If not, belt off, realign and try again. If it’s just one notch off, you’re still stuffed so make sure it’s right.
Now it’s time to turn the engine over with a spanner / socket. Use a 19mm on the big centre bolt on the crank pulley. See that everything moves when it should, if the belt wasn’t seated right it’ll slip and become loose – if it slips, realign all the pulleys and start again.
Assuming it didn’t slip, turn the crank pulley two full turns clockwise and realign the marks. See that everything still lines up, if it does all well and good. If not, you know the score. Check the tension by just turning the crank pulley until it takes up the slack from the right hand side (front of the car) then feel how slack the section of belt on the left hand side of the bottom crank pulley is. There should be a little movement available on the belt from left to right, if not it’s too tight. You ideally want around ¼” max movement on this short stretch, pull quite hard to make sure all the slack is where you’re trying to feel the movement - the play should easily be felt. If the belt is too tight or too slack, loosen the pulley bolt and retension – make sure the marks are lined up first though, in case anything goes wrong.
Bung the belt covers back on ands reattach the crank pulley – making sure the notch in the pulley on the engine lines up with the hole in the pulley in your hand.
Next job is to replace the alternator and power steering belts. You can’t do the alternator belt while the power steering one is fitted as it’s driven from the same pulley and won’t go past it. So, at this stage the PAS belt is already off – easy enough. Loosen the alternator mounting bolt closest to the engine:
then the one nearest the front of the car. Just one turn each will do.
Now undo the tension adjusting bolt, arrowed in the above picture to release the belt.
Fit new belt and tension appropriately, then tighten the front and rear mounting bolts back up.
PAS belt next – the tensioner for this is held on by 2x 13mm bolts which are hidden behind the engine mount. Easy enough to get at though, they are roughly where the arrows point (but behind the mount, obviously………)
The PAS belt is tensioned by turning it with a 17mm spanner, it has a bolt in the centre to allow you to do this. Fit the new belt and tension appropriately.
Refit the splash shields, refit the wheel and take it off the jacks. Start the engine and listen for any strange noises, if all has been done correctly it should run as sweet as a nut. Investigate any odd noises quickly, as they could become expensive quite rapidly.
Well, that’s it – job done. Give yourself a hot bath, a beer and a takeaway to celebrate.
You’ve just managed what Fiat say can’t be done
Last edited: