I mentioned in a post somewhere - can't find it though - That my youngest boy's wife was paying us a visit yesterday. This was partly so she and Mrs Jock could talk babies and various preparations which are under consideration for the imminent arrival of our new grandchild, but also so I could investigate a possible partly seized front brake on the Jazz.
I'd parked my car in the road so she was able to pull straight onto my hard standing in front of the house. Ah, so it'll be the N/S/F brake you're talking about to judge from the substantial "whisp" of smoke curling gently up from it? While it was cooling down I gave the other three a check over. Rears look OK although the discs have seen better days. They will need pads at the next service so I'll factor in discs too. O/S/F pads are about 3/4 worn and the discs are still nice and shiny but not in their first flush of youth (probably renewed with the last pad change) The wheel spins by hand but there is just a touch more drag than I would expect.
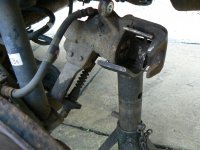
So, now for the main event. Wheel nuts slackened on N/S/F wheel (nuts and studs for a change) and car jacked up with stand under chassis. Pads look 3/4 worn - just - like the O/S so, with a bit if luck it's not been running like this for long. Things have been getting very hot though with slight bluing on the disc and a lot of heat still in the assembly, note to self, keep an eye on the wheel bearing seal. I can turn the wheel but would not say it can be "spun" - there's a lot of drag. Ok, wheel nuts off and wheel removed, turn steering fully to port, undo the caliper retaining set screws - 12mm spanner? Honda doing it differently again! and the caliper is solid. I can't retract the piston at all. Levering with screwdrivers, tyre lever etc achieves nothing. I finally managed with a large G clamp with one end on the outer pad and the other on the inside of the caliper. I got the piston pushed back enough to get the caliper off the carrier. Pads were free in carrier so it's definitely the caliper itself at fault.
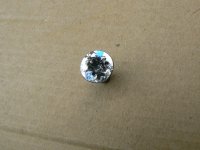
At this point a garage would just order up and fit a new caliper but I decided to examine the caliper closely to see if it would take an overhaul kit. I got Mrs J to pump the brake pedal expecting the piston to be jacked out of the caliper but NO! Mrs J couldn't/was reluctant to stand on the pedal hard enough to shift the piston (at this point I knew I was probably on a looser but continued anyway). I found I had to run the engine, so I had the servo assist, before I could get the piston shifted. Once it was on the move it went quite easily and after about 8 pumps (1/2 to 3/4 depression only to try to avoid M/Cyl problems) I topped the reservoir to max and kept on going until the piston popped out. Clamped up the flex hose and drained the, now open, caliper into a tin. Oh dear this looks rusty although the bore deeper in looks good so it might all clean up with some emery? Now for the piston. Oh well, game over. Here's the piston after being cleaned up:
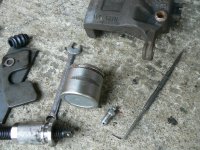
Even after a bit of a clean up with some fine emery It's obvious the corrosion has penetrated the plating (is it chrome?). If I'm to rescue this caliper it's going to need a new piston, fluid and dust seals etc and a fair bit of derusting and gunge busting of the caliper casting. This sort of kit is not usually on the shelves at your local factor or the likes of Halfords as a quick 'phone call confirms. "I've got a rebuilt caliper kit on the shelf right now though if you want" offered my factor. The price was reasonable and £18 back if the old caliper is acceptable. Who judges if it's acceptable I ask? That's me he says! Done, I'll be right round.
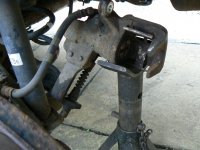
The new caliper is remanufactured by Apec (I've had their pads before and they've been fine) It's a quality bit of kit complete with a wee sachet of brake grease, new bleed nipple, new rubber bellows for the guide pins and sealing washers for the banjo connector on the flex hose. Time's getting on now - she didn't turn up with the car until lunch time - so a quick clean up, glaze bust on the pads and a wee bit brake grease in the right places sees the caliper reinstalled (a couple of new retaining screws would have been nice) and the banjo fixing tightened into place with it's new sealing crush washers. What a good idea a banjo fitting is on the caliper end of the flex. Here's the new caliper after fitting, you can clearly see the banjo union (I didn't take any pictures as I worked because brake fluid on the camera is just not worth thinking about!)
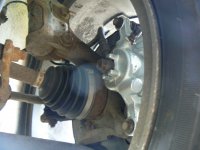
How often have you fitted a new caliper only to find that the old screw in flex hose, once fully tightened, has a twist in it? To rectify this you've got to slacken the tube nut and chassis fixing on the other end of the flex to allow it to be rotated to "loose" the twist. Good luck with that if the car is more than a few years old!
Now to bleed it out and I'm done Whoo hoo! Ok Mrs Jock, just jump in there and pump the pedal when I say (Daughter in law is 8 months pregnant and just getting behind the wheel is effort enough!) Ok, nipple slackened and push down, Nipple tightened and pedal up. Repeat several times. No fluid appearing? Oh dear! Maybe the nipple needs more than 3/4 of a turn so slacken it a couple of turns and Mrs J pumps again. Still no fluid going down the "bleeding" tube! What the? but wait a minute, there's fluid oozing out past the bleed nipple threads? that's weird? Took the nipple out (knowing what I'm going to find as this is not the first time I've had this) and guess what? the long axial drilling - down the length of the nipple - is drilled right to it's depth but the wee cross hole near the end is not drilled in far enough to meet up with the axial hole so the fluid has no way out. Luckily I slaistered copaslip all over the nipple on the old caliper when I did a fluid renewal a couple of years ago so it came out easily and once installed in the new caliper the bleeding was quickly completed. Usually I would do this with my Gunson pressure bleeder but the Honda master cylinder has a "funny" top and I don't have an adaptor to fit (must buy a universal one)
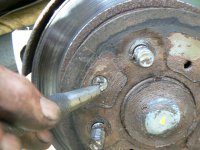
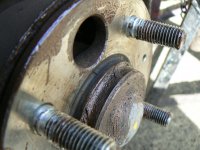
I had checked very roughly for disc run out with a screwdriver clamped to my axle stand - in the same way I check for wheel run out before doing toe adjustments. It's not very accurate to do it this way, you really need a dial gauge, but it gives a rough indication if there's a serious problem. (A badly overheated disc may well be warped) My rough and ready check had not shown up any problems and I was relieved to find there were no obvious problems on road test. In the not too distant future a decision will need to be made over the other front caliper which is probably slightly "sick" at this time and a set of front pads. Maybe the O/S/F caliper will soon become more of a problem and make that decision for us. Rear pads and discs, whilst not a priority, will be needed in the medium term future. (hope the calipers wind back ok!
As I was finally topping up the brake fluid I noticed the strut top mounts had nice little flexible plastic (maybe silicon rubber of some sort?) boots to keep them clean.
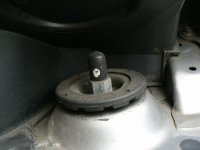
This car is more than 2 years older than our Panda but the threads under these boots - I took one off for a look - are absolutely pristine. What a good idea! The more I work on this car the more I like all these little touches. Still regret not buying that Civic Estate!
Daughter in law, and grandchild soon to be, departed and I roughly reassembled the piston and seals into the old caliper, jumped in the Panda (Becky) and shot round to the factors with maybe 10 minutes 'till they closed. £18, as stated, refunded onto my card and they commented that I shouldn't have bothered to do such a good job of cleaning up the old caliper! Unfortunately they were very busy so I wasn't able to do much leg pulling over the duff bleed nipple, I'll save that for next time.
I'd parked my car in the road so she was able to pull straight onto my hard standing in front of the house. Ah, so it'll be the N/S/F brake you're talking about to judge from the substantial "whisp" of smoke curling gently up from it? While it was cooling down I gave the other three a check over. Rears look OK although the discs have seen better days. They will need pads at the next service so I'll factor in discs too. O/S/F pads are about 3/4 worn and the discs are still nice and shiny but not in their first flush of youth (probably renewed with the last pad change) The wheel spins by hand but there is just a touch more drag than I would expect.
So, now for the main event. Wheel nuts slackened on N/S/F wheel (nuts and studs for a change) and car jacked up with stand under chassis. Pads look 3/4 worn - just - like the O/S so, with a bit if luck it's not been running like this for long. Things have been getting very hot though with slight bluing on the disc and a lot of heat still in the assembly, note to self, keep an eye on the wheel bearing seal. I can turn the wheel but would not say it can be "spun" - there's a lot of drag. Ok, wheel nuts off and wheel removed, turn steering fully to port, undo the caliper retaining set screws - 12mm spanner? Honda doing it differently again! and the caliper is solid. I can't retract the piston at all. Levering with screwdrivers, tyre lever etc achieves nothing. I finally managed with a large G clamp with one end on the outer pad and the other on the inside of the caliper. I got the piston pushed back enough to get the caliper off the carrier. Pads were free in carrier so it's definitely the caliper itself at fault.
At this point a garage would just order up and fit a new caliper but I decided to examine the caliper closely to see if it would take an overhaul kit. I got Mrs J to pump the brake pedal expecting the piston to be jacked out of the caliper but NO! Mrs J couldn't/was reluctant to stand on the pedal hard enough to shift the piston (at this point I knew I was probably on a looser but continued anyway). I found I had to run the engine, so I had the servo assist, before I could get the piston shifted. Once it was on the move it went quite easily and after about 8 pumps (1/2 to 3/4 depression only to try to avoid M/Cyl problems) I topped the reservoir to max and kept on going until the piston popped out. Clamped up the flex hose and drained the, now open, caliper into a tin. Oh dear this looks rusty although the bore deeper in looks good so it might all clean up with some emery? Now for the piston. Oh well, game over. Here's the piston after being cleaned up:

Even after a bit of a clean up with some fine emery It's obvious the corrosion has penetrated the plating (is it chrome?). If I'm to rescue this caliper it's going to need a new piston, fluid and dust seals etc and a fair bit of derusting and gunge busting of the caliper casting. This sort of kit is not usually on the shelves at your local factor or the likes of Halfords as a quick 'phone call confirms. "I've got a rebuilt caliper kit on the shelf right now though if you want" offered my factor. The price was reasonable and £18 back if the old caliper is acceptable. Who judges if it's acceptable I ask? That's me he says! Done, I'll be right round.
The new caliper is remanufactured by Apec (I've had their pads before and they've been fine) It's a quality bit of kit complete with a wee sachet of brake grease, new bleed nipple, new rubber bellows for the guide pins and sealing washers for the banjo connector on the flex hose. Time's getting on now - she didn't turn up with the car until lunch time - so a quick clean up, glaze bust on the pads and a wee bit brake grease in the right places sees the caliper reinstalled (a couple of new retaining screws would have been nice) and the banjo fixing tightened into place with it's new sealing crush washers. What a good idea a banjo fitting is on the caliper end of the flex. Here's the new caliper after fitting, you can clearly see the banjo union (I didn't take any pictures as I worked because brake fluid on the camera is just not worth thinking about!)

How often have you fitted a new caliper only to find that the old screw in flex hose, once fully tightened, has a twist in it? To rectify this you've got to slacken the tube nut and chassis fixing on the other end of the flex to allow it to be rotated to "loose" the twist. Good luck with that if the car is more than a few years old!
Now to bleed it out and I'm done Whoo hoo! Ok Mrs Jock, just jump in there and pump the pedal when I say (Daughter in law is 8 months pregnant and just getting behind the wheel is effort enough!) Ok, nipple slackened and push down, Nipple tightened and pedal up. Repeat several times. No fluid appearing? Oh dear! Maybe the nipple needs more than 3/4 of a turn so slacken it a couple of turns and Mrs J pumps again. Still no fluid going down the "bleeding" tube! What the? but wait a minute, there's fluid oozing out past the bleed nipple threads? that's weird? Took the nipple out (knowing what I'm going to find as this is not the first time I've had this) and guess what? the long axial drilling - down the length of the nipple - is drilled right to it's depth but the wee cross hole near the end is not drilled in far enough to meet up with the axial hole so the fluid has no way out. Luckily I slaistered copaslip all over the nipple on the old caliper when I did a fluid renewal a couple of years ago so it came out easily and once installed in the new caliper the bleeding was quickly completed. Usually I would do this with my Gunson pressure bleeder but the Honda master cylinder has a "funny" top and I don't have an adaptor to fit (must buy a universal one)
I had checked very roughly for disc run out with a screwdriver clamped to my axle stand - in the same way I check for wheel run out before doing toe adjustments. It's not very accurate to do it this way, you really need a dial gauge, but it gives a rough indication if there's a serious problem. (A badly overheated disc may well be warped) My rough and ready check had not shown up any problems and I was relieved to find there were no obvious problems on road test. In the not too distant future a decision will need to be made over the other front caliper which is probably slightly "sick" at this time and a set of front pads. Maybe the O/S/F caliper will soon become more of a problem and make that decision for us. Rear pads and discs, whilst not a priority, will be needed in the medium term future. (hope the calipers wind back ok!
As I was finally topping up the brake fluid I noticed the strut top mounts had nice little flexible plastic (maybe silicon rubber of some sort?) boots to keep them clean.

This car is more than 2 years older than our Panda but the threads under these boots - I took one off for a look - are absolutely pristine. What a good idea! The more I work on this car the more I like all these little touches. Still regret not buying that Civic Estate!
Daughter in law, and grandchild soon to be, departed and I roughly reassembled the piston and seals into the old caliper, jumped in the Panda (Becky) and shot round to the factors with maybe 10 minutes 'till they closed. £18, as stated, refunded onto my card and they commented that I shouldn't have bothered to do such a good job of cleaning up the old caliper! Unfortunately they were very busy so I wasn't able to do much leg pulling over the duff bleed nipple, I'll save that for next time.


