For this task you will need;
Trolley jack
Axle Stand
Wheel Brace
17mm socket
Ratchet
Ratchet extension
Pipe grips
Large screwdriver
Pliers
Firstly, using the wheel brace loosen the wheel nuts while the car is still on the ground.
Place the trolley jack under the jacking point at the front of the car, place a thin but sturdy piece of wood between the jack and the jacking point (to stop metal on metal damage) and raise the car from the ground.
Now place the axle stand under the rear of the wishbone, again place a thin but sturdy piece of wood between the axle stand and wishbone and slowly lower the car until the axle stand is bearing the weight of the car. Check the stand is sturdy before starting work!
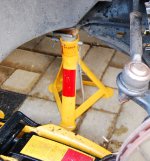
Next, remove the road wheels and remove the top from the brake fluid resoviour in the engine compartment and surround it with an old towel. Later in the process you will be forcing the calliper pistons back into their housing, this forces brake fluid back into the resoviour and on occasion can overflow – which is why you need a towel!
Once the road wheels have been removed soak the two 17mm calliper bolts located on the back of the wheel hub with WD40 and leave to penetrate for a while.
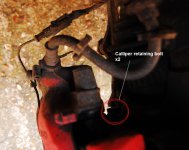
If you have brakes with pad wear indicators de-couple the electrical connection and cable tie out of the way so as not to snag or damage them.
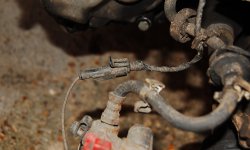
Take a screwdriver and ease (force) a space between the disc and pads, this will give you enough space to remove the brake until once you have removed the calliper retaining bolts, if you do not do this you will find it difficult to lift the calliper off the disc!
Now remove the calliper and discs by undoing the 17mm calliper retaining bolts on the back of the calliper, once removed place the calliper on a second axle stand so as not to stress the brake hose.
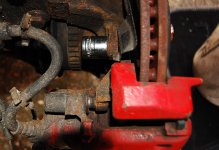
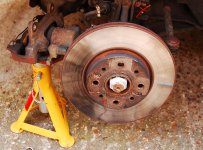
Remove two locating studs holding the disc onto the hub 12 or 13mm then remove the disc (you may need to help the disc along with a gentle thump from a hammer!).
Now place the new discs on the wheel hub.
Next remove the old pads from the calliper housing. First remove the large retaining spring with a pair of pliers then, using the screwdriver place it between the back of each pad and the calliper and 'jiggle' the pads towards the centre until they pop out.
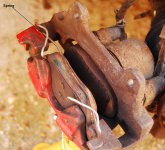
Once the pads are clear of the calliper use the pipe grips to press the calliper piston 'home'. Be very careful doing this as it is easy to puncture the rubber seal, it is advisable to use a small piece of wood between the piston and pipe grips.
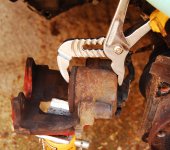
Now you can fit the new pads. Start with the pad facing the calliper piston, then the pad against the piston and finally re-fit the spring using the pair of pliers. Re-fitting the spring can be tricky, it is made easier if you can get someone to hold the calliper while you replace the spring.
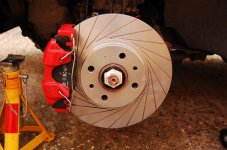
Now you are ready to re-fit the calliper unit and road wheels, to do this simply follow the removal instructions in reverse!
Trolley jack
Axle Stand
Wheel Brace
17mm socket
Ratchet
Ratchet extension
Pipe grips
Large screwdriver
Pliers
Firstly, using the wheel brace loosen the wheel nuts while the car is still on the ground.
Place the trolley jack under the jacking point at the front of the car, place a thin but sturdy piece of wood between the jack and the jacking point (to stop metal on metal damage) and raise the car from the ground.
Now place the axle stand under the rear of the wishbone, again place a thin but sturdy piece of wood between the axle stand and wishbone and slowly lower the car until the axle stand is bearing the weight of the car. Check the stand is sturdy before starting work!

Next, remove the road wheels and remove the top from the brake fluid resoviour in the engine compartment and surround it with an old towel. Later in the process you will be forcing the calliper pistons back into their housing, this forces brake fluid back into the resoviour and on occasion can overflow – which is why you need a towel!
Once the road wheels have been removed soak the two 17mm calliper bolts located on the back of the wheel hub with WD40 and leave to penetrate for a while.

If you have brakes with pad wear indicators de-couple the electrical connection and cable tie out of the way so as not to snag or damage them.

Take a screwdriver and ease (force) a space between the disc and pads, this will give you enough space to remove the brake until once you have removed the calliper retaining bolts, if you do not do this you will find it difficult to lift the calliper off the disc!
Now remove the calliper and discs by undoing the 17mm calliper retaining bolts on the back of the calliper, once removed place the calliper on a second axle stand so as not to stress the brake hose.


Remove two locating studs holding the disc onto the hub 12 or 13mm then remove the disc (you may need to help the disc along with a gentle thump from a hammer!).
Now place the new discs on the wheel hub.
Next remove the old pads from the calliper housing. First remove the large retaining spring with a pair of pliers then, using the screwdriver place it between the back of each pad and the calliper and 'jiggle' the pads towards the centre until they pop out.

Once the pads are clear of the calliper use the pipe grips to press the calliper piston 'home'. Be very careful doing this as it is easy to puncture the rubber seal, it is advisable to use a small piece of wood between the piston and pipe grips.

Now you can fit the new pads. Start with the pad facing the calliper piston, then the pad against the piston and finally re-fit the spring using the pair of pliers. Re-fitting the spring can be tricky, it is made easier if you can get someone to hold the calliper while you replace the spring.
Now you are ready to re-fit the calliper unit and road wheels, to do this simply follow the removal instructions in reverse!


