The Norwegian contribute to the Fiat Forum. This shows the car before the project. It is actually taken a year earlier. The guide applies to the 1.6 litre version, but might work with all versions.
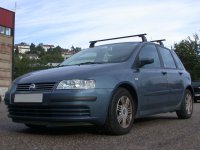
The Eibach pro system should lower the car about 30 mm. Due to wear and tear of the soft OEM shocks and springs it might not lower this much.
Tools needed:
- WD40
- Wirebrush.
- Jack.
- Garage jack.
- Offset ring spanner set (metric).
- Open spanner set (metric).
- Socket spanner / wrench set (metric).
- Allen keys 5 mm and 6 mm.
- Rope / wire etc.
- Wood / bricks etc.
- Grease.
Bits needed:
- None.
- For the strut brace re-fix you'll need 6 bolts, locknuts, washers and splitwashers. See between point 14 and 15. Skip this if you don't have a strut brace. It is recommended with a strut brace though, to force / keep the energy where it belongs.
Precautions:
- Make sure you buy the correct system for your car. You need to check the TUV papers and the numbers on the springs before starting.
- Do not let the car rest on the jack. The threads on the car's jack might seem fine, but you don't know what the threads are like on the inside of the metal.
- Never work under the car without axle stands.
- Springs are full of energy. You don't want a bearing to be the last thing you ever see before nailing the coffin. Take care.
- Torque settings.
- Don't expect your wife (if you are a male) to understand this is a necessary modification.
So... here we go.
Front:
See also Deckhair5's guide to remove a strut.
01. Loosen wheelbolts on both sides.
02. Jack up the car on one side.
03. Place an axle stand under the "garage jack point". It does not need to be lifted more than to remove the wheel.
04. Jack up the car on the other side and insert axle stand.
05. Unbolt and remove wheels.
I will suggest to work on both sides at the sime time. If you can't remove the spring on the second side, it's not funny to have assembled and completed the first side. :bang:
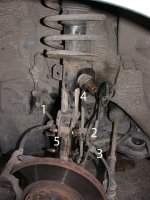
06. Unclip the hoses and wires from the strut [1-3].
07. Remove the nut from the anti-roll bar link [4], using an offset ring spanner and an allen key. Use lots of WD40 and brush the threads with a wire brush to remove rust and dirt. If the nut gets stuck, tighten it clockwise, apply WD40 and rebrush the threads and some WD40 again. Work like this until it comes off. Do the other side.
08. Remove the nuts from the bolts going through the hub [5]. Use WD40. Do not remove the bolts.
09. Place a garage jack under the hub to support it's wheight.
10. Open the bonnet...
11. Remove the top securing nut from the strut using an offset ring spanner and an allen key. The strut and hub etc. are now supported by the jack. Do not remove the second nut, as this secures the spring to the strut.
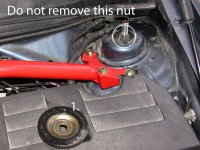
12. Lower the jack slightly. Holding the strut you can now remove the bolts from the hub. Wiggle the hub to get them out if they are stuck. Be careful if using a hammer so the threads don't get damaged.
13. Lower the jack carefully, until you can remove the unit.
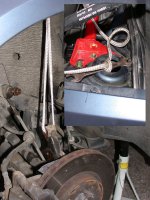
14. Using a rope or some pieces of electrical cord etc. secure the hub as shown on the picture. Pull it up until normally levelled as if it had the strut in place.
Now it is time to re-fix the strut brace. Remove one self-tapper, and drill a slightly bigger hole, to the size of the hole in the brace and your new bolts. Run a bolt (which fits) and splitwasher from the underside and throug the brace.
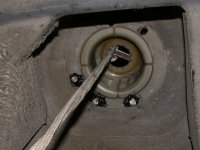
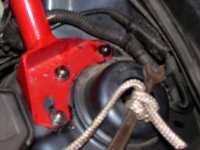
Add new washer and locknut from the top. Do one bolt at a time. Use some anti-rust sludge to prevent corrotion when bolting up. This is not something you need to do. I just don't trust the self tapping bolts.
15. Make a note on the top assembly, bearing and cap. They have marks on it, which point to the hub fixings side.
16. Use spring compressors to compress the spring. I used 4, as mine weren't long enought and not "wide" enought to cope with the length and width of the original spring. You should be able to use 2 compressors to loosen the spring from the strut, but you will not be able to release it without running out of threads. Use the second set of compressors to compensate when releasing the spring afterwards.
17. Remove top bearing using a spanner and and allen key. This one is tight, as it is screwed until the threads stop.
18. Pull off the spring and release it using spring compressors until you are done.
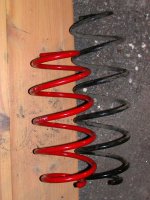

See the spring's length difference on the picture. The shocks are very similiar. They are exactly the same lengt and size. But the Fiat shock is like a bicycle pump compared to the Eibach shock.
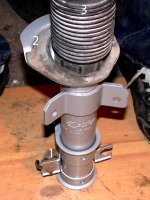
19. Refit parts from the Fiat shock to the Eibach shock [1-3]. Hose clip bracket, rubber seat and dust protector / bump stop. Use some grease on the piston / rod. Do not modify these parts. I have checked this with Eibach, who comfirmed using original parts. This is also stated in the TUV papers.
20. Compress the Eibach spring using a pair of compressors. Make sure it is fitted with the part numbers printed so you can read them.
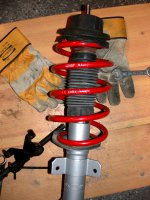
21 Place the spring over the strut and refit the top bearing assembly. Tighten it using the new nut which came with the Eiback shock. Remember to fit the top assembly exactly as it was removed - lined with the hub nut fixings. The picture shows the "inside" of the complete unit.
22. Uncompress the spring so it sits tight. Remove the spring compressors.
23. Put the strut in place, and refit top mount and nut. Tighten slightly.
24. Insert hub bolts and nuts and tighten. Use WD40.
25. Refit hoses etc. You are still working on both sides ofcourse.
26. Refit wheels and tighten bolts slightly. Use WD40.
27. Remove axle stands and jack down the car.
28. Tighten wheel bolts.
29. Tighten top mount bolts.
30. Close the bonnet.
You might now have used 4 hours, as I did, and it is time to get some food before doing the rear axle. Or a couple of beers and a good night's sleep. Rear will take about 2 hours. Many of you will say "I'd do all in 3 hours". But I didn't, and I don't want to give any false hopes of a fast (and unsecure) project.
Rear:
31. Loosen wheelbolts on both sides.
32. Jack up the car on one side.
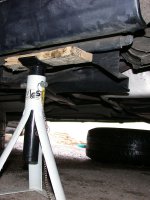
33. Insert axle stand. I couldn't find any obvious garage jacking ponts back there, so I solved it with a piece of wood on the axle stand to divide the loads. See picture.
34. Jack up other side and insert axle stand.
35. Remove both wheels.
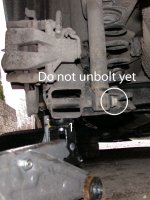
36. Place a jack under the hub / axle on one side. See picture. Jack it up a bit.
37. Open rear hatch, and make your way to the rear shocks' top mounts.
38. Remove nut and rubber bearing from the top mount on the side you have placed the jack.
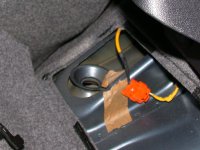
39. Lower the jack just to replace it with bricks or wood etc. to the about same height.
40. Follow point 36-39 on the other side.
41. Unbolt both shock absorbers from the axle. These are long bolts, and sit very tight. One on each shock bottom.
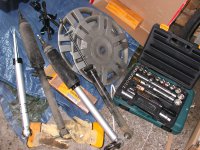
42. Remove shocks and put aside. Make sure the bolts, shims and rubber bits are still in place.
43. Lower the axle using the garage jack on each side a little by little, using fewer bricks / wood.
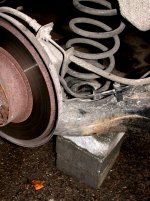
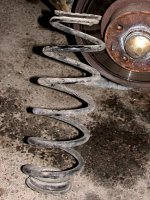
44. Now pull out the springs. Notice the difference of the top and bottom bushes.
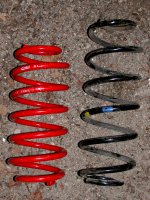
45. Refit the bushes to the new springs. See the spring's length difference on the picture.
46. Install the new springs. Make sure you can read the print the correct way. These springs are shorter, so you need to jack up the axle to make them sit tight.
47. Remove the bits from the original shock and refit them to the Eibach shock. Use some grease on the piston.
48. Put the shocks up through their holes in the boot and refit the parts there. Use the new locknut. Do not tighten yet, just make sure it doesn't fall out.
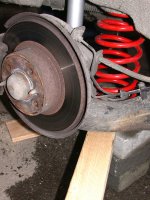
49. Bolt the struts to the axle, lifting the axle with the jack. One side at the time. Use WD40.
50. Tighten the top mounts (nut).
51. Refit wheels and tighten bolts slightly. Use WD40.
52. Remove axle stands and jack down the car.
53. Tighten wheel bolts.
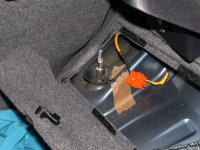
54. Tighten top mount nuts again, and put the boot shelves in place.
55. Close the hatch.
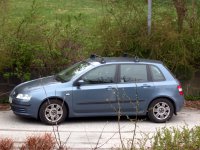
Finished, and the result might look like this picture. Might drop more over time though, as this is two days after installation. Take a drive and enjoy. Finally, the Stilo doesn't strike the asphalt anymore when doing speed bumps.

The Eibach pro system should lower the car about 30 mm. Due to wear and tear of the soft OEM shocks and springs it might not lower this much.
Tools needed:
- WD40
- Wirebrush.
- Jack.
- Garage jack.
- Offset ring spanner set (metric).
- Open spanner set (metric).
- Socket spanner / wrench set (metric).
- Allen keys 5 mm and 6 mm.
- Rope / wire etc.
- Wood / bricks etc.
- Grease.
Bits needed:
- None.
- For the strut brace re-fix you'll need 6 bolts, locknuts, washers and splitwashers. See between point 14 and 15. Skip this if you don't have a strut brace. It is recommended with a strut brace though, to force / keep the energy where it belongs.
Precautions:
- Make sure you buy the correct system for your car. You need to check the TUV papers and the numbers on the springs before starting.
- Do not let the car rest on the jack. The threads on the car's jack might seem fine, but you don't know what the threads are like on the inside of the metal.
- Never work under the car without axle stands.
- Springs are full of energy. You don't want a bearing to be the last thing you ever see before nailing the coffin. Take care.
- Torque settings.
- Don't expect your wife (if you are a male) to understand this is a necessary modification.
So... here we go.
Front:
See also Deckhair5's guide to remove a strut.
01. Loosen wheelbolts on both sides.
02. Jack up the car on one side.
03. Place an axle stand under the "garage jack point". It does not need to be lifted more than to remove the wheel.
04. Jack up the car on the other side and insert axle stand.
05. Unbolt and remove wheels.
I will suggest to work on both sides at the sime time. If you can't remove the spring on the second side, it's not funny to have assembled and completed the first side. :bang:

06. Unclip the hoses and wires from the strut [1-3].
07. Remove the nut from the anti-roll bar link [4], using an offset ring spanner and an allen key. Use lots of WD40 and brush the threads with a wire brush to remove rust and dirt. If the nut gets stuck, tighten it clockwise, apply WD40 and rebrush the threads and some WD40 again. Work like this until it comes off. Do the other side.
08. Remove the nuts from the bolts going through the hub [5]. Use WD40. Do not remove the bolts.
09. Place a garage jack under the hub to support it's wheight.
10. Open the bonnet...
11. Remove the top securing nut from the strut using an offset ring spanner and an allen key. The strut and hub etc. are now supported by the jack. Do not remove the second nut, as this secures the spring to the strut.

12. Lower the jack slightly. Holding the strut you can now remove the bolts from the hub. Wiggle the hub to get them out if they are stuck. Be careful if using a hammer so the threads don't get damaged.
13. Lower the jack carefully, until you can remove the unit.

14. Using a rope or some pieces of electrical cord etc. secure the hub as shown on the picture. Pull it up until normally levelled as if it had the strut in place.
Now it is time to re-fix the strut brace. Remove one self-tapper, and drill a slightly bigger hole, to the size of the hole in the brace and your new bolts. Run a bolt (which fits) and splitwasher from the underside and throug the brace.


Add new washer and locknut from the top. Do one bolt at a time. Use some anti-rust sludge to prevent corrotion when bolting up. This is not something you need to do. I just don't trust the self tapping bolts.
15. Make a note on the top assembly, bearing and cap. They have marks on it, which point to the hub fixings side.
16. Use spring compressors to compress the spring. I used 4, as mine weren't long enought and not "wide" enought to cope with the length and width of the original spring. You should be able to use 2 compressors to loosen the spring from the strut, but you will not be able to release it without running out of threads. Use the second set of compressors to compensate when releasing the spring afterwards.
17. Remove top bearing using a spanner and and allen key. This one is tight, as it is screwed until the threads stop.
18. Pull off the spring and release it using spring compressors until you are done.


See the spring's length difference on the picture. The shocks are very similiar. They are exactly the same lengt and size. But the Fiat shock is like a bicycle pump compared to the Eibach shock.

19. Refit parts from the Fiat shock to the Eibach shock [1-3]. Hose clip bracket, rubber seat and dust protector / bump stop. Use some grease on the piston / rod. Do not modify these parts. I have checked this with Eibach, who comfirmed using original parts. This is also stated in the TUV papers.
20. Compress the Eibach spring using a pair of compressors. Make sure it is fitted with the part numbers printed so you can read them.

21 Place the spring over the strut and refit the top bearing assembly. Tighten it using the new nut which came with the Eiback shock. Remember to fit the top assembly exactly as it was removed - lined with the hub nut fixings. The picture shows the "inside" of the complete unit.
22. Uncompress the spring so it sits tight. Remove the spring compressors.
23. Put the strut in place, and refit top mount and nut. Tighten slightly.
24. Insert hub bolts and nuts and tighten. Use WD40.
25. Refit hoses etc. You are still working on both sides ofcourse.
26. Refit wheels and tighten bolts slightly. Use WD40.
27. Remove axle stands and jack down the car.
28. Tighten wheel bolts.
29. Tighten top mount bolts.
30. Close the bonnet.
You might now have used 4 hours, as I did, and it is time to get some food before doing the rear axle. Or a couple of beers and a good night's sleep. Rear will take about 2 hours. Many of you will say "I'd do all in 3 hours". But I didn't, and I don't want to give any false hopes of a fast (and unsecure) project.
Rear:
31. Loosen wheelbolts on both sides.
32. Jack up the car on one side.

33. Insert axle stand. I couldn't find any obvious garage jacking ponts back there, so I solved it with a piece of wood on the axle stand to divide the loads. See picture.
34. Jack up other side and insert axle stand.
35. Remove both wheels.

36. Place a jack under the hub / axle on one side. See picture. Jack it up a bit.
37. Open rear hatch, and make your way to the rear shocks' top mounts.
38. Remove nut and rubber bearing from the top mount on the side you have placed the jack.

39. Lower the jack just to replace it with bricks or wood etc. to the about same height.
40. Follow point 36-39 on the other side.
41. Unbolt both shock absorbers from the axle. These are long bolts, and sit very tight. One on each shock bottom.

42. Remove shocks and put aside. Make sure the bolts, shims and rubber bits are still in place.
43. Lower the axle using the garage jack on each side a little by little, using fewer bricks / wood.


44. Now pull out the springs. Notice the difference of the top and bottom bushes.

45. Refit the bushes to the new springs. See the spring's length difference on the picture.
46. Install the new springs. Make sure you can read the print the correct way. These springs are shorter, so you need to jack up the axle to make them sit tight.
47. Remove the bits from the original shock and refit them to the Eibach shock. Use some grease on the piston.
48. Put the shocks up through their holes in the boot and refit the parts there. Use the new locknut. Do not tighten yet, just make sure it doesn't fall out.

49. Bolt the struts to the axle, lifting the axle with the jack. One side at the time. Use WD40.
50. Tighten the top mounts (nut).
51. Refit wheels and tighten bolts slightly. Use WD40.
52. Remove axle stands and jack down the car.
53. Tighten wheel bolts.

54. Tighten top mount nuts again, and put the boot shelves in place.
55. Close the hatch.

Finished, and the result might look like this picture. Might drop more over time though, as this is two days after installation. Take a drive and enjoy. Finally, the Stilo doesn't strike the asphalt anymore when doing speed bumps.

