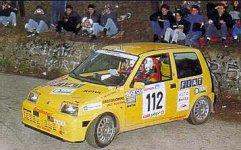
Right - These headlights are a real pain, but can easily be fixed!
Cinquecento manually adjustable headlights - may work on other similar units but no guarantees
I had recently replaced the headlight with a nice new looking one from a scrap yard. but when I adjusted it for MOT - The adjuster self-destructed! Causing a low beam angle which cannot be changed...
The adjusters are very fragile - so be gentle with them! There is a larger manual knob, which allows fine adjustment and an 8mm bolt behind for more movement.
2nd unit I have repaired, both had similar problems - manual adjusters a big weak point, certainly on Cinq models - if not Sei's as well.
Its worth attempting repairs, pretty easy when you consider a cheapo new one will cost £20 - but its down to money and time... (2nd hand units may be broken already, so beware)
This took me about an hour, including hunting for tools etc
Tools required:
8mm spanner
Sharp Knife
Small (‘ish) flat blade screwdriver or blunt knife
Kitchen Oven
Long Nose Pliers - If you’re unlucky
Small Self-tapping screw and washer
Silicon gun or similar exterior adhesive
Tape - (If using car straight away)
Stage 1 - Disassembly & Damage Assessment
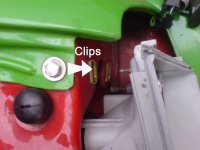
Firstly remove the headlight unit. There is one 8mm nut on the back of the front panel towards the inside end of the headlight (see Photo 1) and remove the connectors for the headlight and sidelight bulbs. The main unit un-clips from the body (see Photo 2) Then slide the indicator unit off the headlight (easy).
Photo 1
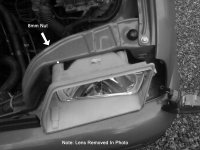
Photo 2
The lens of the headlight is held on with mastic, which needs to be softened to aid removal. Removed as much as possible from the seal before putting the unit in the over for 5 min’s (as it is warming up). I used an electric oven - A gas oven may heat up quicker and have a naked flame so be careful *(no responsibility taken...)
BE CAREFULL, Do not forget about it - this may lead to toxic melted plastic and fumes in your oven! set an alarm or something :idea: !
When warm, remove from oven (using oven gloves) and use a small flat blade screwdriver or blunt knife to remove more mastic and carefully prize the lens from the plastic casing. Use a very shallow angle (see Photo 3 and 4). If this is difficult, use another implement or get a buddy to help.
DO NOT USE THE SCREWDRIVER / KNIFE AT A STEEP ANGLE OR USE THE TIP ONLY - AS ITS EASY TO CHIP OR CRACK THE LENS!
Photo 3
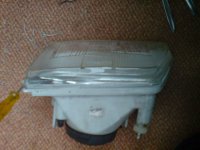
Photo 4
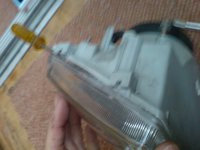
A good point to start is the corner of the headlight, as seen in the photos above. Carefully push the screwdriver/knife along the seam until the lens is removed.
Onto the repair...
Cinquecento manually adjustable headlights - may work on other similar units but no guarantees
I had recently replaced the headlight with a nice new looking one from a scrap yard. but when I adjusted it for MOT - The adjuster self-destructed! Causing a low beam angle which cannot be changed...
The adjusters are very fragile - so be gentle with them! There is a larger manual knob, which allows fine adjustment and an 8mm bolt behind for more movement.
2nd unit I have repaired, both had similar problems - manual adjusters a big weak point, certainly on Cinq models - if not Sei's as well.
Its worth attempting repairs, pretty easy when you consider a cheapo new one will cost £20 - but its down to money and time... (2nd hand units may be broken already, so beware)
This took me about an hour, including hunting for tools etc
Tools required:
8mm spanner
Sharp Knife
Small (‘ish) flat blade screwdriver or blunt knife
Kitchen Oven
Long Nose Pliers - If you’re unlucky
Small Self-tapping screw and washer
Silicon gun or similar exterior adhesive
Tape - (If using car straight away)
Stage 1 - Disassembly & Damage Assessment
Firstly remove the headlight unit. There is one 8mm nut on the back of the front panel towards the inside end of the headlight (see Photo 1) and remove the connectors for the headlight and sidelight bulbs. The main unit un-clips from the body (see Photo 2) Then slide the indicator unit off the headlight (easy).
Photo 1

Photo 2

The lens of the headlight is held on with mastic, which needs to be softened to aid removal. Removed as much as possible from the seal before putting the unit in the over for 5 min’s (as it is warming up). I used an electric oven - A gas oven may heat up quicker and have a naked flame so be careful *(no responsibility taken...)
BE CAREFULL, Do not forget about it - this may lead to toxic melted plastic and fumes in your oven!
When warm, remove from oven (using oven gloves) and use a small flat blade screwdriver or blunt knife to remove more mastic and carefully prize the lens from the plastic casing. Use a very shallow angle (see Photo 3 and 4). If this is difficult, use another implement or get a buddy to help.
DO NOT USE THE SCREWDRIVER / KNIFE AT A STEEP ANGLE OR USE THE TIP ONLY - AS ITS EASY TO CHIP OR CRACK THE LENS!
Photo 3

Photo 4

A good point to start is the corner of the headlight, as seen in the photos above. Carefully push the screwdriver/knife along the seam until the lens is removed.
Onto the repair...
Repair
Stage 2 - Repair
Now the damage can be assessed...
Usually the top connection between the adjuster mechanism/shaft and the chrome reflector panel breaks. You will see a small white lug, which will have broken away from the reflector (see photo 5). These lugs are designed to push through the reflector panel and twist 45 degrees to lock into position - but they brake alot!!
Photo 5
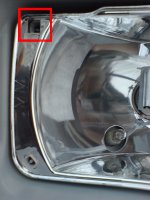
It is likely that the end of the adjuster may have disconnected from a small ball joint as you work. If so, insert the white lug (see photo 6) into the reflector panel, twist 45 Degrees (long nose pliers) and use it to push the lug onto the small ball joint. You should hear a click as it goes back on
Photo 6
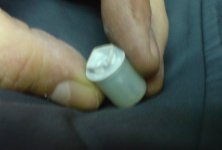
It may be that more than one of these lugs has broken - if so treat them all the same and repair as follows.
Next step is to re-enforce the connection using a short self-tapping screw with washer (see photo 7) - I used a small screw with a 6mm long shaft and roughly 3mm wide, size is important as too larger screw may split the white lug.
Photo 7
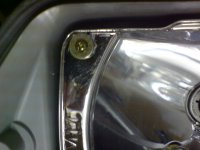
Once this step is complete - test fit the unit back on the car (before fitting lens). To check the correct adjustment of the headlight can be achieved, park the car facing a wall, garage door or flat surface - I used the rear bumper of another car. Use the adjuster to move the chrome reflector into the correct position.
This is only a rough test, which will hopefully allow the MOT man to use the fine adjusters to sort things out - If your worried, take an 8mm spanner along and oblige. Remember - the passenger side (UK) should be slightly higher than the drivers side headlight. If you have one good headlight, which is correctly adjusted this should be easy.
At this point you will know if the unit is good enough to re-use. If not, it only took 20mins
*The headlights should always be checked at an MOT centre using the correct equipment. It is difficult for the MOT man as if he (/she :slayer
Now for Re-assembly…
Re-assembly
Stage 3 - Re-assembly
This is easy:
Remember to ask an adult to supervise, as silicone substances can get messy...
Run a bead of ideally clear silicone (or similar) around the rim of the plastic headlight body. Then, being careful not to smear dirt and stuff inside the lens, push the lens onto the plastic body.
Couldn’t take a photo as hands got too dirty!
As I needed to use the car straight after the repair - I used racer style tape to hold the lens in place - we don’t want it falling off do we. This can be removed the next day (if you want
Then carefully fit the headlight unit and indicator back in place and insert the headlight and sidelight connectors. Replacing the 8mm nut.
There you go - it should be fixed, avoid putting too much force on the adjuster in future – Though it should be as strong as before, if not better.
Well done - you just saved yourself some cash, and the environment! - Respect! Haha
Now go get some
