The Usual Applies to this guide
I made this guide as a way to show you how easy it is to change an alternator
All cars are slightly different, your may vary so be prepared
An Alternator is a High Amperage device Connected to the battery
There is a Risk of been Shocked - so I advise you take precautions
I am not accepting any responsibility to any damage or injury that is caused to you or the property. If you are unsure about your capabilities of doing an alternator, then you should seek professional help.
As mentioned above, this is a Guide to show you what occurs changing an alternator change. Your work is your own risk
I've made this guide for Use within the Fiat forum only
you do not have the right to replicate this work as your own
Tools Used
It’s not a hard Process to change an Alternator so only a few tools used
- A 3/8th Ratchet
- A 17mm 3/8th Socket or 17mm Spanner
- A 10mm 3/8th Socket or 10mm Spanner
- A 8mm 1/4inch socket - Spanner may be hard to fit in but could be used
- A 13mm 3/8th Socket - Spanner may be hard to fit in but could be used
- A 3/8th to 1/4inch socket adaptor
- A 17mm Spanner
- WD40 May come handy, if the bolts haven’t been cracked off before
- Volt-meter/multi meter if you have 1 - not essential though
If the Belt is suspect to been old / cracking / Dry / Shredding, it must be replaced
now is the chance to-do it
If you don’t have a multi-meter, find a local garage that does a free battery and alternator test
Do a test before and after fitting, and the voltages should still apply mentioned later
So On with it we go!
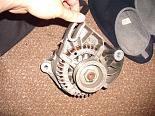
what does the Alternator Look Like?
Simple like this


Mine is a 2nd hand replacement from a Local Scrap yard - So as you can see they simple cut the wires off
There are also 2 Bolt holes
And 1 Slider Hole
the Slider and the Bolt hole that are level with each other use a Simple Bolt to attach
the Bolt hole that is set back uses a Nut and Bolt
On the Back 2 wires
the thick Red One is the Feed and from the battery
And the black I believe is an earth? I’m not sure but either way
Working on remove the current alternator
Start with making sure the handbrake is on - and popping the bonnet
With a 10mm Socket or Spanner Disconnect the battery, you don’t need to remove
just Simply Disconnect the terminals and push away from the battery
Next if you are using a new alternator, it won’t need any prep work, but like me the old wires have to be removed from the scrappy cars alternator
Using a 8mm Socket I simply undid the Nut and pulled the wires off
And the larger Red Wire uses a 13mm nuts, with a socket undid and pulled the wire off
with the car now Discharging, Spray a little WD40 onto the 3 Bolt as mentioned earlier
Using the 17mm socket or spanner Start my Loosening all the Bolts that retain the alternator in place
Don’t Fully remove as you don’t want it to just drop off
Once loose I Removed them by hand holding the alternator to prevent it dropped
The sliding points should now allow you to remove belt tension and just slide it off
Once free - lay the Unit down - I rested it on the Steering Arm, won’t do it any harm
Undo the 2 wires from the back and Retain the nuts
Once Free From Bolts wires and Belts
Remove unit from the car
Collect your replacement unit and fit it into the same position as you did when removing the wires
Make sure you refit the wires in the correct poles and correct way - so not to strain the cables
Once cables are fitted - slide the unit up into place on the bolt holes and sliders
Loose fit the bolts - so that the sliders remain free to rock back and forth
Slip the Belt back over the top of the Pulley
Push the Alternator Away from the Engine towards the Firewall/Scuttle panel off the car
The belt will now become tight, simple Nip the 2 Bolts up nice and tight to prevent it loosening its tension
Once tight, refit the Bolt and Nut as well - making sure its tight
If the belt is tensioned okay, it shouldn’t squeal
Too loose and it'll squeal like a pig
Once your alternator is secure and belt tensioned
Double check all your bolts are tight You really don’t want to loose them on the motorway and for the belt to slip off and stop charging when you need it most
If your happy its secure - Reconnect the battery.
Testing
I was suspect my alternator was on the blink - i.e. would stop charging and suddenly kick back. Even when demand was high it'd often just cut out
I was off to test this one to ensure it works okay
If you’re lucky to have a Voltmeter/Multi-meter
Set to 20v DC, stick the Positive Probe on the Positive terminal
Negative on negative terminal
And watch the voltage
With the engine off Battery voltage should be around
12.3 to 12.7
engine Running - 13.6v to 14v
If these results look good - time to stress test it
Whack as may electrical goodies as you can
Lights - Fans - Rear heaters - fog lights - Full beam (Careful not to blind potential drivers coming up and down your area)
and watch the voltage then
You may see a Drop, this is expected, but nothing below 13v
When you give the engine some more juice - it should quickly jump up to about 13.6v+
If Not then there may be other potential Faults
- This is when you need to post a NEW TOPIC in the Punto section, where many other Punto owners may be able to help you ") -
-
-Don’t post questions in this guide, as you probably won’t get a quick answer
I Hope this helps
Time Taken - 1hr MAX
Could be quicker - Yes, probably 30mins if I didn’t struggle getting the bolts to line up
You could potentially do it via the Driver wheel and arch liner out, but that was not needed, its quicker to hover above and do it
Lack of Images - Yes, as its quiet clear on the 2 pictures where everything is
The alternator is exposed Quiet well, so following the guide should be easy