thanks to the guide on this forum for info that helped me change my own front struts and top bearing re-greasing.
here are some different pics so it might help others further, I will post a link tot his thread on the existing guide.
My strut failed, lucky it was less than 20mph, and within yards of my home.

Its killed three birds with one stone, I already had a top mount to do, and in 2019 I bought new drop links [unfitted], so those two items plus the struts.
I removed my wipers, and trim panel, and cracked loose the two strut nuts, all of which was easy.


Car was placed on axle stands.

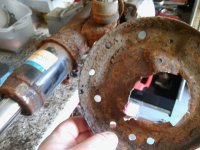
I already knew the clamp bolts were rusted, so I sliced through the flats of the nuts with a cutting disk on a grinder, and then whizzed them off with my impact gun.


I will be buying new nuts and bolts from my local engineering fittings place before refit.
As I was replacing the drop links, I just cut them off too, leaving the top part attached to the old struts. I later tried to remove the nuts "just to see" but they simply binded up on the rusted thread ends so I didnt proceed further, as it happens there was no play in any of the ball joint ends on the drop link, no idea how old they are.


With the strut out of the way, I also cut the bottom drop link fixing off with the grinder.
The inner arches are very good on both sides of the car, as is the whole of the underside in general, it just seems that the struts [and rear shockers, I did those a while ago] are quite rusty.

I can only work on one strut at a time, so clamped the damaged one in a vice, and removed the spring using my spring compressors.

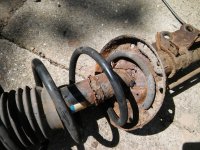
As you can see the strut is mullered, its the original since 2006. Its rotted next to the weld, forces on the strut via the spring meant it eventually gave in, thankfully this happened close to home!

At this time I pulled apart the top mount, cleaned it all up and it will be well greased before refitting.

Putting it all back together is quite easy, working with new parts helps this process.
My parcel

one of the shockers

now fitted the first spring assembly

and there it is fitted, I gave all exposed new nuts and bolts/thread ends a coating of black spray just to protect them from the elements a bit, I doubt I will ever have to revisit them but if I do, I have made it easier.


So with the wiper trim and wipers refitted, its good to go.
here are some different pics so it might help others further, I will post a link tot his thread on the existing guide.
My strut failed, lucky it was less than 20mph, and within yards of my home.
Its killed three birds with one stone, I already had a top mount to do, and in 2019 I bought new drop links [unfitted], so those two items plus the struts.
I removed my wipers, and trim panel, and cracked loose the two strut nuts, all of which was easy.
Car was placed on axle stands.
I already knew the clamp bolts were rusted, so I sliced through the flats of the nuts with a cutting disk on a grinder, and then whizzed them off with my impact gun.
I will be buying new nuts and bolts from my local engineering fittings place before refit.
As I was replacing the drop links, I just cut them off too, leaving the top part attached to the old struts. I later tried to remove the nuts "just to see" but they simply binded up on the rusted thread ends so I didnt proceed further, as it happens there was no play in any of the ball joint ends on the drop link, no idea how old they are.
With the strut out of the way, I also cut the bottom drop link fixing off with the grinder.
The inner arches are very good on both sides of the car, as is the whole of the underside in general, it just seems that the struts [and rear shockers, I did those a while ago] are quite rusty.
I can only work on one strut at a time, so clamped the damaged one in a vice, and removed the spring using my spring compressors.
As you can see the strut is mullered, its the original since 2006. Its rotted next to the weld, forces on the strut via the spring meant it eventually gave in, thankfully this happened close to home!
At this time I pulled apart the top mount, cleaned it all up and it will be well greased before refitting.
Putting it all back together is quite easy, working with new parts helps this process.
My parcel
one of the shockers
now fitted the first spring assembly
and there it is fitted, I gave all exposed new nuts and bolts/thread ends a coating of black spray just to protect them from the elements a bit, I doubt I will ever have to revisit them but if I do, I have made it easier.
So with the wiper trim and wipers refitted, its good to go.