Re: Timing Belt - Too tight or too loose?
Hey Guys, so i've come back and done some research and am feeling about 65% confident (at the moment). What I am going to do is a 2 part Section post: First will be listing the steps of a Timing belt change (from the engine mount removal) in my own words / steps on how i would / plan to carry it out from using this Youtube Video:
https://bit.ly/35s6pLl & also reading of the Tjet Elearn write up (
https://bit.ly/2M5fmT7). If you could watch the youtube vid and tell me if that is correct (pretty much) as that has been a good step by step video but want to be sure im following a correct-ish one. Second Section: Will be leaving a marker next to specific steps I have listed and marking them in
GREEN with the word
'Help', this will be followed up by my own video that is asking a few questions on this specific section that I am unsure of / whether all the steps are needed or not and could with some added elaboration.
Apologies for the work i'm asking you guys to do but, if I am right then I do think im going ahead with it and then I owe you drinks all round lol.
SECTION 1: The Steps (My interpretation)
1) Remove Auxiliary belt .
2) Insert Pin Lock that is somewhere on gearbox to hold Crank pulley .
3) Remove the Crank Pulley -
HELP (regarding ratchet vs impact / pin breakage : see video).
4) Remove belts covers / wiring & support engine via sump with wood
5) remove engine mount.
6) Fit CRANK shaft pulley locking tool at crank and then also into this long threaded shaft coming off the engine:
HELP - Also links with STEP 8 (see vid below).
7) Remove CAM shaft protective plug, inlet side (back of engine)
8) Rotate crank shaft in clockwise direction, then insert CAM shaft timing tool into inlet side (think its a stubby little nub type tool:
HELP (see vid).
9) Add tippex marks on CAM sprocket that align onto engine block (added insurance I guess? ).
10) Loosen the 13mm Tensioner nut, remove belt and remove tensioner
11) Refit NEW tensioner, do up 13mm nut but only finger tight.
12) HERE IS WHERE IM REALLY NOT SURE BUT ITS ON ELEARN (
https://bit.ly/2M5fmT7) , The First point under 'refitting': Remove the spark plugs for cylinder 1 & 2, insert these long thin tools into cylinder 1 & 2 and torque to 5Nm, Rotate Crank slowly until pins line up with each other.
HELP: (see vid).
13) Fit CAM sprocket counter moving tool (i believe is this square little block with a point on the end) to hold pulley in place.
14) Slighty slacken the CAM shaft pulley bolt -
how much should I slacken and why is this point needed?
15) Remove CAM pulley locking tool and compare new to old timing belt and then fit new belt working from Crank - Water pump - Cam pulley.
16) Check tippex marks are still aligned.
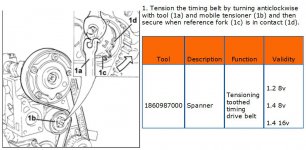
17) Tension the Adjuster - Turn anticlockwise with tool until the grooves align , then "lock" into place with 13mm spanner by turning it clockwise to 22Nm -27Nm :
HELP (see vid - How should this be situated on its locating pin? I address my concerns about tensioner at start of the video).
18) Refit CAM sprocket counter moving tool (little square block) and torque the CAM retaining bolt to 108Nm - 132nm and then remove CAM counter moving tool.
19) CHECK ALL MARKS ALIGN AGAIN and remove crank locking tool, CAM shaft timing tool (in back of engine inlet side), remove Cam sprocket counter move tool.
20) Turn the engine 6 revolutions SLOWLY via the crank clockwise using a 1/2" ratchet.
HELP. How should it feel? Should there be compression?
21) Refit the Crank locking tool, with the crank locking tool in, the tippex marks should align also - Is there anything else that you can use for a point of reference for aligning, is there marks on the crank somewhere? If all aligns the TIMING IS ALL OK.
22) Refit crank pulley and bolts :
HELP: How do you torque these down? I assume via putting in a locking pin, but I saw on a youtube video:
https://bit.ly/2nGVexf @ 36m 39 secs he was using a pin and then it broke inside? Better to impact them down? but I do prefer torque things correctly.
23) Refit drive belt.
24) To Avoid putting thing back together, only to have to take them off again if something wrong. Are you able to put back on drive belt but leave air filter off and test it before hand or will that causing some issues? Or shall I just fulyl assemble back and test it running that way.
Thats my take on it guys, so if you could get the steps a read through first and then watch my video and then respond so that I know you have full picture. Thanks guys taken me an hour and 30 just to write this lol
MY VIDEO:
https://bit.ly/33sytfE


") ) It's for the Bravo but doesn't matter if you look at engine stuff only ...
) It's for the Bravo but doesn't matter if you look at engine stuff only ...


