Technical Timing Belt- Too tight or too loose?

Currently reading:
Technical Timing Belt- Too tight or too loose?

The crank locking tool should have a little hole where the 'pip' locates that is on the pulley so that the locking tool can only go on one way

What i do is rotate the crankshaft with all the covers off, place the crank tool over by hand first and see where you are, then rotate bit by bit slowly until it lines up, place tool over and finger tight the bolts.

The cam tool 'should' go in. Get a mirror and see it the cut out is visible in the camshaft, if not, remove crank locking tool, rotate the crankshaft ONCE and lock back into place with the tool. Then you should see the camshaft cut out and fit tool. If it does not go in nicely then the timing is out slightly. Don't panic, remove belt then rotate camshaft via the pulley bolt slowly until tool fits in.

Yes leave cam locking tool in when cracking off pulley, NOTE this will require a pulley holder and big bar as these are very tight! 2 man job, one holds the pulley holder while the other cracks off with a 2 foot breaker bar (reverse way to tighten) And the cam locking tool will not hold this alone. I left the cam locking tool in place and just made sure the pulley did not move whilst un doing

I would not worry about the cylinder pin tool you mention
 
Last edited:
I think Bj's (short for Boostjunkee) got it all covered there. As he says, the cam's locking "cut out" will only line up once every two crank revolutions. So if you can't see it in the cam cover hole (with your mirror) after you've lined up the crank then the crank needs to go round one complete turn. It's good practice to always turn an engine in it's normal direction of rotation so that you eliminate any small "backlash" effects which might be introduced by turning it "backwards".

The "problem" with the cam locking tool in this case is that if you don't have it installed, when you've slackened the sprocket bolt, the cams will then be free to rotate slightly under the influence of the valve springs. So the cam locking tool needs to be screwed into the port in the cam cover to stop this. As Bj says you must not rely on the locking tool to withstand the forces you will need to exert to slacken the pulley bolt so you will need a sprocket holding tool to stop any rotation of the sprocket (and so cams) whilst slackening. On the 8 valve engines the cam cover has to be removed to fit the cam locking tool (which is quite different and fits into a slot in the end of the camshaft) so you can afford to remove the locking tool whilst slackening the sprocket bolt and then, if necessary, use a gripping tool (mole grip for instance) to slightly rotate the cam back to the correct position to engage the locking tool. You don't have that option.

And again, as Bj says, I would just forget about that flywheel locking peg. I can't see why it would be necessary, you're already going to lock the crank with the tool that screws onto the front of the crank with the 3 pulley bolts. (I'm assuming this will set the pistons all half way up the bores? - you could double check that by installing the rods that fit in the no 1 & 2 plug holes after you've locked the crank with that tool) I don't think our 8 valve engines have this locking peg? In fact I have made a flywheel locking tool of my own which engages with the flywheel teeth, so that I can lock the Panda and Punto flywheels if needed. I will be using it soon when I have to renew the front crankshaft seal on my boy's Punto which has been weeping slightly for some time and is now just beginning to be what you would classify as a "leak" (The bottom sprocket has to come off to do it so that big bolt on the end of the crankshaft will have to come off!)

If you type "Becky's timing belt" into the search banner at the top of the page and hit "enter" (that's how it works on my laptop anyway) you'll find a few entries I made when I did our Panda's (called Becky- yes, I'm a sad old git) timing belt. not quite the same engine as it's the 8 valve but you might be interested in my experiences with doing the job without slackening the cam pulley bolt?

Again, all the best. Good luck with it all
regards
Jock
 
The crank locking tool should have a little hole where the 'pip' locates that is on the pulley so that the locking tool can only go on one way

What i do is rotate the crankshaft with all the covers off, place the crank tool over by hand first and see where you are, then rotate bit by bit slowly until it lines up, place tool over and finger tight the bolts.

The cam tool 'should' go in. Get a mirror and see it the cut out is visible in the camshaft, if not, remove crank locking tool, rotate the crankshaft ONCE and lock back into place with the tool. Then you should see the camshaft cut out and fit tool. If it does not go in nicely then the timing is out slightly. Don't panic, remove belt then rotate camshaft via the pulley bolt slowly until tool fits in.

Yes leave cam locking tool in when cracking off pulley, NOTE this will require a pulley holder and big bar as these are very tight! 2 man job, one holds the pulley holder while the other cracks off with a 2 foot breaker bar (reverse way to tighten) And the cam locking tool will not hold this alone. I left the cam locking tool in place and just made sure the pulley did not move whilst un doing

I would not worry about the cylinder pin tool you mention

Thanks for response, apologies delay just doing some major reading today. Apologies if it feels like are trying to teach a fish to swim here lol. But again wanted to clarify a few things: You mention

1) "What i do is rotate the crankshaft with all the covers off, place the crank tool over by hand first and see where you are, then rotate bit by bit slowly until it lines up, place tool over and finger tight the bolts." To ensure I follow you can, this is what I i'll be doing from this. Put the crank lock tool on over the 'pip' with just with 3 bolts finger tight > slowly rotate crank until 'pip' is facing opposite to the crank sensor > check to see if CAM timing tool cut out is visible with mirror (as got a 50/50 chance) > if not, rotate one more time > insert CAM timing tool and final bolt on the Crank locking tool to hold in place?

2) "If it does not go in nicely then the timing is out slightly. Don't panic, remove belt then rotate camshaft via the pulley bolt slowly until tool fits in." - I take from this your saying there is a chance from the previous timing belt change the timing could have been set slightly wrong with a new belt in place, especially if they only used tippex marks, so the cam tool will never quite go in. Meaning i need to reset it back to perfect timing which will be> removing tensioner > removing the timing belt > rotate the crank bit by bit, so that the cam timing tool can slide in nice and easy > and then lock it all down with the crank tool and cam tool = Perfect Timing?

3) "Yes leave cam locking tool in when cracking off pulley, NOTE this will require a pulley holder and big bar as these are very tight! 2 man job, one holds the pulley holder while the other cracks off with a 2 foot breaker bar (reverse way to tighten) And the cam locking tool will not hold this alone. I left the cam locking tool in place and just made sure the pulley did not move whilst un doing" - I assume loosening the Cam pulley bolt is to make it easier to route the timing belt back on? I am like Jock here and dont like to mess when I dont need to? Do you need to loosen the Cam pulley bolt?

If it is a must to loosen, you mention about a pulley holder tool being need, wont the Cam tool and the Cam counter tool (little black block thing in the kit) be enough to hold it?


4) Lastly loosening the CAM pulley bolt inst one of these weird opposites when it come to loosening i.e instead of Right - righty, lefty-loosey it is actually Righty - loosey and Left - Tighty?


Thanks again.
 
I think Bj's (short for Boostjunkee) got it all covered there. As he says, the cam's locking "cut out" will only line up once every two crank revolutions. So if you can't see it in the cam cover hole (with your mirror) after you've lined up the crank then the crank needs to go round one complete turn. It's good practice to always turn an engine in it's normal direction of rotation so that you eliminate any small "backlash" effects which might be introduced by turning it "backwards".

The "problem" with the cam locking tool in this case is that if you don't have it installed, when you've slackened the sprocket bolt, the cams will then be free to rotate slightly under the influence of the valve springs. So the cam locking tool needs to be screwed into the port in the cam cover to stop this. As Bj says you must not rely on the locking tool to withstand the forces you will need to exert to slacken the pulley bolt so you will need a sprocket holding tool to stop any rotation of the sprocket (and so cams) whilst slackening. On the 8 valve engines the cam cover has to be removed to fit the cam locking tool (which is quite different and fits into a slot in the end of the camshaft) so you can afford to remove the locking tool whilst slackening the sprocket bolt and then, if necessary, use a gripping tool (mole grip for instance) to slightly rotate the cam back to the correct position to engage the locking tool. You don't have that option.

And again, as Bj says, I would just forget about that flywheel locking peg. I can't see why it would be necessary, you're already going to lock the crank with the tool that screws onto the front of the crank with the 3 pulley bolts. (I'm assuming this will set the pistons all half way up the bores? - you could double check that by installing the rods that fit in the no 1 & 2 plug holes after you've locked the crank with that tool) I don't think our 8 valve engines have this locking peg? In fact I have made a flywheel locking tool of my own which engages with the flywheel teeth, so that I can lock the Panda and Punto flywheels if needed. I will be using it soon when I have to renew the front crankshaft seal on my boy's Punto which has been weeping slightly for some time and is now just beginning to be what you would classify as a "leak" (The bottom sprocket has to come off to do it so that big bolt on the end of the crankshaft will have to come off!)

If you type "Becky's timing belt" into the search banner at the top of the page and hit "enter" (that's how it works on my laptop anyway) you'll find a few entries I made when I did our Panda's (called Becky- yes, I'm a sad old git) timing belt. not quite the same engine as it's the 8 valve but you might be interested in my experiences with doing the job without slackening the cam pulley bolt?

Again, all the best. Good luck with it all
regards
Jock

Hey Jock, been doing a fair bit of reading today, mainly from what you suggested, looking at "Becky's threads" (No judgement my car is called Krystal and everyone thinks im not all there lol). you mention:

1)when I have to renew the front crankshaft seal on my boy's Punto which has been weeping slightly for some time and is now just beginning to be what you would classify as a "leak" (The bottom sprocket has to come off to do it so that big bolt on the end of the crankshaft will have to come off!) - In your thread where you changed your sons timing belt, you put a picture behind the lower timing belt cover, under the Crank it had this rubbery grit residue. Are these two linked? the rubbery grit and the oil leak? I ask as I think I will have that rubbery grit when I remove mine and wanted to know what is causing it?

Thanks
 
Hi Everson. The rubber dust is just very small bits of belt which have abraded (in Becky's case over 62,000 miles - I'm pretty sure that belt was her original belt) during running. I would guess that it's mostly created by the belt running against the guide flanges on the water pump? Anyway I've seen it on a lot of engines where the belt guards are very "protective" so that the particles can't escape and it doesn't worry me. If it's oily you need to have a careful look at where it's coming from. Often it will be the crank seal but it could be the cam seal leaking or the valve (cam/rocker) cover gasket and the oil then dribbling down the front of the engine. Oil leaks are often very difficult to find. Sometimes you've just got to clean it all down and run the car around a bit then look again for where it's coming from. I once saw a video all about synchronous (that's what these things are called) belt development and on their test rig they were firing road grit, used engine oil and all manor of "nasties" at them. They say it's not good to let the belt run in oil or with the guards off but I think these belts are pretty robust bits of kit - It's not uncommon to see exposed belts on competition engines. Having said that I would not knowingly let a noticeable oil leak continue for long and, having replaced the seal, I would probably fit a new belt when building it all back together again just for my own peace of mind.

I made the flywheel locking tool not so much to aid removal of the bottom sprocket bolt but to aid torque tightening on reassembly. Crankshaft sprocket retaining bolts have a reputation for being VERY tight - ask anyone whose worked on a belt type Honda engine - Undoing it can sometimes be accomplished by engaging a gear (top) with the front bubs restrained from turning. However often these bolts are so tight that the clutch will slip before the bolt lets go! Honda actually make a special socket wrench to hold the pulley from turning! I am lucky in that I have a nice big compressor and "Hooligan" (my beast of a rattle gun). Whatever method you use to remove it the big problem comes with retightening it when refitting because most of the tightening procedures now a days are in more than one stage. Often a low torque figure just to "settle" the components together. Then one, or more, angle tightening procedures. Angle tightening on a component like a crankshaft is only possible if the shaft can be locked up to prevent any turning at all (if it turns the angle you are measuring becomes meaningless) The easiest way to accomplish this on a crankshaft is to lock/block the flywheel - hence why I made my locking tool for the flywheel. You can lock a flywheel with a large screwdriver thrust into the starter ring gear, but, if you're working on your own - as I do - it's very difficult to manage this with one hand, or sometimes a foot, at the back of the engine holding on to the screwdriver, whilst you try to apply a lot of force to the bolt at the other end of the engine with your other hand. The locking tool lets you concentrate 100% on the bolt. I know of the practice of just letting your Rattle gun rattle the bolt up as tight as it can get it - a quite common "back street" garage practice - But for me this is just not precise enough.

So, after all that "waffle", If the dusty rubber/detritus shows no signs of oil then just clear it away with an old paint brush or give it a squirt of compressed air (wear a mask with compressed air always) - it's nothing to worry about. This is the lowest point too so little bits of dirt etc are going to collect here anyway. Oily though? fix the oil leak because it will eventually degrade the belt material.

Regards
Jock
 
Last edited:
Just a wee addition for those of us who have "battled" with stupidly tight crank sprocket bolts and are of a "brave" disposition:

If you're very very brave you can usually slacken a crank pulley bolt by using a suitable impact type single hex socket and a nice long power/breaker or "t" bar. With the socket located firmly on the bolt head rest the end of the bar on a very substantial chassis member or a big block of wood on the ground. Then, with the ignition disabled (very important this - you DO NOT want the engine to fire even once) just "flick" the ignition switch so that the starter motor engages the ring gear and very, very briefly causes the starter to "shock" the flywheel ring gear - you may have to flick it a few times, checking each time to see if it worked. This procedure is quite risky and, although I've seen it done, I've never done it myself. If the bolt comes right out the sprocket could fall off and the valves and pistons could become indecently acquainted! You'ld need to be very sure of whether the "handing" of the thread would allow this (I suspect in most cases it would). Also, on our 8 valve engines, the crank "nose" does not project very far out of the front of the engine so the bolt wouldn't have to unwind very far for the sprocket to disengage from the crank key with disastrous results. By the way, check very carefully the DOR of the engine - not all engines rotate clockwise! If you position the breaker bar wrongly it could go the best part of three quarters of a rev taking out anything in it's way as it swings! So the likes of electric fans, radiator, air con components/condenser and piping, coolant expansion tank, an ECU or two and a whole lot more! So, as Clint Eastwood's "Dirty" Harry famously said: "You've got to ask yourself one question - Do I feel lucky"?

Oh, and keep children, pets, elderly idiots like me and everything else well out of the way. There's always the possibility of the socket and breaker bar being "spat" out!

So, stay safe all
Jock
 
Just came upon this video on You Tube which illustrates exactly what I've been talking about in my last post. Think you'll find it interesting. Watch right to the end to see the "cranking engine over" method:


Enjoy and stay safe
Jock

PS. That's some impact socket he's using isn't it? Just felt I needed to say that although it doesn't look as if any great forces were being exerted when the bolt finally "gave" I can assure you that if the socket had not been very well engaged with the bolt it can easily be "spat out" across a good distance and if you are in the way it'll HURT!
Also watch in the background - look above the tool box - at about 7 to 8 minutes in, when he's using the air hammer (which, by the way, makes my Vibroshock stuff look positively wimpy!) Listen for his compressor cutting in. D'ya see how the lights don't just dim but actually go out as the compressor motor fires up! - Oh dear!
I've also been puzzling over how his air guns sound, especially that big one which just seems to Chug away quite slowly. My biggest one, which I would say is somewhere in between his two in size, attacks much more aggressively and I think he's loosing a lot of performance due to his air hose which to me looks like a 1/4" hose. I run a 1/2" hose out to near where I'm working with a 3/8" to the gun for flexibility and it really "rocks". Small diameter hoses on big guns really rob them of "grunt"
 
Last edited:
The timing belt procedure is the same for bravo, grande abarth, abarth 500, mito tjet. They all share the same timing tools. Only difference is room and airbox/pipework etc. But identical in the belt procedure.

The tensioner tool makes it a lot easier than trying with circlip pliers. And if you lock the cam and crank you can't go wrong where as paint marking has the potential to be slightly out.

Leave water pump to go off for 24 hours to be sure the sealer has fully dried as there is no gasket.

I would highly recommend slacking off the cam pulley bolt which makes it easier to pull the belt round, which start from the crank, go up to the water pump, round the cam pulley and have the slack tensioner side.

Tension pulley, then torque cam pulley bolt last (cam pulley is floating type so cam will not move as its locked in). You will need a locking tool to hold pulley and torque wrench to tighten) Turn engine over twice after removing locking tools, then make sure locking tools fit back in correctly.

I have marked in yellow where the tensioner needs to align (if the picture uploads ok)View attachment 203664View attachment 203665
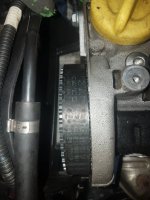
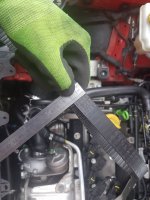
Hey Boost. I also noticed on your timing belt vs.mine. Your belt thickness is a lot wider and covers the whole cam pulley it seems. When looking at mine (See pics) there is space either side. I measured the thickness of my old OEM belt (well it's the one the garage gave me back) and they do match at 2.2cm but when ordering my new belt should it be covering the entire cam pulley like yours? 20191010_163444.jpeg20191012_115510.jpeg
 
Mine does not cover the whole pulley it was just over near the edge of the pulley, it is not the entire width of the pulley.
 
Hey All so little report. After speaking with u lot and doing research , I will be attempting this timing belt job. I have a few finishing touch questions that someone may know to hand that I have come across.

1) Phonic Relearn - Seen that this is the final step to do at the end of the job and that it can be done manually. Is this true on a GP 1.4 Tjet as i do not have the Fiat software just a generic cheap code reader. If my engine does throw a code because of this issue what would the code be?

2) Thread Locker? - Do people recommend using thread locker on main bolts i.e Crank pulley, tensioner bolt and Cam pulley bolt?

3) Torque Specs - Can anyone confirm if correct: Crank bolts: 28Nm / Tensioner retaining nut: 27Nm / Cam pulley bolt:132Nm (sounds high???)

Next I will be ordering tools and parts to assist with this jobl with delivery I hope to be doing this job around next weds / thurs. I will be documenting pics and doing short 30 sec videos for myself /others to view for confirmation that if things are going correct and to log the process. In the end I would like to do a guide for the forum if all goes well. Thanks again as always
 
Posted this before, in the 8V timing belt Guide. Should apply to the other engines too. Be careful undoing (and installing) crank pulley, you can crack the key off = disaster. Use timing belt tool to hold (support) the pulley.
German video (part 1/2): [ame]https://youtu.be/EurjlpX6er8?t=494[/ame]
 
Last edited:
Hi Everson,

I would not use thread locker where the manufacturer did not...
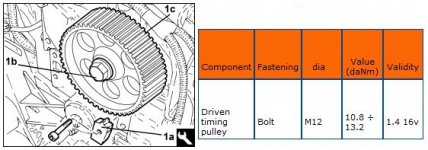
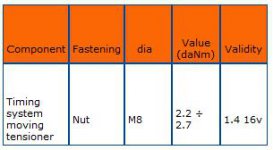
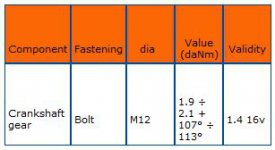
Here are the torques I found in eLearn, notice the crankshaft gear uses the two steps tightening technique: torque + angle ...

BRs, Bernie

If someone here helped You fix -or better, understand- your issue, hit the thanks icon @ bottom right corner, it's free and makes us feel helpy ;-)
 

Attachments

  • Torque - camshaft pulley Tjet.JPG
    Torque - camshaft pulley Tjet.JPG
    74.7 KB · Views: 44
  • Torque - tensionner Tjet.JPG
    Torque - tensionner Tjet.JPG
    18.6 KB · Views: 42
  • Torque - crankshaft pulley Tjet.JPG
    Torque - crankshaft pulley Tjet.JPG
    18.4 KB · Views: 36
Posted this before, in the 8V timing belt Guide. Should apply to the other engines too. Be careful undoing (and installing) crank pulley, you can crack the key off = disaster. Use timing belt tool to hold (support) the pulley.
German video (part 1/2): https://youtu.be/EurjlpX6er8?t=494

Thanks for this. As its in german couldn't fully understand what they saying. But it seems some how the actual crank sprocket has worked its way loose? I am assuming the retaining bolt worked its way loose and fell off completely? Would this happen though if your just removing the crank / aux pulley? as I would just be removing the 3 outer bolts that hold on the crank / aux pulley but not messing with the centre main retaining bolt.

Would this have caused the owner bent valve issues or not? As Im assuming without the actual crank sprocket it it cannot rotate the crank shaft, meaning the engine would have merely just stop right?
 
Hi Everson,

I would not use thread locker where the manufacturer did not...
Here are the torques I found in eLearn, notice the crankshaft gear uses the two steps tightening technique: torque + angle ...

BRs, Bernie

If someone here helped You fix -or better, understand- your issue, hit the thanks icon @ bottom right corner, it's free and makes us feel helpy ;-)

Thanks for this berne. A little unsure now with the main CAM pulley bolt, as the tjet elearn states 10.8 - 13.2 daNm which i believe = 108Nm - 132Nm, but nothing else to do with angle tightening. whereas the 1.4 16v seems to be 19Nm - 21Nm and a further 107 to 113 degrees of turn but on both the validity is listed as the 1.4 16v? maybe Boostjunkeee can advise due to having a tjet vs the 1.4 16v?
 
I did not require a phonic wheel relearn, also tighten the cam pulley bolt to 130nm, that's what mine is at (higher end of the scale)
Thanks for this berne. A little unsure now with the main CAM pulley bolt, as the tjet elearn states 10.8 - 13.2 daNm which i believe = 108Nm - 132Nm, but nothing else to do with angle tightening. whereas the 1.4 16v seems to be 19Nm - 21Nm and a further 107 to 113 degrees of turn but on both the validity is listed as the 1.4 16v? maybe Boostjunkeee can advise due to having a tjet vs the 1.4 16v?
 
Thanks for this. As its in german couldn't fully understand what they saying. But it seems some how the actual crank sprocket has worked its way loose? I am assuming the retaining bolt worked its way loose and fell off completely? Would this happen though if your just removing the crank / aux pulley? as I would just be removing the 3 outer bolts that hold on the crank / aux pulley but not messing with the centre main retaining bolt.

Would this have caused the owner bent valve issues or not? As Im assuming without the actual crank sprocket it it cannot rotate the crank shaft, meaning the engine would have merely just stop right?

As you say, you only need to remove the outer 3 pulley bolts so you're not touching that centre bolt. I wonder if it's perhaps had a crank seal done at some time and the sprocket retaining bolt hasn't been properly tightened. You'd need to jam the flywheel to do that so the temptation is to just "rattle" it up with an air gun - not an accurate way to achieve proper tightness. Likely to be either over tightened or, as perhaps here, not tightened enough?

That engine has a VVT sprocket on it's cam so I'm virtually certain it's an interference design (as far as I know all the VVT engines are interference). At around the 12mins 30 secs it shows him fitting the belt but then, strangely, goes on to show him slackening the plug under which is the big torx (on these later engines) bolt which actually holds the sprocket and locks it onto the end of the cam. If you are going to free the top sprocket - which you would want to be doing before you try fitting the belt anyway if you're doing it the "recommended" way - then that plug you see him slackening has to be removed altogether - nice big rag needed to catch the oil - this sprocket is full of oil - and the big bolt under it then slackened. The sprocket easily comes free when the bolt is undone so not sure why he's hitting it? The plug, which you subsequently see him tightening with a torque wrench is just that, a plug with a rubber ring seal. You can torque it if you want to be extra technical about it, and if you don't have "the feel" in your fingers then maybe you should, but it's easy enough to just nip up with a wrench. It's interesting also to observe that they correctly fit the cam locking tool to the back end of the cam and you can clearly see that the crank locking tool is in place so, if the cam sprocket bolt had been loosened then you would expect to see the cam sprocket rotate just a little as the tensioner applies tension to the belt? I cannot see any movement which is what you would expect if the cam bolt was still tight and the crank and cam locked with the locking tools. So I really don't think he's slackened the cam sprocket at all and I'm really puzzled therefore why he's fiddling about with the sprocket plug?

Very interesting for me to see him torquing up that crank sprocket bolt using only the locking tool to stop it rotating. I'm not that brave hence why I made my own crank locking tool. However now I see G P PL advises that the key can be cracked off during slackening and tightening? I didn't know this. wonder if I can arrange it so I can install both my flywheel locking tool and the sprocket locking tool at the same time? I think I'll try to do that when I do the Punto's crank seal. Has anyone else had experience of this? is damage to this key common? Is the crank locking tool - particularly that wee bolt (cover retaining bolt) which actually stops the rotation, strong enough? The bit of casing it screws into doesn't look that robust come to that, worried it might shear off?

Then again I don't speak German. So if he's explaining all this as he's working then please, sir, accept my most abject appologies.
 
Last edited:
Thanks for this. As it's in german couldn't fully understand what they saying.
I don't sprechen zee german too. But just listen to the funny sounds this guy makes, and he's showing things too at the same time. That's enough to understand what happened.
But it seems some how the actual crank sprocket has worked its way loose? I am assuming the retaining bolt worked its way loose and fell off completely?
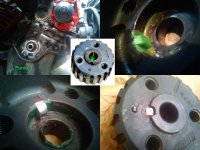
No (or "yes", but it happened very quickly, engine never started). As stated before, the key was cracked (it's a one casting with the pulley - bad design!). So they (previous "mechanics", not the guys in the video) probably started, or rather tried to start the engine and damaged the valves.
Would this happen though if your just removing the crank / aux pulley? as I would just be removing the 3 outer bolts that hold on the crank / aux pulley but not messing with the centre main retaining bolt.
You will be alright then.
Would this have caused the owner bent valve issues or not?
YES. That's the point of this video. Cranking the engine with the starter and broken key, destroyed the valves (crankshaft was spinning, but pulleys, timing belt and camshaft not).
As I'm assuming without the actual crank sprocket it cannot rotate the crank shaft, meaning the engine would have merely just stop right?
Crankshaft is propelling the pulley/cog, not the other way round! Then this pulley makes other parts spin through the timing belt. Except oil pump of course.
Engine will almost never stop immediately (literally), it's a fairly big mass, moving, rotating parts, it has a momentum.
But one turn is enough to do the damage and engine will not start without the repair.
Very interesting for me to see him torquing up that crank sprocket bolt using only the locking tool to stop it rotating. I'm not that brave hence why I made my own crank locking tool. However now I see G P PL advises that the key can be cracked off during slackening and tightening? I didn't know this.
I did this years ago in Punto 1. Broke a key during shaft seal replacement. "Bump method" using starter motor (in the past it worked with no problems, in other cars). I repaired the pulley with new key (drill a hole, file a square or rectangular slot/keyway and press custom key), plasticine was used to copy (visualise) missing feature. It worked, but "just in case" I've ordered brand new pulley couple days later.
Uwaga_na_klin_na_wale_korbowym.jpg
Answering post below: "key" is a basic machine part or feature: https://www.google.com/search?q=machine+parts+shaft+key+keyway
 
Last edited:
LMAO your first statement about not speaking German made me laugh out.[emoji23]. When you say the "Key" what do you.mean are u referring to the locking tool or something on then crank sprocket?
 
I don't sprechen zee german too. But just listen to the funny sounds this guy makes, and he's showing things too at the same time. That's enough to understand what happened.

Well done (y)

The guy called Fiat to ask for the reason of the sheard off key and got the answer, in most cases it occurs when workshops use an impact wrench to tighten the pulley. The impact ist to strong and the integral key cracks. Afterwards the engine runs properly but after quite a while the pulley will slip on the crankshaft.
 
Posted this before, in the 8V timing belt Guide. Should apply to the other engines too. Be careful undoing (and installing) crank pulley, you can crack the key off = disaster. Use timing belt tool to hold (support) the pulley.
German video (part 1/2): https://youtu.be/EurjlpX6er8?t=494
For clarification for all

When you say to "be careful when removing and installing the Crank pulley". When u say crank pulley do you mean the bigger pulley that drives the Crank and auxiliary belt or the smaller actual crank pulley behind it...if that makes sense?

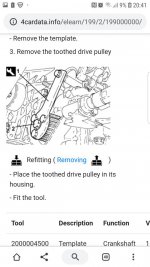
You also say the way to prevent cracking the key is to.use the timing belt locking tool. Are you referring to the tool that is shaped like a.magnifying glass (See pic)

Thanks again Screenshot_20191017-204118_Chrome.jpeg
 
Back
Top