Technical Second Hand Turbo Rebuild

Currently reading:
Technical Second Hand Turbo Rebuild

Joined
Aug 23, 2015
Messages
479
Points
139
Location
Aberdeenshire
So, I finally decided to upgrade the turbo on my Tjet and after some time searching I found a VL36 in what I thought to be good shape.

However...... It arrived and turned out to be badly cracked on the exhaust side. Core is ok but I had planned on having it rebuilt anyway so no loss there.

Managed to source a replacement from Italy for about 50% of the price I paid so arranged to keep it for 50% refund and have decided to rebuild it myself.

As I go along I'll post some pics and info for anyone else who may wish to undertake the same.

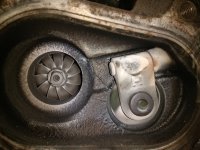
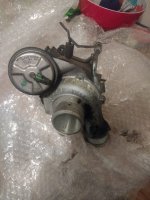
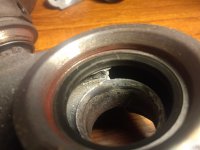
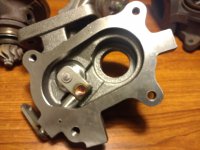
First pic shows crack between turbine wheel and wastegate, second is complete unit as it arrived.

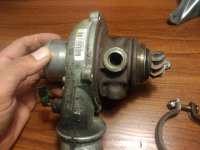
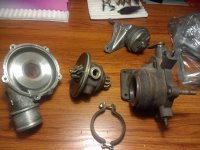
Will add some more pics in next few days of stripping it.

Cheers

Ben
 

Attachments

  • IMG_20180104_190515806.jpg
    IMG_20180104_190515806.jpg
    3.2 MB · Views: 209
  • IMG_20180104_162847828.jpg
    IMG_20180104_162847828.jpg
    3.9 MB · Views: 106
That crack is ok.. it's just a hairline one.... not that bad.
Most turbos develop one or multiple cracks between the wastegate and turbine exhaust port.
But the replacement you got is really well priced..so definitely worth replacing.

Ben, people might find helpful if you post measurements of the intake, compressor wheel and housing... i've lost my measurements.

What you might want to do to the new housing is a small grind/polish of the sharp edges... to try and prevent heat points=>stress=>cracks.
 
Last edited:
It looks not too bad from that picture however, once dismantled, there are several other cracks some of which are scarily large!

It will be getting polished and opened up a little to match the manifold.

I'll post pics and some measurements over weekend.


Cheers

Ben
 
Last edited:
Stripping is easy enough.

Remove circlip holding actuator arm to wastegate and pull off arm then remove two screws holding actuator to compressor housing - first pic

Remove nut from V band clamp holding hot side to the core and pull the turbine housing off the core.

Compressor housing is clamped to compressor back plate. Remove remaining screws and the core can be pulled out. Will take some wiggling out as it is assembled with liquid gasket - second pic

Once in bits, everything can be properly inspected and replaced where required - third pic

On closer inspection, old turbine housing is junk. Another crack ok inside - fourth pic.

New turbine housing ready to be fitted once new core arrives - fifth pic


Cheers

Ben
 

Attachments

  • IMG_20180112_083029575.jpg
    IMG_20180112_083029575.jpg
    3.6 MB · Views: 68
  • IMG_20180112_083218346.jpg
    IMG_20180112_083218346.jpg
    3.9 MB · Views: 90
  • IMG_20180112_083252860.jpg
    IMG_20180112_083252860.jpg
    4.2 MB · Views: 100
  • IMG_20180112_083440560.jpg
    IMG_20180112_083440560.jpg
    3.3 MB · Views: 78
  • IMG_20180112_083649224.jpg
    IMG_20180112_083649224.jpg
    3.3 MB · Views: 170
Last edited:
What kind of liquid gasket did you use? Does it go on both sides?
 
I'm enormously enjoying this thread. As any regular visitors to our forum will know, the earlier part of my working life was spent "mechanicing". Laterly I've been more of a "serious enthusiast". I've replaced a number of goosed turbo's over the years but just swapping them out for a new one. My boy's Fabia gummed up it's variable vanes forcing it to "limp" but responded well to being "injected" with oven cleaner and continued to work fine till we sold it.

I too would be interested in what this sealant is? Does it need to be very special to withstand the heat? I've never stripped a turbo but from what I'm seeing here (and one or two other articles I've read) as long as you don't disturb the impellers, and thus their balance, the jobs not all that daunting?

Thanks again for posting this - How did it all turn out?
 
Last edited:
Not been on in a while so missed the comments.

It was really simple to strip and put back together, it's two housings and a pre balanced cartridge between them. Once drained it's a fairly clean job too, did it inside in the house. I wouldn't even think about stripping cartridge, bits are available to rebuild but it would need professional balancing once rebuilt and the savings would be minimal.

Quite a big job to change the turbos over though, I did it over two days and the only way really is to take the manifold off and swap turbos over on the bench. Manifold was cracked in several places too so that had to be changed anyway.

I used some Granville high temperature silicone sealant for core to cold side, applied to one face only, just a thin bead.

Only done about 1500 miles since fitted but so far so good. Needs a proper tune, will be going to T4P soon.

Pre tune there was little difference. Boost came on a little later and peaked a little higher up the range and it made a little more turbo noise through induction kit. After a very average tune the difference is quite marked. Definitely pulls better, booster peaks at 2500rpm as expected and holds throughout the range.

Cheers

Ben
 
Hey guys done a post separately on this but thought would see if any had any ideas in this thread: "Hey guys

I have a grande punto tjet 1.4 2009.

I recently changed to lowered springs (more for the reason I could get four eibachs for the same price as one OEM).

I have the work but now the front clunks going over bumps or into pots holes . Rougher the road or harder I hit the speed bump the louder it is

Now I am 99% certain I put springs on correct into the strut groove as this is 2nd time of me taking of and having a look. I believe top nut is fully tight as I thought it was this so I did tighten very hard to be sure. But again same issues again. If I take wheels off and strut again it will be.my 3rd time. And I am getting a bit fed up with it now. Any ideas if what it could be
 
Back
Top