Technical Changing the Headlamp

Currently reading:
Technical Changing the Headlamp

essential2design

New member
Joined
May 30, 2010
Messages
4
Points
1
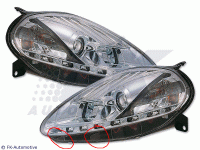
Hello I'm a new member and very happy with my new 2007 Punto Grande Sport (Orange). I need to replace the front drivers side headlamp assembly.

I have a new one ready to install and I'm struggling.

I have unscrewed all three threaded bolts so it is now loose, but it doesn't seem to be able to physically come out. Hope I don't need to remove the front bumper or cross structural member??

Does anyone have any experience with this or seen how to download the owners manual?
 
You will need to remove the bumper, but not completely.

There are 4 torx headed screws which you should remove just under where the bonnet closes.

There are also 4 torx headed screws on the underside of the bumper (behind the rubber under-spoiler)

There is another torx headed screw inside the wheel arch attaching the bumper to the front wing.

The black plastic wheel arch surround will need to be unscrewed from the bumper you can then get to the final torx screw which is inside the bumper behind the light unit. It will be obvious at this point as it will be the only one holding the bumper from moving on that side.

Sounds daunting but can be performed in 10minutes if youve done it before..
 
I know its an after market light but the fittings are the same.

The red bits I've circled are the bits stopping it from coming out unless the bumper is loosened.
 

Attachments

  • fkfsfi010003.GIF
    fkfsfi010003.GIF
    104.1 KB · Views: 32
You will need to remove the bumper, but not completely.

There are 4 torx headed screws which you should remove just under where the bonnet closes.

There are also 4 torx headed screws on the underside of the bumper (behind the rubber under-spoiler)

There is another torx headed screw inside the wheel arch attaching the bumper to the front wing.

The black plastic wheel arch surround will need to be unscrewed from the bumper you can then get to the final torx screw which is inside the bumper behind the light unit. It will be obvious at this point as it will be the only one holding the bumper from moving on that side.

Sounds daunting but can be performed in 10minutes if youve done it before..
Many thanks sounds daunting. I'll give it a go this weekend and report back. Whilst I'm at it, and you sound like you know what you're talking about - do you have experience with replacing the bonnet? Hail damaged I'm afraid, but I have a replacement for that as well. I can create a new thread if you prefer. Cheers. W
 
Cant say i've ever had any experience changing the bonnet, sorry. Might worth making another thread?

Good luck with the bumper though!
 
its his own thread no need to start another :)


a nice simple job to remove the bonnet since the hinges wont be damaged...

undo the washer jet hose at the 3 way joint....

unbolt the bonnet hinges from the bonnet lid 4X 5mm Alan key bolts (2 each side)


DSCF2670.JPG

and have a friend handy to help you remove it...

the black trim is held on by 2x 10mm headed nuts and plastic tit type clips...

remove the other hardware from the old bonnet for the new one the bonnet should then be loosely tightened and adjusted for fit...

the hight against the wing can be adjusted by the Alan key bolts you removed to get the old one off...

the panel gap/ front end gap can be adjusted by the hinge bolts on the upper wing been loosened and adjusted

finally the strike / locking catch can be adjusted up down left and right


the hinge mounts on the wing can be moved
 
Brilliant - sounds simple many thanks. Will report back as info to others. Need to firstly organise the bonnet to be sprayed Orange. Love that colour! Cheers to all. W

its his own thread no need to start another :)


a nice simple job to remove the bonnet since the hinges wont be damaged...

undo the washer jet hose at the 3 way joint....

unbolt the bonnet hinges from the bonnet lid 4X 5mm Alan key bolts (2 each side)


View attachment 78779

and have a friend handy to help you remove it...

the black trim is held on by 2x 10mm headed nuts and plastic tit type clips...

remove the other hardware from the old bonnet for the new one the bonnet should then be loosely tightened and adjusted for fit...

the hight against the wing can be adjusted by the Alan key bolts you removed to get the old one off...

the panel gap/ front end gap can be adjusted by the hinge bolts on the upper wing been loosened and adjusted

finally the strike / locking catch can be adjusted up down left and right


the hinge mounts on the wing can be moved
 
Back
Top