So, you have a keyfob that is damaged, scratched, haggered rubber buttons, or generally looks crap. You don't fancy forking out £165+ for a new one. Well, this should help you.
Providing you already have a remote keyfob, and the electronics and key work, then this guide is for you.
There are numerous versions of replacement casings, some can use your existing key blade, and others you will have to get the supplied blade cut.
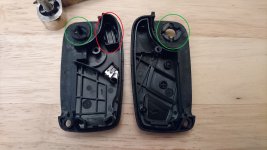
IF YOU ARE UNSURE WHICH CASING TO BUY, USE THE DISASSEMBLY GUIDE TO DETERMINE WHICH CASE YOU NEED, PAYING ATTENTION TO THE KEY PIVOT LOCKING FIXTURE. BUY ONE THAT MATCHES YOUR EXISTING KEY (like shown in step 6)
DISCLAIMER: NOR MYSELF OR THIS FORUM WILL BE HELD RESPONSIBLE IF YOU DAMAGE YOUR KEYFOB. THIS IS A GUIDE AND SHOULD NOT BE ATTEMPTED BY ANYONE THAT IS NOT COMFORTABLE TAKING THINGS APART
What you will need:
Posi-drive hobby screwdriver
Thin flat-head hobby screwdriver
Craft blade or Stanley knife
Grease (although not essential)
A fresh brew
Step 1
To start, first remove the battery from the keyfob. This has a screw lock that will release the slide-out battery tray.
Step 2
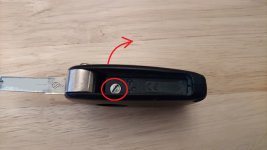
Use the thin flathead screwdriver or fine edge of your blade to slip in between the badge and the casing. Lever the badge out of the recess (it is stuck down with an adhesive pad).
Step 3
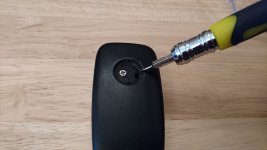
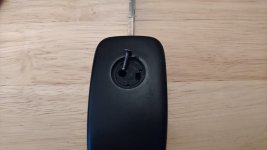
Remove the screw that has been revealed.
Step 4
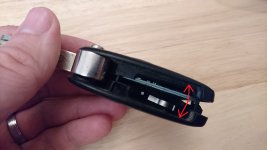
With the key in it's outward position, use both thumbs to pry the casing apart at the bottom of the key. Once this has parted, hold onto the key blade and gently pry the top apart.
Step 5
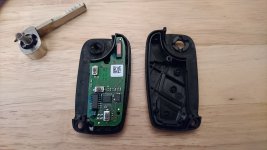
Gently lift out the circuit board from the casing.
Step 6
Gently remove your transponder chip (circled red) if there is one present, using a thin flathead screwdriver (Some keys have one fitted, some are located on the circuit board, model dependant). It is at this point you will need to reference which replacement casing you need to buy. Pay particular attention to the key's locking lugs circled in green, buy the casing that matches yours if you want one that can swap the key blade over.
Now you have the key disassembled, you are ready to swap the contents into the new casing.
Providing you already have a remote keyfob, and the electronics and key work, then this guide is for you.
There are numerous versions of replacement casings, some can use your existing key blade, and others you will have to get the supplied blade cut.
IF YOU ARE UNSURE WHICH CASING TO BUY, USE THE DISASSEMBLY GUIDE TO DETERMINE WHICH CASE YOU NEED, PAYING ATTENTION TO THE KEY PIVOT LOCKING FIXTURE. BUY ONE THAT MATCHES YOUR EXISTING KEY (like shown in step 6)
DISCLAIMER: NOR MYSELF OR THIS FORUM WILL BE HELD RESPONSIBLE IF YOU DAMAGE YOUR KEYFOB. THIS IS A GUIDE AND SHOULD NOT BE ATTEMPTED BY ANYONE THAT IS NOT COMFORTABLE TAKING THINGS APART
What you will need:
Posi-drive hobby screwdriver
Thin flat-head hobby screwdriver
Craft blade or Stanley knife
Grease (although not essential)
A fresh brew
Step 1
To start, first remove the battery from the keyfob. This has a screw lock that will release the slide-out battery tray.

Step 2
Use the thin flathead screwdriver or fine edge of your blade to slip in between the badge and the casing. Lever the badge out of the recess (it is stuck down with an adhesive pad).

Step 3
Remove the screw that has been revealed.

Step 4
With the key in it's outward position, use both thumbs to pry the casing apart at the bottom of the key. Once this has parted, hold onto the key blade and gently pry the top apart.

Step 5
Gently lift out the circuit board from the casing.

Step 6
Gently remove your transponder chip (circled red) if there is one present, using a thin flathead screwdriver (Some keys have one fitted, some are located on the circuit board, model dependant). It is at this point you will need to reference which replacement casing you need to buy. Pay particular attention to the key's locking lugs circled in green, buy the casing that matches yours if you want one that can swap the key blade over.

Now you have the key disassembled, you are ready to swap the contents into the new casing.

