Tools Required:
So, what you will have is a long shaped silicone tube with a big filter on the end! Thought I had a picture of mine but turns out I don't and now it's back on the car I really CBA to go take one...but i'm sure you know what it looks like as you have it with you!!!
For those of you that aren't sure...The filter end will go towards the floor and the end with the hole is what goes where your airbox was once connected.
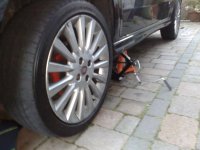
So, First things first...Open the bonnet & Jack whichever side of the car up the GSR goes towards. Most GSR's for the Punto's are aimed at the passenger side foglight area. You'll want to secure the car with an Axle Stand and bricks/chocks on the rear wheels to stop it moving (tbh i don't normally bother with either an axle stand or bricks but I have to tell you to use them so you can't sue me when the car falls on you whilst you're under it )
)
Once you have done that you need to remove the standard airbox. It's awkward to see from this picture but my airbox (and I assume the other fiat one's) is held in by 3 screws with washers which screw directly into the engine. The pipe which goes from the airbox to the engine is held on using spring clips.
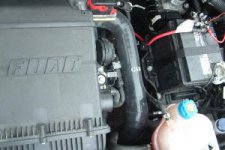
First thing to do is to remove the pipe. The easiest way to do this is to get the pliers onto the spring clip either side of the clip which holds it closed. Once you've located the pliers simply close them which will push the clip together. Use a flat bladed screwdriver to force the clip upwards which will release the clip completely and hence release that side of the pipe. Repeat this on the other end and then pull the pipe away from both the airbox and the engine removing the pipe completely.
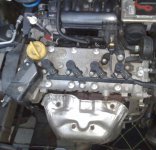
Now that the airbox is disconnected you can undo the screws (they will be easy to locate - usually one on top and one on the left and right sides.) and then lift the airbox off the engine which should leave you with a bare engine like so:
Now then, the next thing to do is to fit your GSR!!
The GSR is held in by the attachment to the engine and also by a Washer, Nut and Bolt on the underside of the engine (done up from underneath.)
First things first, you need to locate where the underside bolt needs to go! If you get under the car and look toward the side of the engine where the GSR will end up (in this case the passenger side) you should see a part of the engine which sticks out and has a hole which is easy(ish) to access as shown below:
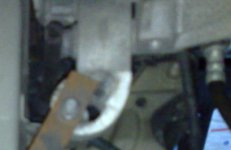
Now, the bolt will fall through this hole unless it has a washer on it to stop it doing so! So you need to prepare the bolt by putting a washer onto it before installing it on the car.
Now, the easiest way i find to install the GSR is to offer the GSR up to the car and thread it towards the air intake without actually attaching it to anything. So you will end up with your filter sort of aiming in the right direction but resting on the ground.
Next, get under the car and locate the hole where the bolt will go. Thread the bolt through the hole (top downwards) and it should sit on the hole without falling through (purpose of the washer.)
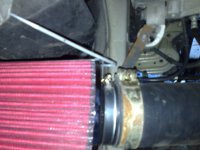
Next, raise the GSR upwards towards where it will sit (somewhere behind the bumper towards the fog light - there will be a blatant hole where it will fit as it is quite a large filter and won't fit most places!) and hold it in place. Allgn the hole at the end of the metal bracket (i'm assuming your GSR comes fitted with one of these) with the bolt and thread it through so the bolt is now coming through the metal bracket. Whilst holding the filter in place you need to get your free hand and tighten the nut onto the end of the bolt (which can be fidly but it is possible to hold the filter and the top of the bolt with the same hand!) until it is finger tight. Finally, get your socket set and tighten the nut until it can not be tightened any further and you are sure the filter is secure - it should not move or wobble when shaken. (can't have your GSR falling off now can we!)
Once fitted from the bottom it should look like this:
You can now get up from under the car - your work there is done. Move onto working under the bonnet!
Now, because the filter is held in place securely it is easy to connect to the air intake. I find it easier to lock the screwclip (don't know what they're called!) together slightly before fitting the filter and then slip it losely over the end of the piping.
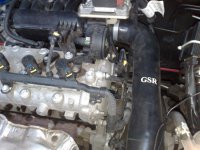
Then push the piping over the edge of the air intake (should be a very snug fit - will require quite abit of pressure) and then tighten the screwclip until that can not be tightened any more. If you try and move the filter pipe it should flex but not move away from the air intake and the filter itself should not move from where it has been secured.
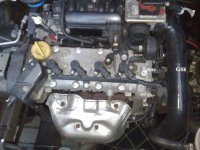
Job Done - Enjoy the power increase and the noise!!
Word of Warning: Keep all previous parts so the origional airbox can be refitted for warrenty purposes :slayer:
- Average Sized Crosshead Screwdriver
- Small Sized Flathead Screwdriver
- 12mm Socket (Socket set would be useful incase other sizes required)
- Chocks/Bricks
- Axle Stand
- Car Jack
- Pliers
So, what you will have is a long shaped silicone tube with a big filter on the end! Thought I had a picture of mine but turns out I don't and now it's back on the car I really CBA to go take one...but i'm sure you know what it looks like as you have it with you!!!
For those of you that aren't sure...The filter end will go towards the floor and the end with the hole is what goes where your airbox was once connected.
So, First things first...Open the bonnet & Jack whichever side of the car up the GSR goes towards. Most GSR's for the Punto's are aimed at the passenger side foglight area. You'll want to secure the car with an Axle Stand and bricks/chocks on the rear wheels to stop it moving (tbh i don't normally bother with either an axle stand or bricks but I have to tell you to use them so you can't sue me when the car falls on you whilst you're under it

Once you have done that you need to remove the standard airbox. It's awkward to see from this picture but my airbox (and I assume the other fiat one's) is held in by 3 screws with washers which screw directly into the engine. The pipe which goes from the airbox to the engine is held on using spring clips.

First thing to do is to remove the pipe. The easiest way to do this is to get the pliers onto the spring clip either side of the clip which holds it closed. Once you've located the pliers simply close them which will push the clip together. Use a flat bladed screwdriver to force the clip upwards which will release the clip completely and hence release that side of the pipe. Repeat this on the other end and then pull the pipe away from both the airbox and the engine removing the pipe completely.
Now that the airbox is disconnected you can undo the screws (they will be easy to locate - usually one on top and one on the left and right sides.) and then lift the airbox off the engine which should leave you with a bare engine like so:

Now then, the next thing to do is to fit your GSR!!
The GSR is held in by the attachment to the engine and also by a Washer, Nut and Bolt on the underside of the engine (done up from underneath.)
First things first, you need to locate where the underside bolt needs to go! If you get under the car and look toward the side of the engine where the GSR will end up (in this case the passenger side) you should see a part of the engine which sticks out and has a hole which is easy(ish) to access as shown below:

Now, the bolt will fall through this hole unless it has a washer on it to stop it doing so! So you need to prepare the bolt by putting a washer onto it before installing it on the car.
Now, the easiest way i find to install the GSR is to offer the GSR up to the car and thread it towards the air intake without actually attaching it to anything. So you will end up with your filter sort of aiming in the right direction but resting on the ground.
Next, get under the car and locate the hole where the bolt will go. Thread the bolt through the hole (top downwards) and it should sit on the hole without falling through (purpose of the washer.)
Next, raise the GSR upwards towards where it will sit (somewhere behind the bumper towards the fog light - there will be a blatant hole where it will fit as it is quite a large filter and won't fit most places!) and hold it in place. Allgn the hole at the end of the metal bracket (i'm assuming your GSR comes fitted with one of these) with the bolt and thread it through so the bolt is now coming through the metal bracket. Whilst holding the filter in place you need to get your free hand and tighten the nut onto the end of the bolt (which can be fidly but it is possible to hold the filter and the top of the bolt with the same hand!) until it is finger tight. Finally, get your socket set and tighten the nut until it can not be tightened any further and you are sure the filter is secure - it should not move or wobble when shaken. (can't have your GSR falling off now can we!)
Once fitted from the bottom it should look like this:

You can now get up from under the car - your work there is done. Move onto working under the bonnet!
Now, because the filter is held in place securely it is easy to connect to the air intake. I find it easier to lock the screwclip (don't know what they're called!) together slightly before fitting the filter and then slip it losely over the end of the piping.

Then push the piping over the edge of the air intake (should be a very snug fit - will require quite abit of pressure) and then tighten the screwclip until that can not be tightened any more. If you try and move the filter pipe it should flex but not move away from the air intake and the filter itself should not move from where it has been secured.

Job Done - Enjoy the power increase and the noise!!
Word of Warning: Keep all previous parts so the origional airbox can be refitted for warrenty purposes

