Technical Replace Battery

Currently reading:
Technical Replace Battery

RubyDavidson

New member
Joined
Jul 7, 2020
Messages
1
Points
1
I need to replace in starter battery on my Ducato 2005 Motorhome. I have a new battery but just cant work out how to remove the old one. Mine in under the bonnet.

Anyone got a user guide or video, please
 
Hi :)

The battery is probably only half visible..
Half tucked under the scuttle.. windscreen area

Removal:

Put the key in your pocket..or even better in the building ..somewhere safe :)

Unbolt the black negative battery lead

Unbolt the Red positive battery lead

Undo the clamp securing the battery

Slide and lift.. the battery is HEAVY

And will be at 45' momentarily


Installation.. leave the plastic covers on the battery posts : poles

Slide battery in

Clamp down
Red positive lead.. remove plastic cap.. wriggle clsmp down on post.. then tighten

Black Negative.. remove plastic cover

Place clamp onto battery post.. there might be a little spark.. that is normal

Wriggle clamp onto post..and tighten it
 
I can't find any decent pictures/videos at the moment, but I would add the following to the above post:

It is likely on that vintage of 'van that the battery live post has a fuse box on it, and this will partially obscure the clamp bolt (largely because the fuse box itself is clamped to it).

so, between

Unbolt the black negative battery lead

Unbolt the Red positive battery lead


...you may have to remove the fuse box. If you have one, it will be a black plastic box sitting over the positive terminal, with the top held on by plastic lugs. I'm pretty sure I found it easier to get at with the top unclipped and removed, and that should give you (slightly better, but fiddly) access to the positive terminal clamp. (remember, the negative lead should be off at this point). You may find you can access the clamp bolt without. It is sufficient to unclamp the fuse box from the battery post and lay it to one side as this releases the battery; you shouldn't have to undo anything else - though I have heard it mentioned that the box is sometimes secured to the top of the battery casing by a couple of screws - I don't remember any such).

Heavy battery, restricted space, poor visibility - been there, done that.

The fuse box, without top, is similar to that pictured below (the clamp bolt is obvious).

71tMEml7AHL._AC_SL1500_.jpg
 
Hi,

I've recently replaced mine and for a fit fella OK with mechanics, I found myself struggling at times due to its weight and restricted access.


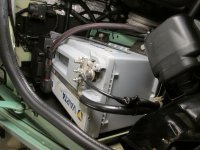
The Pos' terminal is as said by others is well hidden near the bulkhead and is part of the fuse link plate which hinders dragging the battery forwards even when unfastened. Neg' terminal is easy to get at.

The battery holding clamps are engine side and because of near wiring difficult to get spanners etc on. BTW if like mine I removed the zip ties from relays on the near cabling to get a bit more space.


The battery when free then needs to be lifted and tilted at the same time and dragged out of its lair at an angle a bit at a time but due to its weight and restricted access this is a struggle and can only be lifted and tilted in small amounts as bits catch like the plastic tray under the battery which catches on the side of the fixed mounting tray.

I tidied up the area before putting a new battery in and reffitting the heavy lump was a lot easier to get in place with gravity helping.

HTH
:cool:
 
Hi,

I replaced the battery on my 2006 x244 2.8JTD PVC about two years ago. On that occasion I unbolted the after market alarm unit and associated bonnet sensor, so as to clear the battery's exit path.


Read through the following procedure, and see if you still have a problem.

Minimum required tools are 10mm and 13mm spanners, but sockets with a short extension would make the task easier.

Unlike the x250 and later versions, there is no special procedure to be followed before disconnecting the battery negative.

Be aware of the potential hazards from sulphuric acid spillage, and with short circuits created by metal jewelry.


1. As the vehicle is a motorhome, remove all charging sources, by covering solar panels, and and switching OFF the mains charger.


2. Remove the battery negative connection. This should be a lever operated clamp at the front. It is a good idea to wrap the connector in a couple of plastic bags, to prevent accidental contact with the battery post. Also it helps to unclip the negative cable near the front of the battery, so that the cable can be pulled clear.

3. It may help at this stage if the heavy lead to unbolt the positive lead to the staarter. To access the starter connection press the two tabs on battery fusebox cover, and lift off. Using 10mm spanner or socket loosen the positive clamp at rear of inboard side of battery. Carefully lever off the clip that holds the battery fusebox to the battery. The fusebox can now be raised clear of battery top.

4. Using 13mm socket and extension, remove the clamping bolts and plates from the inner edge of the battery base.

5. Using the lifting cords, or handles fitted to the battery, raise the front end of the battery and slide it upwards and forwards over the front panel of the vehicle. As the battery is heavy, it may be safer if assistance is available at this stage. Lower the battery to the ground, or suitable support.


Replacement is generally a reverse of the removal procedure.

You will have to reset the clock on the instrument panel with the LHS button.

You may need to key a code into the radio to re-enable it.
 
General view of battery installation attached. Sorry about the quality. Picture needs rotating clockwise by 90 degrees.
 

Attachments

  • IMG_0180.JPG
    IMG_0180.JPG
    513 KB · Views: 74
Last edited:
Good point about solar panels

And jewellery :)


The Radio Code:
The original FIAT unit is part of the vehicle..and will be recognised as part of the build.. it will not ask for a CODE :)

However an aftermarket ... or even a replacement FIAT unit... MIGHT need a code

My radio is aftermarket, and does not need a code. However there is no body computer, only ECU and airbag modules in x244 and earlier models. There is therefore no body computer to recognise a Fiat radio.
 
I found it helpful to unbolt the power steering fluid reservoir on its bracket, and moving to the right, without tilting it too far and spilling fluid or letting air in, and I used a piece of laminate flooring to slide the battery out along, s it is way too heavy to lift at the reach required to manhandle it. Room on mine was slim above the battery so be careful.
 
I found it helpful to unbolt the power steering fluid reservoir on its bracket, and moving to the right, without tilting it too far and spilling fluid or letting air in, and I used a piece of laminate flooring to slide the battery out along, s it is way too heavy to lift at the reach required to manhandle it. Room on mine was slim above the battery so be careful.

Good point, I had considered it, but as the OP has not given the make/type of motorhome, I decided not to cause verbal idigestion.

I believe that Ocwobio's vehicle is an "A" class motorhome, and the bonnet opening in such vehicles can be restricted. Also the presence of aircon will probably reduce access in that area. In FreeSpirit's guide to changing the cam belt he also mentions moving the power steering reservoir. On my PVC without aircon, I could not see what advantage would be gained by moving the reservoir for either operation.
 
Last edited:
Good point, I had considered it, but as the OP has not given the make/type of motorhome, I decided not to cause verbal idigestion.

I believe that Ocwobio's vehicle is an "A" class motorhome, and the bonnet opening in such vehicles can be restricted. Also the presence of aircon will probably reduce access in that area. In FreeSpirit's guide to changing the cam belt he also mentions moving the power steering reservoir. On my PVC without aircon, I could not see what advantage would be gained by moving the reservoir for either operation.

Yep, mine is an A class, so we both know first hand what a chore it can be. As an aside, last week I had a cambelt done and I asked if the thing put up much of a fight. Appaerently not, but the blokes knuckles made him look like a prizefighter! He is used to them, it's his stock in trade, so no excuses and a good job done. Total cost for - Gates cambelt, 2x Gates tensioners, 2x Gates aux. belts, oil and filter change, and air filter change (including dealing with the rusted canister screws, which is what did for his knuckles, and stainless screws fitted) was 526.86 which I thought was a good deal. Most places make excuses when they look under the bonnet on an A class!
 
Back
Top