Technical Side markers won't turn off.

Currently reading:
Technical Side markers won't turn off.

dally

New member
Joined
Aug 8, 2011
Messages
15
Points
5
Hi, Got a strange one here. We have a 2015, 2.3 litre Pilote "A" class motorhome, built on a Fiat Camper chassis. Last week after a trip, I turned off the ignition, removed the keys and the lights went out as normal except the side markers, they stayed on.

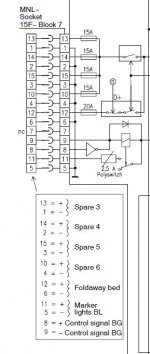
After reading as much as I could find, I understand that this feed goes into the Shaudt Electroblock. I looked up the wiring diagram and discovered that the feed went into socket number 7 so I removed it and the lights went out so I have a temporary fix.

Guessing now but the feed must come from the headlights as both work when working normally when the in cab switch is activated but for what ever reason the power to the side markers stays live when turned off. Could this be as simple as a relay? If so, which? Can anyone help please? Thanks.
 
...whilst using similar concepts, Schaudt equipment can vary significantly by vehicle, so it is hard to comment definitively.

As far as "position lights" (and some other switched functions) are concerned, however, it is not unusual to find a smallish additional Schaudt box hidden somewhere in the conversion that performs the supply and switching function. (Other distributed boxes might provide radio switching function, etc. etc.)

Not confirming you've definitely got one, but for a Fiat, it should be an AD 01 adapter, and AFAIK (From description only, I've not had one apart) it contains a switching relay (and fuses, etc. but the latter are unlikely to be the cause of your problem). Mine (non-Pilote) is under the drivers seat, but if you have one it will be wherever the converter finds it convenient for him, and probably not for you ;-) .
 
Just typed a long reply and lost it all when my browser threw a wobbly. Let's try again.

The arrangement for your side marker lamps is probably provided by the converter (Pilote) using the signal provided at the conversion socket by Fiat.

The conversion socket is at the bottom of the right hand cab B-pillar (the body member that the driver's seat belt mountings are attached to, and accessed by removing the lower internal trim cover at the base of the pillar where it meets the floor. There is a 15-pin Tyco connector in that area, which provides various signals enabling the converter to take feeds from the base vehicle without interrupting the canbus or disturbing the base vehicle wiring.

Pin 11 on the 15-pin connector is a pull-to-earth signal for the side marker lamps. When the body computer signals activation of the side marker lamps, pin 11 becomes earthed to the chassis, and when it signals the lights to be switched off, the earth is removed from the terminal. It is intended for connection of the earth cable on the switch circuit of a relay provided by the converter. The converter should make his own arrangements for the supply to the lamps and connect them through the feed side of the relay, so that activation of the earth on pin 11 of the connector switched the power feed through the relay to energise the marker lamps.

I have attached a diagram of the connector in the conversion socket showing the pin numbering, which runs from pin 1 at the upper corner with the rib on it. Some Fiat documents actually show the pin numbering running vertically which is incorrect!

You may need to test the earth function on pin 11 of this connector and then follow the cable that the converter has attached to it to find the relay which switches the lamps.

One thing you might like to try first though, is to reboot the body computer. I have found that this fixed issues related to the 15-pin connector signals failing to operate correctly on a couple of vehicles.

To do that, switch off and remove the key from the ignition, close the cab doors and wait a couple of minutes. Then disconnect both terminals from the vehicle battery situated under the floor in the passenger footwell (earth cable first). Wait 5 minutes, then reconnect the battery cables (earth last). Close all doors and wait another couple of minutes, turn on the headlamp switch and then turn on the ignition and check the functions.
 

Attachments

  • Tyco Connector.JPG
    Tyco Connector.JPG
    20.7 KB · Views: 94
Wow, many thanks for your detailed replies. It's in storage and I'm off out in it tomorrow so will study what you have said when looking at it.

The fuse box in the pillar is a slight problem. We have no drivers door so no pillar but this could be something I have seen else where, no 15 pin connector however.

Having said that, the connector going into the Schault electroblock which I pulled out to turn the markers off, is a 15 pin tyco type so hoping that's the one. I think tho, firstly I will try the reboot.

Will report back.
 
You may find it useful to download the Converters and Upfitters manual I uploaded to the downloads section on here.

Whilst it is supposedly for the 2016 on models, the principles (and I suspect very much of the practice) will be relevant for your 'van.

In particular it gives details of most of the wiring and locations, how such things as the marker lights should be connected, and the diagrams are most useful.

I suspect the signal for the marker lights is taken from the pillar interface (or its equivalent) as set out above. I wouldn't be surprised if that then is transferred to a Schaudt AD01 or equivalent to switch and power the lights (though possibly not, and it is always possible that your EBL has the functions built in, so I hope I'm not serving to confuse).

Which version EBL do you have?

The Schaudt AD01 instructions can be downloaded from their website, but it is awkward, so I've taken the liberty of attaching.
 

Attachments

  • Schaudt_AD01_BA_EN (1).pdf
    289.9 KB · Views: 101
Right.

I thought I remembered something similar.

Read the thread here for a 2014 Pilote with similar issues.

https://forums.outandaboutlive.co.uk/forums/Motorhomes/Motorhome-Matters/side-marker-lights/48455/

It isn't necessarily the same initial cause as yours, but if you have an EBL271 (or similar) then the info is invaluable.

The switching function is provided within the EBL itself, and the input and output signals use pins on Block 7 (as you have largely deduced).

The issue now will be to work out if the input signal is OK, and if so what has gone wrong internally to cause the permanent power - and it may mean an EBL repair is required. (There are still a couple of UK-based repairers, and Schaudt do a less convenient (since it is Germany) turn-round service.

I suspect you have an EBL manual, if not I can point you at one (with a block/pin diagram).
 

Attachments

  • ebl271.JPG
    ebl271.JPG
    45.8 KB · Views: 77
Last edited:
I agree with Hugh as that is what happened on my Pilote with the Amber side marker lamps fed from the electroblok. It appears that the contacts on the relay shown on the diagram had 'welded' together. As a temporary fix I made up a harness to go between the socket and the plug with a relay and fuse holder. All the bits cost less than £10 of e bay. Two years later and it is still working fine.
 

Attachments

  • Marker lamp relay mod.pdf
    278.4 KB · Views: 105
Though it would be sensible to check that the switching signal from the base vehicle is working correctly, (and hasn't stuck permanently to ground) my own suspicion would also be that the cause is a "stuck" relay (which we are now pretty sure is in the EBL on this model).

I would assume that the relay will be a "surface mount" device, rather than a "plugable" socket mounted one. That makes it rather more fiddly to fix, but, assuming the actual relay is identifiable (and, TBH, using the wiring diagram and tracing from the connecting pins, that shouldn't be too difficult), and that the PCB is either accessible or relatively easily removable, it shouldn't prove beyond the scope of DIY, or a local electronic repairer.

Having within the last 18 months diagnosed a failed 12V/240V relay in an AES motorhome fridge for a friend, and managed to gain access to the PCB, we sourced an identical replacement relay, and an acquaintance replaced the faulty component for "a drink". £10 instead of a £200 replacement PCB.

I would have done it myself, but you really need a solder pump to remove the failed component (it needing to be unsoldered at multiple connections before removing) and the acquaintance had one.

Obviously, Ray's external solution is also a possibility, or search for A&N Caravan Service, or Apuljack, both of whom are familiar with these units, and do a ship and return repair service.
 
I can't thank you people enough. I now feel I know whats going on and the solution. I think for the future I need a permanent fix and have spoken to a local auto electrician who is happy to do a full repair depending on an assumption that this is the problem. Sadly because of where our van is stored and my unusual shift patterns I will have to wait till I next have leave from work.

In the mean time, I'm going with Rayc's option as, quite amazingly, I understand it and can do the work without too much trouble.

Once again, your help has been very much appreciated.
 
Two simple checks before doing anything else:

1. Does pin 9 go negative when the Fiat lights are switched on? If not then there is a fault with the Fiat side.

2. Remove plug 7 and check for 12v on the socket pin 11. If it has 12v then the fault is within the electrobloc with the main suspect the relay contacts have stuck together.

Mine developed the fault whilst in a Fiat workshop for the AGR recall. They disconnected /reconnected the vehicle battery whilst the lights were switched ON. Obviously a spike or whatever.
 
Last edited:
In the mean time, I'm going with Rayc's option as, quite amazingly, I understand it and can do the work without too much trouble.

...all the parts should be easily obtainable from eBay or an auto-electrician.

I'm assuming you know the EBL connectors are standard MNL (Mate-N-Lok) items, but if you didn't, much like these:

http://www.vehicle-wiring-products.eu/product.php/618/mate-n-lok-connectors

(the 15-way one, and they are reasonably widely available elsewhere - this is just an example)
 
Wow, thank you, everybody for all your excellent help. I have just done Rayc's "temp" repair and everything is working again, really pleased. Thank you once again. :)
 
Back
Top