does anyone have any idea how to get to the top alternator mounting bolts on this car?? does anyone have astep by step method of removing and replacing this alternator??? Ive been at it 4 hrs and cant even see any top mounting bolt let alone get to it!! I have all the o/s suspension stripped out and the driveshaft out and all the accesible bolts out but cant get it to even budge 1mm!! Help??


You are using an out of date browser. It may not display this or other websites correctly.
You should upgrade or use an alternative browser.
You should upgrade or use an alternative browser.
Technical doblo deisel ELX JTD 52 plate Alternator replacement
- Thread starter bograt
- Start date
Currently reading:
Technical doblo deisel ELX JTD 52 plate Alternator replacement
bit late I know! but might help others, best way I found is to remove crank pulley then undo rear engine mount & move engine foward (after removing driveshaft,exhaust) this will 'just' allow removal out of o/s wheel arch...its a bugger though & best left to garage unless you have ramp.
Last edited:
Niall_G
Established member
yep, Mrs_G's Cargo had a new alt about a month ago - the guys at the garage didn't have much fun 
Again for benefit of others or those thinking of renewing the alternator themselves.......a few pointers (rough guide);
remove belt,o/s track rod & driveshaft(complete) etc etc
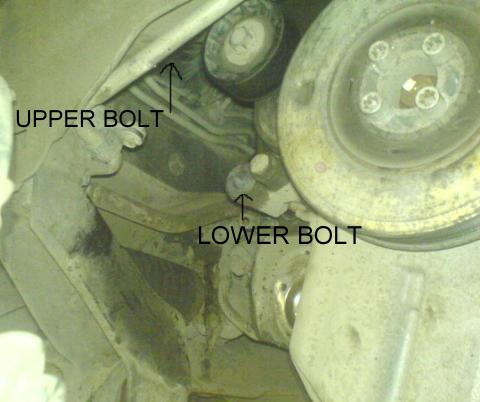
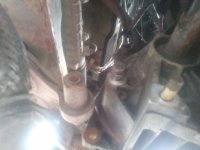
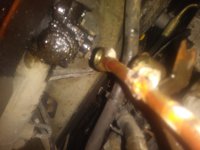
these are the 2 alternator retaining bolts, bottom was is easy but you need to hold the nut on the other side with a spanner, sounds easy but it aint as the nut is buried away behind the driveshaft support bracket.
the top one is visable......just! you will need a long breaker bar to get a socket on to it & a ratchet/extension on the other side above the alternator. A impossible position for a mere mortal man so two is whats required here unless your good at yoga.
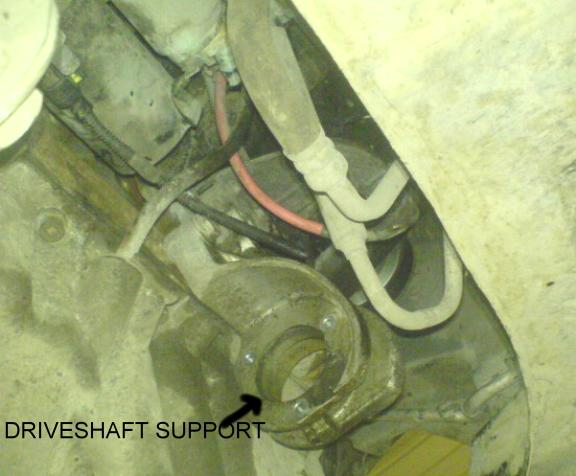
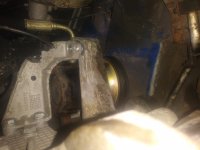
removing the driveshaft/alternator top support is what you want to do to get the alternator out but there a 5 bolts holding this on (2 out of view) so (ok I cheated) I just removed the rear engine mount & pushed the engine foward as it will move a good 6 inches to give you clearnce to get the alternator out through the o/s/f wheel arch.
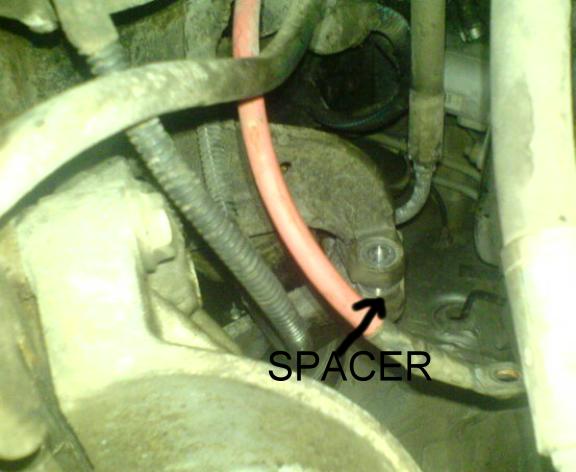
there is a spacer (shown in pic) on the bracket,this is a pig to refit (assuming you found it as after removing the alternator it falls & dissapears!) as you cant see what you are doing & dont forget your trying to fit the top mounting bolt at the same time which incidently is a swine to fit as there isn't enough clearence between bracket & chassis leg to get it in
So as you can tell its not a easy job however if anyone is seriously considering it i'll do a full guide.
remove belt,o/s track rod & driveshaft(complete) etc etc
these are the 2 alternator retaining bolts, bottom was is easy but you need to hold the nut on the other side with a spanner, sounds easy but it aint as the nut is buried away behind the driveshaft support bracket.
the top one is visable......just! you will need a long breaker bar to get a socket on to it & a ratchet/extension on the other side above the alternator. A impossible position for a mere mortal man so two is whats required here unless your good at yoga.
removing the driveshaft/alternator top support is what you want to do to get the alternator out but there a 5 bolts holding this on (2 out of view) so (ok I cheated) I just removed the rear engine mount & pushed the engine foward as it will move a good 6 inches to give you clearnce to get the alternator out through the o/s/f wheel arch.
there is a spacer (shown in pic) on the bracket,this is a pig to refit (assuming you found it as after removing the alternator it falls & dissapears!) as you cant see what you are doing & dont forget your trying to fit the top mounting bolt at the same time which incidently is a swine to fit as there isn't enough clearence between bracket & chassis leg to get it in
So as you can tell its not a easy job however if anyone is seriously considering it i'll do a full guide.
Yet another ploy by the manufacturer to force us to take the car in for the garage to do.
I dont think so to be honest, years ago starters & alternators were servicable items but now reliability is so much better they can be located differently.
Another thing that must be remembered is 'what the customer wants' which over the years is air-con etc plus increased cabin space,add this to 'style' & its easy to see how 'crammed in' modern engines are.
Was repairing a renault modus today, if you get the chance have a look under the bonnet...you can see about 1/4 of the top of the engine. Even changing plugs on them things look like a nightmare!
Chris56000
New member
Hi!
Could you do me the writeup please? I'm wailing and gnashing my teeth over the one in my Brava TD100 which is the same as the Doblo example you've depicted! I've got all Fiat's official binders and there's absolutely zilch in 'em!
Chris Williams
Could you do me the writeup please? I'm wailing and gnashing my teeth over the one in my Brava TD100 which is the same as the Doblo example you've depicted! I've got all Fiat's official binders and there's absolutely zilch in 'em!
Chris Williams
Last edited:
Please tell me T14086, if you had chance to make that guide "how to.." replace alternator. I have fiat brava 1.9TD, and it still looks like I have to remove whole motor, to be able to remove alternator. I dont even see place in front of motor to push it forward, so I will have more place - its nightmare :-( . Thanks for answer
Andy
Andy
brian bennett
New member
In the middle of replacing my alternator. Just got the thing out today and ordered new part. I went about it by undoing all the mounting bolts till i got it loose. Undoing the drive shaft nut at the hub. undoing the hub assembly from the strut/ shock and then undoing the hub from the swinging arm. Slid drive shaft out of hub which enables it to be moved out of the way undone wiring to the alternator and removed it from the van. It is a pig of a job but the top mounting bolt for the alternator can be seen as mentioned in this thread. Putting the new one in will require some dexterity with the top mounting bolt:bang: as there is a spacer to fit in as well. I should mention that my van is a 1.9diesel 52 plate.
PeteFiatForum
New member
- Joined
- Nov 10, 2013
- Messages
- 5
- Points
- 0
I got it out without having to remove the driveshaft.
1) Put car up on ramps.
2) Remove plastic sump guard with its umpteen fasteners all different sizes.
3) Take the tension off the belt by applying a long spanner to the idler pulley and than slip the belt off and tuck it out of the way.
4) Undo the long bolt on the clevis of the lower engine mount and the 1 bolt and 1 nut securing the bracket to the transmission housing. It is then possible to remove said long bolt past the exhaust pipe.
5)Undo the 3 bolts securing the exhaust to the manifold. Clout it with a hammer to break any sealant and then bend it over towards the left and secure it out of the way with a piece of baler twine. ( I love baler twine!!!)
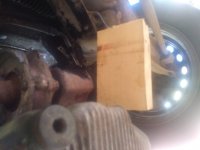
6) Get a suitable piece of wood, push the bottom of the engine as far forward as you possibly can, and wedge said piece of wood between engine and subframe.
7) You will now be able to see or feel the 2 bolts holding the alternator. They are done up ridiculously tight. Mind you, mine hadn't been touched for 20 years. With a ratchet and a length of pipe I cracked them off and then they undid quite easily.
8) Remove the 2 wires from the alternator. It is now free!!! But it still won't come out:devil:.
9) Relocate piece of wood to right hand side.
10) Remove plastic bracket holding wires, 1 M8 bolt. Tie out of the way with a piece of baler twine.
11) Get a suitable oil catching container and undo the 2 banjo bolts holding the power steering pipes to the rack. Tie up out of the way with a piece of baler twine.
12) Wiggle the alternator out.
13) Sit down and have a rest - you've earned it!!!
1) Put car up on ramps.
2) Remove plastic sump guard with its umpteen fasteners all different sizes.
3) Take the tension off the belt by applying a long spanner to the idler pulley and than slip the belt off and tuck it out of the way.
4) Undo the long bolt on the clevis of the lower engine mount and the 1 bolt and 1 nut securing the bracket to the transmission housing. It is then possible to remove said long bolt past the exhaust pipe.
5)Undo the 3 bolts securing the exhaust to the manifold. Clout it with a hammer to break any sealant and then bend it over towards the left and secure it out of the way with a piece of baler twine. ( I love baler twine!!!)
6) Get a suitable piece of wood, push the bottom of the engine as far forward as you possibly can, and wedge said piece of wood between engine and subframe.
7) You will now be able to see or feel the 2 bolts holding the alternator. They are done up ridiculously tight. Mind you, mine hadn't been touched for 20 years. With a ratchet and a length of pipe I cracked them off and then they undid quite easily.
8) Remove the 2 wires from the alternator. It is now free!!!
But it still won't come out:devil:.9) Relocate piece of wood to right hand side.
10) Remove plastic bracket holding wires, 1 M8 bolt. Tie out of the way with a piece of baler twine
.11) Get a suitable oil catching container and undo the 2 banjo bolts holding the power steering pipes to the rack. Tie up out of the way with a piece of baler twine
.12) Wiggle the alternator out.
13) Sit down and have a rest - you've earned it!!!
Attachments
Similar threads
- Replies
- 1
- Views
- 205