Technical Bravo 1.9 Multijet Sticky Gear Stick

Currently reading:
Technical Bravo 1.9 Multijet Sticky Gear Stick

Skezza

New member
Joined
Jul 20, 2016
Messages
14
Points
3
Hello,

So we picked up a Bravo dynamic 1.9 Multijet yesterday for £700. It drives really nicely actually, very smooth and is very nicely kitted out actually. Surprised me just how nice the interiors are :) I think it might be the top of the range as it has voice bluetooth stuff etc. It's a Dynamic.

Anyway, my bargaining chip to get it cheaper was that the gear stick is stiff and doesn't return to centre, which seems to be a common problem from Google hence I thought sack it, buy it and I can fix.

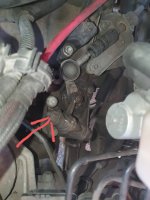
First thing I did was spray the connector cables at the top and that's already made a difference but apparently there's also some pin I need to remove, clean up, grease etc... so I'm happy to do that, but struggling to actually spot which pin it is? Is there any decent photos of this?

I can remove the battery to make the job easier and what not, but here's a photo of where I sprayed with it currently in-place:
Wo2bKCF.jpg


Anyone spot the pin?

Here's a video from an Alfa but it's the same principal apparently?
https://www.youtube.com/watch?v=6tX5v2n9XGY
 
I had something similar problem. The gear stick didn't return to center and was stiff. The solution in my case was to remove the cables on top of the gear box where I found out there is a little plastic bushing. That little bushing had somehow shrunken and made the gear stick stiff. I made it bigger with a rasp and then it worked. Maybe the same with your car since we have the same.
 
I had something similar problem. The gear stick didn't return to center and was stiff. The solution in my case was to remove the cables on top of the gear box where I found out there is a little plastic bushing. That little bushing had somehow shrunken and made the gear stick stiff. I made it bigger with a rasp and then it worked. Maybe the same with your car since we have the same.

Hi, thanks for your reply. You don't happen to know which bushing it was or have a photo? I've taken some more photos I can attach. Did you have to remove the battery and battery tray?
 
Hi again sorry I don't have any photos of that bushing. But what I do no is that the fiat dealer said I couldn't buy just the bushing as a spare part, it was the hole thing in that case. I did not have to remove battery tray in order to fix this problem.

xTCvjA6.jpg

So this is what I've got to play with. Is it that green top hat ? Tempted remove the battery and tray just to give me a bit more visibility. I can get my hands in there, but I simply can't work out which part I'm removing.
 
It was a couple of years since I did this.. I will have a look when my wife return with the car, and then post a photo of what I think you should remove.

// Thomas
 
It was a couple of years since I did this.. I will have a look when my wife return with the car, and then post a photo of what I think you should remove.

// Thomas

I'd really appreciate that. I know it's a job I'll be able to do, just need to know which part before I start ripping my missus car to bits :D
 
xTCvjA6.jpg

So this is what I've got to play with. Is it that green top hat ? Tempted remove the battery and tray just to give me a bit more visibility. I can get my hands in there, but I simply can't work out which part I'm removing.
I think you can unscrew this nut and take the thing apart. Then you can control that it's moving freely if it's not it can be the little bushing inside there. 20200507_153919.jpeg
 
I had a feeling it was that bolt. I'll start from there and see where I get. If I can do it without removing the battery, it'll be nice. Start from somewhere anyway :D
 
So do I. Hoping it becomes very obvious once I start :)
 
So for anyone else in the same situation, this is a very easy job to do. You don't need to remove the battery or battery tray but be prepared to scuff up your fingers and hand if you don't. I've got a few naughty cuts. I should have taken a few photos but it's not really necessary. It's very simple.

As per Thomas27 photo above, you can unscrew this bolt. It's a 17mm.

You'll be left with the screw end and you can hammer this out. I hammered uncomfortably using a hammer + extension bar until no more was visible. I then used a screwdriver hammer and the opposite end as a flat plate surface is visible.

This then slides out and you have the pin as per other threads and like a mechanism. The pin was rusty and pitted.

So I sanded this with some 240 grit. and finished it off with some 800 grit. To be honest, if I'd had 40 grit, I'd have gone with that. It took some effort to get it clean.

You've also got this like selector plate thing with a spring.
m8ZztSE.jpg


This was also seized solid. I loosened off the nut which took some effort and re-tightened, so it could slide again.

I greased both the plates and the pin with Castrol lithium grease. I inserted the pin several times to pull some of the crap out of the inside.

Put back together and initially only 1-4 returned to centre... However after a drive, now 5 returns to centre as well. Job done.

Took about an hour and half.
 
So an important update:

My missus was driving and lost reverse and 5th yesterday.

After 4 hours of triage and diagnosis today,I realised the part I photo'd above ISN'T MEANT TO SLIDE OR SLIP!!

It's meant to be tight and aligned correctly. This was a red herring while working on it last time, it looks like they are meant to slide against each other. I suspect the reason you can move the plates is to allow for adjustment and wear, maybe if the cables stretch??. I lined them up based on the previous old grease line and tightened them back up properly.

Car shifts into reverse and 5th like butter now.
 
Quite an informative thread - can you please confirm if yours is 5 speed or 6 speed manual? I have 1.9 Multijet (150 bhp - 6speed manual - only 38K miles!! was 17K when I bought it 5 years ago - what a great car it is) and so far, the gears work just fine - reading the thread I am thinking is it worthwhile doing a preventative cleaning / lubrication just to keep it going for longer) or maybe 6 speed manual is not prone to this issue?
 
Quite an informative thread - can you please confirm if yours is 5 speed or 6 speed manual? I have 1.9 Multijet (150 bhp - 6speed manual - only 38K miles!! was 17K when I bought it 5 years ago - what a great car it is) and so far, the gears work just fine - reading the thread I am thinking is it worthwhile doing a preventative cleaning / lubrication just to keep it going for longer) or maybe 6 speed manual is not prone to this issue?
Mine is the 5 speed. Entirely possible it's the same mechanism on yours though?
 
Back
Top