General Bravo Rear Bushes

Currently reading:
General Bravo Rear Bushes

mikegreener

New member
Joined
Jan 28, 2018
Messages
5
Points
2
Location
The North East
Hi,


I own a 2010 Bravo 2 165 diesel and have a knocking at the rear. Loots like the rear axle bushes have worn due to potholes and bad roads here in the North East.


Was wondering if anyone had tackled the job of changing the bushes and how they found it.


Any hints, tips and pics would be helpful before I start.


Thanks in advance.
 
I hav'nt done one myself but it's possible to do at home with the right tools. You'll preferably need to drop the rear axle on the floor so it's not a 5 minute job then you'll somehow need to remove the old bush which may be tight due to being in there for years then once the inner bore of the bush hole is nice and clean the new one can be pressed in using a long threaded stud bar and two large thick washers. They have to be inserted a certain way around I belive (there's a mark I think on the bush body that must align with a part on the axle).

The Stilo uses the very same rear axle so you may find some info in that section (y)
 
Hi,


I own a 2010 Bravo 2 165 diesel and have a knocking at the rear. Loots like the rear axle bushes have worn due to potholes and bad roads here in the North East.


Was wondering if anyone had tackled the job of changing the bushes and how they found it.


Any hints, tips and pics would be helpful before I start.


Thanks in advance.
I have changed mine. Search on rear axle here on the bravo forum and you will find your answer.
 
the new one can be pressed in using a long threaded stud bar and two large thick washers.

Sorry but this is wrong, you would need a special tool, it has 3 prongs to push on the outside of the bush. Without it you would ruin the bush.
I am not sure that threaded rod will be able to handle pushing the bush in.

Getting the old bush out is difficult, but it's nothing compared to pushing the new one in. Some people have turned the new bushes on a lathe to reduce the size by 0.2-0.3mm, others have used massively powerful presses to push the bushes in.
 
This post contains affiliate links which may earn a commission at no additional cost to you.
Sorry but this is wrong, you would need a special tool, it has 3 prongs to push on the outside of the bush. Without it you would ruin the bush.
I am not sure that threaded rod will be able to handle pushing the bush in.

Getting the old bush out is difficult, but it's nothing compared to pushing the new one in. Some people have turned the new bushes on a lathe to reduce the size by 0.2-0.3mm, others have used massively powerful presses to push the bushes in.

Like I say, Ive never done one before but I did see someone do it on a Stilo with a threaded bar and some big washers with success.
 
This post contains affiliate links which may earn a commission at no additional cost to you.
Sorry but this is wrong, you would need a special tool, it has 3 prongs to push on the outside of the bush. Without it you would ruin the bush.
I am not sure that threaded rod will be able to handle pushing the bush in.

Getting the old bush out is difficult, but it's nothing compared to pushing the new one in. Some people have turned the new bushes on a lathe to reduce the size by 0.2-0.3mm, others have used massively powerful presses to push the bushes in.
Aurick is right you will need a 3 pronged tool. I made one my self of scrap metal that made it possible. I will post a picture of it this evening.
 
This post contains affiliate links which may earn a commission at no additional cost to you.
It can be done, even by an amator diy-er.
I've helped a friend do it on a Stilo, he had already removed the axle from the car...so that made it 200% easier :)
He had done it multiple times before, already had a massive press, the right tool, and know-how.

It was still the worst bush i ever installed.
 
I did my rear bushes and it was a pig of a job to be honest. to get the old bush out i used a strong metal threaded bar and 2 large sockets and they eventually came out but i ended up removing the rear axle to get the new ones pushed in with a press
 
mikegreener here's some very useful info should you want to tackle the job yourself

https://www.fiatforum.com/stilo/248971-franklin-tools-stilo-rear-bushes.html

It may be worth mentioning that you can now buy polyurethane rear axle bushes for the bravo - no idea if this is a better option or not but worth considering (y)

The Stilo rear axle bushes are made in such a way that they flex to allow the wheel geometry to slightly change when steering and under heavy loads - Polyurethane does not do this.

If Bravo rear axle is same as stilo - i would suspect the suspension and bush setup to be the same, dont change them - they will fail prematurely and wear the tyres out quicker over time.

Very good advice I always wondered what they would be like. I believe the standard bushes are oil filled so wasn’t sure what the ride quality would be like - probably the same as a duff standard. Which ever way people choose it looks a pig of a job to do and I really hope mine don’t need doing soon :eek:
 
Very good advice I always wondered what they would be like. I believe the standard bushes are oil filled so wasn’t sure what the ride quality would be like - probably the same as a duff standard. Which ever way people choose it looks a pig of a job to do and I really hope mine don’t need doing soon :eek:

Just dug this up from eLearn - referring to the Stilo rear bush setup.

Rear suspension
The rear suspension on the Stilo is a classic design with (semi-independent) wheels connected by means of a torsion axle.

Hydraulic bushes have been adopted to guarantee maximum noise filtration giving improved driving comfort (reduced noise/vibrations).

The shock absorber attachment has been altered from inclined under the floor to vertical with the mounting in the wheel arch.

The upper damper attachment is fitted with bushes with reduced dynamic rigidity developed specially for this model. These absorb vertical forces by filtering out even high frequency vibrations induced by road surface roughness.

This solution features a torsion beam produced through a pressing process which ensures the ideal suspension torsional rigidity and, therefore, an excellent balance between the front and rear of the car.

A more stable drive has been achieved by attaching the beam to the body using hydraulic bushes. These have also been specially developed for this model and are able to create a toe-in effect on corners to ensure excellent driving stability even under extreme conditions.

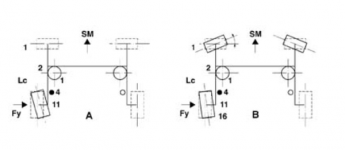
A - Conventional torsion beam: round bends the wheel steers through the effect of lateral force Fy giving an accentuated oversteer effect.

B, 188 torsion axle: under lateral load Fy the wheel steers very little and in a way 'modulated' by the rigidity of the bushes, improves the handling of the vehicle round bends.

hth,
Dan.
 

Attachments

  • stilorearbeam.PNG
    stilorearbeam.PNG
    46.8 KB · Views: 52
Back
Top