You are using an out of date browser. It may not display this or other websites correctly.
You should upgrade or use an alternative browser.
You should upgrade or use an alternative browser.
Technical Air Vents
- Thread starter ghandi
- Start date
Currently reading:
Technical Air Vents
kidneystone
Member
This is the self learn procedure for the climate control. May help.It will be off to the dealer tomorrow to order the parts and i'm going to search the re set procedure next
CLIMATE CONTROL SELF-LEARNING PROCEDURE
The AUTO and MONO buttons must be pressed simultaneously within 40 seconds of the ignition being turned to the ON position in order to active this procedure.
A few seconds later a figure will appear on the display (in place of the driver's side set temperature) which will count down to indicate the time remaining before the start of the procedure. At the same time (i.e. whilst the count down is taking place) the previous self-learning status is signalled on the passenger temperature setting:
'1' flashes if the previous self-learning procedure failed.
'0' indicates that the previous self-learning procedure was successful.
This procedure is not carried out if at least one of the above mentioned buttons is released whilst the figure on the left hand side is not zero (this is designed to check the outcome of the previous self-learning procedure).
Exiting the procedure zeroes the 40 second counting period from when the ignition is switched ON, to allow the procedure to be repeated without having to switch the ignition OFF.
Each time a new control unit is fitted, the flap actuator learning test must be carried out using the diagnostic equipment and the unit must be personalized through programming.
kidneystone
Member
One question for you Kidneystone?
How long has it been since you did the repair ? and is everything working ok?
Stef
I can't remember exactly but I think it was January or February 2014 and everything has worked fine since then.
The temperature control motors are on the right side of the climate control unit. You will need to take off a few parts from there to.
ATTENTION!!!
The motors can be installed in 2 positions : the correct position and 180 degrees out.
If you install it wrong possition the climate control will report a error! and it will stop working correctly.
You can find the correct way by using a 9v battery to rotate the motor and at the same time use a multimeter to check that the value does not go through zero.
You could also just take a gamble that it is installed correctly 50% chance for each motor. Then check with MES that there are no errors after directing air flow to all possible positions and heat ranges.
Just to say thanks to everybody on here who made a conribution on this thread it has been a great aid for me to get the job done.
Took the car for a 500 mile round trip to my son's place in the last few days and everything has been fine.
Stef
Took the car for a 500 mile round trip to my son's place in the last few days and everything has been fine.
Stef
Bravo150sport
New member
- Joined
- Sep 9, 2016
- Messages
- 27
- Points
- 11
[emoji106]?
kidneystone
Member
Just do the self learning procedure.
CLIMATE CONTROL SELF-LEARNING PROCEDURE
The AUTO and MONO buttons must be pressed simultaneously within 40 seconds of the ignition being turned to the ON position in order to active this procedure.
A few seconds later a figure will appear on the display (in place of the driver's side set temperature) which will count down to indicate the time remaining before the start of the procedure. At the same time (i.e. whilst the count down is taking place) the previous self-learning status is signalled on the passenger temperature setting:
'1' flashes if the previous self-learning procedure failed.
'0' indicates that the previous self-learning procedure was successful.
This procedure is not carried out if at least one of the above mentioned buttons is released whilst the figure on the left hand side is not zero (this is designed to check the outcome of the previous self-learning procedure).
Exiting the procedure zeroes the 40 second counting period from when the ignition is switched ON, to allow the procedure to be repeated without having to switch the ignition OFF.
Each time a new control unit is fitted, the flap actuator learning test must be carried out using the diagnostic equipment and the unit must be personalized through programming.
kidneystone
Member
If i remember right two of the screw that hold that actuator are awkward, but possible to get out. The third one I think i had to use a pair of pliers to get it out because the metal plate was in the way. I think i unscrewed all the way using long nose pliers, it's been a few years since i did it.
No the vents don't have to be in a certain position before programming, the programming sorts it all out.
No the vents don't have to be in a certain position before programming, the programming sorts it all out.
If i remember right two of the screw that hold that actuator are awkward, but possible to get out. The third one I think i had to use a pair of pliers to get it out because the metal plate was in the way. I think i unscrewed all the way using long nose pliers, it's been a few years since i did it.
No the vents don't have to be in a certain position before programming, the programming sorts it all out.
Bit of an update.... all 3 of mine were snapped off so im glad i followed your advice and ordered 3 of them

On the motor behind the metal plate I ended up drilling a hole in the metal plate that was big enough to fit a 4.5mm socket through which worked well
when it comes to programming is it best to fit 1 actuater at a time and then run the program mode or fit all 3 together then run program?
kidneystone
Member
You need to fit all three before you run the CLIMATE CONTROL SELF-LEARNING PROCEDURE.
Hi all,
the support and guidance on here is amazing :slayer:
Couple of questions,
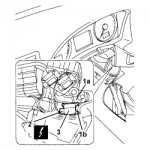
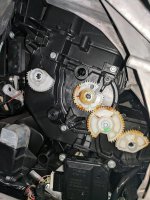
the top motor on the left controls the screen vents, (which was broken)
the middle motor controls top, middle and bottom vent direction,
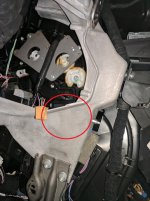
but what controls the temperature for the left side? there's a mention of a 3 connectors on the left side of the heater unit in a previous post on here but i've only managed to find 2,
i can see a motor down the bottom but that's impossible to get to, is it that motor and connector that controls the temperature for the left?
if it is, how on earth do you get to it?
Thanks,
the support and guidance on here is amazing :slayer:
Couple of questions,
the top motor on the left controls the screen vents, (which was broken)
the middle motor controls top, middle and bottom vent direction,
but what controls the temperature for the left side? there's a mention of a 3 connectors on the left side of the heater unit in a previous post on here but i've only managed to find 2,
i can see a motor down the bottom but that's impossible to get to, is it that motor and connector that controls the temperature for the left?
if it is, how on earth do you get to it?
Thanks,
Attachments
kidneystone
Member
Hey bobbob, did you get the other actuator motor off, the one behind the metal framework.
Yeah, all sorted thanks,
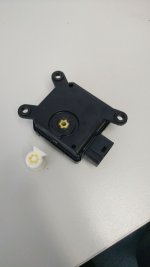
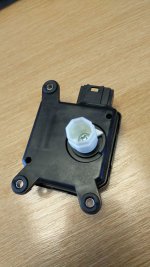
It looks as if someone has attempted a messy half soaked repair previously and glued them in but also glued the white core into the black gear,
I've had to drill a hole through the plastic cup section, use a rather wide self-tapping screw to go through this and into the white base and the black plastic gear, then use some resin glue and activator to grip the inside of the Philips screw head and mould to the inside of the hex shape cup section to stop the hex cup from spinning :idea:
Had to fix a bodge with a bigger bodge unfortunately, picture attached with the screw without the resin in,
The most difficult part of that was trying to line the key'd parts up on the base with the hex cup part whilst not being able to see them both,
But all is working thanks again :worship:
I also figured out the re-calibration differences, mine was press and hold for the left 3 to 0 count down then let go, then the right side goes to the number 2 to say calibration in progress, then once that's finished it will go to 0 for pass or 1 for fail, seems some others may have a different revision where they need to keep it held for 40 seconds,
It looks as if someone has attempted a messy half soaked repair previously and glued them in
but also glued the white core into the black gear,I've had to drill a hole through the plastic cup section, use a rather wide self-tapping screw to go through this and into the white base and the black plastic gear, then use some resin glue and activator to grip the inside of the Philips screw head and mould to the inside of the hex shape cup section to stop the hex cup from spinning :idea:
Had to fix a bodge with a bigger bodge unfortunately, picture attached with the screw without the resin in,
The most difficult part of that was trying to line the key'd parts up on the base with the hex cup part whilst not being able to see them both,
But all is working thanks again :worship:
I also figured out the re-calibration differences, mine was press and hold for the left 3 to 0 count down then let go, then the right side goes to the number 2 to say calibration in progress, then once that's finished it will go to 0 for pass or 1 for fail, seems some others may have a different revision where they need to keep it held for 40 seconds,