Technical Dropping the rear axle

Currently reading:
Technical Dropping the rear axle

Joined
Jul 14, 2020
Messages
380
Points
218
Location
Wiltshire
Hello everyone.
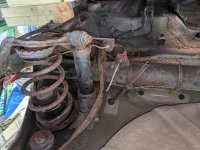
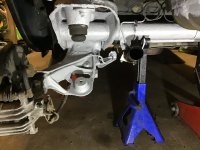
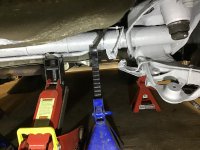
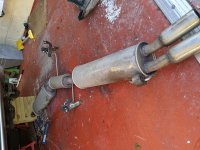
My B will shortly go off road for the winter and be tucked up in the garage. One of the jobs I'd like to look at is cleaning the rust off and painting everything at the back end (arms etc). Rather than spend the winter flat on my back on a cold garage floor with rust and paint dropping on me I wondered about dropping the whole back axle off the car. I've looked through the manual and it doesn't look the hardest job in the world with the only specialist tool being a jig to hold the axle when it is lowered off. Has anyone tried this or have words of warning or encouragement?
Thanks in advance
 
One thing that came to mind is placement of the front axle stands as if the weight of the rear axle comes off I had visions of the car just tipping on its nose. I'm not sure if there is a forward enough point to put the stands that would stop this so might consider ramps for the front wheels rather than stands.
 
Don't think there is the slightest chance she will tip. Then engine an gearbox are directly over the front axle which will still be in contact with the ground. The front overhang is not too long either so you should be able to get the back end quite high.

Crack off the rear wheel nuts. Reverse up some standard ramps. The wood blocks and jack from both sides.

Suggest for the jacking you get a 3" by 3" short fence post. Cut it in half (minimum length of 12 inches) and then router a groove so the sill lip goes into the groove and the block supports the cur on the floor_pan/sill surfaces. You can stick some rubber to the support surfaces for extra protection.

For other normal jacking I use Ice Hockey Pucks. Dirt cheap, can be stacked (NO MORE THAN 3 MAX).
 
Thanks for that. I was more thinking of the case where I'd got the front up on stands too and the stands were on the front of the sill. Leaving the front wheels down is an option and would probably make it more stable while I was working on it.

I had a similar idea to the fence posts and chopped up and routed some fat old timber to make sets of blocks that let me adjust the height.


I do like the hockey puck idea, they're a lot cheaper than the bits of rubber flogged for use in jacking
 

Attachments

  • Blocks.jpg
    Blocks.jpg
    1 MB · Views: 22
Axle renovation project has got started. The service manual guide is good, due to the age of mine it doesn't have brake compensators but other than that it is going to plan. Progress stopped today as I can't find my 15mm socket to undo the ARB.

Never having done anything of this sort before does anyone have any suggestions as to what I should treat and paint the arms with after I've got them off the car?
 

Attachments

  • PXL_20211010_152240258.jpg
    PXL_20211010_152240258.jpg
    3.4 MB · Views: 41
The wheel arms arms are cast iron. Unlike steel the will surface corrode but not rust through. Any issues will be with rubber bushings.

So now we are down to axle tube and other ancillary flanges. The picture you post shows surface but not serious corrosion. A little time and effort with a wire brush etc. followed by quality surface rust treatments will protect preserve your "B"'s integrity.

With regards to the springs then yes you can clean them up and treat them but to do this properly they have to be removed so just replace them. This will also show your MOT tester that you are taking matters of maintenance seriously and will potentially buy you a little slack for other otherwise advisory items. On this point it is my experience that decent MOT test stations that treat and test vehicles on an overall and historic maintenance history will nod in your direction. But make no mistake next year they will strike back hard if you are seen to be taking the ****.

For our "B" last year the MOT tester said that the rear springs were getting quite rusty. Went on to say that other more picky testers (read but not stated those garages looking for work) would advise if not fail.

What did I do?

Simple. Went home and replaced the rear springs and shocks. Even tarted up/treated the anti-roll bar surface corrosion.

As a respected (by me) MOT tester and trusted mechanic (by me) said they test on face value. Honest ones are their to protect your and others safety but even then one tester's opinion will vary from another's. That said a known track record with a testing station/tester helps to build a trust that is inspected every year. But make no mistake if something is clearly andMOT failure or advisory you will get gonged!!!!

I liken the annual MOT to your annual dentist visit. If the tooth needs pulling or filling then this will happen. If tooth and gum care is marginal then the dentist will lecture you and advise you. Go back next year with the same issues then you will wish you never went back to the same dentist (if you are stupid) or you will get your finger out and fix issues and rebuild trust.
 
Last edited:
With regards to the springs then yes you can clean them up and treat them but to do this properly they have to be removed so just replace them. This will also show your MOT tester that you are taking matters of maintenance seriously and will potentially buy you a little slack for other otherwise advisory items. On this point it is my experience that decent MOT test stations that treat and test vehicles on an overall and historic maintenance history will nod in your direction. But make no mistake next year they will strike back hard if you are seen to be taking the ****.

Thank you, I think this makes a really good point. For my own peace of mind I was intending to put in new springs as it seemed daft not to having gone to all the effort of getting the axle out. I hadn't thought that it does demonstrate to the tester my commitment to the car. I was taking a view that I would address all advisories from last year as a matter of course and this, I would think, will also show that commitment. I'll probably replace the flexible hoses while I'm there.

As to 'quality surface rust treatments', is there anything you'd recommend? Apart from the axle, ARB and arms I'd like to protect the exhaust hangers. The first step, as you say, is the wire brush (one of the reasons for dropping the axle was to make it easy to get it properly cleaned up) but what next to ensure a good covering that will survive the assault of stone chips and the like?
 

Attachments

  • Exhaust Hanger.jpg
    Exhaust Hanger.jpg
    298.1 KB · Views: 23
I used to use and trust a product called trust Trustan. I have a very little left but have not seen it for sale for quite a few years now. It is a red paint base anti-rust treater and primer. On our 130TC (1988) from new there was rust in the boot floor too rear panel seam. Nothing massive. We just painted this with Trustan, working into the seam and 33 years on no problems at all. We never even bothered to top coat as the boot floor rubber mat covered it all up. Also wanted at that time to keep an eye on things and apply more treatment if required with having to possibly mess with a fresh top coat. After a couple of years or so completely forgot about it. To this day the red product is there and everything is fine.

We also had on the inside back edge of one door jamb a couple of small rust bubbles. These were treated with Trustan, top painted and no problems ever since.

If you can find this product I would us it.

See also https://www.autoexpress.co.uk/product-reviews/354923/best-rust-converters-2021
 
Last edited:
If it's removed from the car why not find a local place that does shot blasting and get the rust thoroughly cleaned?


It likely won't cost much more then a tin or two of good rust converter and will get a much better overall finish

Edit: think I mis read the thread looks like you've only droppt it down on the mountings rather then tottaly removed it if so disregard my previous post

You got it right first time, the whole back axle is coming off the car so that could be an option. I'll ask around to see if there's someone local I can use.
 
Presently doing this job myself in-situ with the back axle, though I have used a powered wire brush of various sizes to remove the surface rust and crud. Presently hand painted all the wire brushed areas with two pack primer, before I start mask everything up that needs to be masked before spray painting top coats. Will be replacing both shocks, springs with top and bottom mounts. My bump stops will be continued to be used and not changed as in good order. Have to admit the DTR stainless rear silencer was a PITA to remove until the propane blow torch got it to move. Shall post some pics as well.
 

Attachments

  • 5443169A-10A9-4703-B5C3-44878AD98079.jpeg
    5443169A-10A9-4703-B5C3-44878AD98079.jpeg
    1.8 MB · Views: 39
  • E78A7E17-202A-4DA9-A058-93AAF45EEB4D.jpeg
    E78A7E17-202A-4DA9-A058-93AAF45EEB4D.jpeg
    1.8 MB · Views: 54
Last edited:
Good effort on cleaning all that up and priming it! As I said at the start, my main reason for taking the whole axle off was so I didn't have to lie on the floor with a wire brush so I have great respect for you getting to where you've got to. I look forward to seeing it when it's finished.

Luckily for me my exhaust came off OK, it's a stainless steel one of some sort (I'm not sure where it came from, I got the impression from the previous owner that he'd had it put together bespoke but may be wrong) and the only casualty was the bolts snapping on the clamp joining the back to the front which I expected to have to replace anyway.
 

Attachments

  • PXL_20211010_155417955.jpg
    PXL_20211010_155417955.jpg
    3.4 MB · Views: 47
Good effort on cleaning all that up and priming it! As I said at the start, my main reason for taking the whole axle off was so I didn't have to lie on the floor with a wire brush so I have great respect for you getting to where you've got to. I look forward to seeing it when it's finished.

Luckily for me my exhaust came off OK, it's a stainless steel one of some sort (I'm not sure where it came from, I got the impression from the previous owner that he'd had it put together bespoke but may be wrong) and the only casualty was the bolts snapping on the clamp joining the back to the front which I expected to have to replace anyway.

Thanks. Sure will update the thread when I applied the spray coats. Will be doing after masking and after under sealed the undercarriage as it seems on my B a bit hit and miss what coverage they applied at the factory.

Extensively checked my rear arches with a light chipping hammer, all seems good with no concerns, will just overcoat the under seal. Removal of the liners was a doddle compared to my Fiat Coupe liners that where a PITA.

Noted on your SS exhaust you have a mid silencer as well. Mine just has the front and rear silencer, and a SS pipe between them.

Still contemplating in rubbing down the rear brake calipers and painting them once I replaced the discs and pads. Thinking red or silver.
 
under sealed the undercarriage as it seems on my B a bit hit and miss what coverage they applied at the factory
I'd agree with that, there's a few bare patches on mine that'll get the treatment.
Extensively checked my rear arches with a light chipping hammer, all seems good with no concerns
That's good news, I had to pay for mine to be sorted. I knew it needed doing when I got given the car so I can't complain.
Still contemplating in rubbing down the rear brake calipers and painting them once I replaced the discs and pads. Thinking red or silver.
I've got that on my list too. I've got some E-Tech paint in graphite ready for the job. Seems silly not to now that the things in pieces.

Good luck with it all
 
On a scale of 1 to 10, how much of a ball ache was it?

(Asking for a friend...)
As an enthusiastic but inexperienced mechanic I found it quite straightforward, I just followed the guide in the service manual. The only exception being that I removed the springs and shocks before dropping the axle as I wanted to reduce the weight that was dropping as much as possible. I held the arms up with some ancient climbing rope as you can see in the diagram.

I had two main areas of concern:

  • I'd be undoing nuts and bolts that hadn't been undone for a while and might, otherwise, never need undoing. I was concerned that I'd end up snapping bolts and have the world of pain that come with that. So far the only one that has snapped was the exhaust clamp and who cares about that. However, the possible next part of the process will be to remove the arms from the axle and the bolts there look like they might give trouble. I can't start those yet as my 22mm socket doesn't really get fully onto the nut so I'm going to get hold of a deeper one and then we'll see how that goes.
  • There is one specialist tool that mounts on a trolley jack and clamps to the axle to hold it steady when being lowered. I ummed and ahhed whether to try to make something similar but in the end just put something soft under the hubs so they didn't slam into the floor and used a trolley jack with a large block of wood on top of it and lowered away. The whole assembly is understandably heavy but I was able to lift the whole thing single handed on to the bench although another pair of hands would have been helpful.
I'm currently working out how to remove the clips from the axle that hold the brake lines, just want to be careful not to break them.

The obvious point is that I haven't put the whole thing back on yet so there may well be problems ahead but I'm pleased with how it has gone so far and I think the clean up process will be easier now that it is at a more comfortable working height for me. There is also the benefit that I can have a very good look at the underside of the back end.

The next painful part will be working out how many parts I need to get ordered. Shocks and springs were already on the list but I'll definitely do the flexible brake pipes too as they look horrible. The danger of this sort of job is the temptation to go a bit further than you intended. I have thought that if I wanted to get the arms powder coated I'd need to remove the hub and then I might as well replace the hub bearings and remove the ABS sensor (which I've seen the guide for and which worries me as I thing I could easily break) and so it goes on.

I've taken a lot of photos throughout the process and thought I might write up a guide but at the moment that guide would mostly say "Do what the service manual says" but we'll see as I go through the rest of the process
 
22mm deep socket delivered and the arms are now off the axle and, happily, the nuts and bolts came out intact. They are tough to undo, firstly immobilising the axle and arm while you're trying to turn the nut is tricky and secondly they were incredibly tight/rusted and it took a good heave with a 2' breaker bar to get them moving.

Just need to decide whether to take the hubs off now or not, the disc guards are hard to remove with the hubs on as none of the holes in the hub exactly line up with the allen key bolt that holds the guard on - problem for another day.
 

Attachments

  • PXL_20211018_172220817.jpg
    PXL_20211018_172220817.jpg
    1.3 MB · Views: 37
22mm deep socket delivered and the arms are now off the axle and, happily, the nuts and bolts came out intact. They are tough to undo, firstly immobilising the axle and arm while you're trying to turn the nut is tricky and secondly they were incredibly tight/rusted and it took a good heave with a 2' breaker bar to get them moving.

Just need to decide whether to take the hubs off now or not, the disc guards are hard to remove with the hubs on as none of the holes in the hub exactly line up with the allen key bolt that holds the guard on - problem for another day.

Good job.

Have undersealed the rear including the rear arches that where to be over coated and two coats of under seal sprayed on where the factory have missed. Just waiting on the two pack paint for the rear axle for me.

If you need a link for new upper and lower rubber spring mounts, let mw know. Happy to share we’re I got mine that are identical to the perished original I had.
 
Thanks and pleased to hear that yours is getting there.
Happy to share we’re I got mine that are identical to the perished original I had
Yes please.
just waiting on the two pack paint for the rear axle for me
What paint did you go for? I've been reading (probably too much) about powder coating not being very chip resistant and thinking that I may go for two-pack with a brush instead.
 
Back
Top